100 Days of YARA - 2023
Note
This is a consolidated post of all 100 days of posts from 2023. These fall roughly into the following sections:
- Days 1-4 - Introduction to YARA modules
- Days 5-30 - Highlighting the YARA LNK module
- Days 31-34 - Hex values in text string tips
- Days 35-37 - YARA atoms
- Days 38-45 - YARA math module
- Days 46-57 - YARA command line flags
- Days 58-75 - File classification in YARA
- Days 76-77 - YARA rule writing philosophy
- Days 78-99 - Greg’s challenge: AcidBox framework rules
- Day 100 - Wrapup, and index of coincidence
Day 1 - 100 Days of YARA
I’m a big fan of YARA. It’s a tool that makes it possible for anyone interested to write static signatures, whether to classify specific strains of malware, perform broader threat hunting, or even parsing files.
In 2022, Greg Lesnewich started #100DaysofYARA; an initiative, similar to #100DaysOfCode, to engage with YARA for the first 100 days of the year. This can either be writing YARA rules, contributing to the source code, creating tools to help automate YARA, or generally learning more about the tool/helping teach others.
Last year, I didn’t contribute to the full 100 days, but was inspired by the event to create a module in YARA to parse LNK files: https://github.com/VirusTotal/yara/pull/1732
This year, I’d like to highlight this module and what it’s capable of, as well as trying to contribute on as many of the days that I can!

To start with, I’d always recommend starting by looking through the YARA documentation to see how to write rules. This is a document I spend a lot of time in: https://yara.readthedocs.io/en/stable/writingrules.html
I’d also recommend checking out Florian Roth’s guide for YARA performance, which can give some good insight into why rules like the following are not great:
import "math"

rule CPU_Eater {
    meta:
        description = "Please don't actually use this rule, it's realllllly bad"

    condition:
        for all j in (0 .. filesize) : (
            for all i in (0 .. j) : (
                math.entropy(i, j) > 0
            )
        )
}
And with that terrible rule out of the way, we can start moving on to more useful content from today onwards!
Day 2 - YARA Modules
YARA is primarily designed to be used for efficient string matching (which it does very well). But one of its most powerful features (in my opinion) is the ability to create and use modules. These can be used for file parsing (such as PE, ELF or .NET binaries), utility functions to aid in writing rules (such as hashing algorithms, or maths functions), to help debug your rules (e.g. via the console module), or anything you can think of that can be written in C using YARA’s API!

Personally, I find myself using the PE module the most, which also happens to be the most built out default YARA module. I highly recommend reading through its documentation to see what it can do, and if there’s something missing then raise an issue on GitHub! There are many active contributors to YARA who will be willing to try and implement it.
I’ll give some example rules using the PE module over the next couple of days to give some inspiration for how they can be used!
Day 3 - YARA Module Example 1 - Imphash and Rich Header Hash
A simple, yet effective way of using the PE module to cluster samples is via hash values of specific components of the PE: namely, the import hash (or imphash) and the rich header hash.
Both of these hash values can prove to be quite unique, and make it possible write YARA based off them. For example, if I take the SHA-256 hash a37a290863fe29b9812e819e4c5b047c44e7a7d7c40e33da6f5662e1957862ab from a report by Mandiant on APT42, we can write the following the rule which can be used to cluster further samples:
import "pe"
import "hash"

rule APT42_CHAIRSMACK_PE_Metadata {
    meta:
        description = "Detects samples of CHAIRSMACK based on unique PE metadata (i.e. imphash and rich PE header hash)"
        reference = "https://mandiant.com/resources/blog/apt42-charms-cons-compromises"
        hash = "a37a290863fe29b9812e819e4c5b047c44e7a7d7c40e33da6f5662e1957862ab"

    condition:
        pe.imphash() == "72f60d7f4ce22db4506547ad555ea0b1" or
        hash.md5(pe.rich_signature.clear_data) == "c0de41e45352714500771d43f0d8c4c3"
}
I’ve written a script that can generate rules from these values (making use of pefile which makes this parsing very straightforward!), and you can also get these values from other platforms that parse files, such as VirusTotal, AlienVault, MalwareBazaar, and so on!
So next time you are about to write some rules for a PE binary, use the imphash and rich header hash for some quick and easy rules! These shouldn’t be intended to replace more rigorous rules (i.e. based on strings, code segments, anomalies, etc.), but can build in some redundancy into your detection capabilities.
Disclaimer
As always with YARA rules, test to make sure your rules behave as expected! Blindly using an imphash or rich header hash might get you lots of false positives. E.g., the imphash for a .NET PE binary (f34d5f2d4577ed6d9ceec516c1f5a744) will be the same across many different files, due to them all importing the same library (mscoree.dll) and the same function from that library (_CorExeMain).
Day 4 - YARA Module Example 2 - PDB Paths
PDB files are generated by Visual Studio for the purposes of debugging. As such, binaries generated using the Debug option in Visual Studio will have a hardcoded path to where the PDB file lies. This path can reveal some useful information, such as the drive/username of the user that compiled the file, or internal names given to the project.
All kinds of heuristics can be used on PDB paths (see Steve Miller’s Swear Engine), so it’s worth trying to see what weird things you can find!
import "pe"

rule Heuristic_PE_PDB_Self_Identifying_as_Malware {
    meta:
        description = "Detects files that identify themselves as malware"

    condition:
        pe.pdb_path icontains "malware"
}
Note: icontains is an operator that acts as a case-insensitive contains. If you’ve not seen this operator, I highly recommend checking out all the operators listed in the YARA documentation; there are some really useful ones!
For a more practical example, we could consider the SessionManager IIS backdoor as reported on by Kaspersky. In the IoCs section of this report, they list the following PDB paths:
C:\Users\GodLike\Desktop\t\t4\StripHeaders-master\x64\Release\sessionmanagermodule.pdbC:\Users\GodLike\Desktop\t\t4\SessionManagerModule\x64\Release\sessionmanagermodule.pdbC:\Users\GodLike\Desktop\t\t4\SessionManagerV2Module\x64\Release\sessionmanagermodule.pdbC:\Users\GodLike\Desktop\t\t4\SessionManagerV3Module\x64\Release\sessionmanagermodule.pdbC:\Users\GodLike\Desktop\t\t0\Hook-PasswordChangeNotify-master\HookPasswordChange\x64\Release\HookPasswordChange.pdb
As you can see, there are some strings across these PDBs, such as \GodLike\, \t\t[0-9]\, and sessionmanagermodule.pdb. It can sometimes take some trial and error to figure out which segments of a PDB path will be good to signature, but a first pass at writing a rule making use of the PE Module could be as follows:
import "pe"

rule SessionManager_IIS_Backdoor_PDB_Path_Segments {
    meta:
        description = "Detects the SessionManager IIS backdoor based on some unique PDB path segments"
        reference = "https://securelist.com/the-sessionmanager-iis-backdoor/106868/"

    condition:
        pe.pdb_path contains "\\GodLike\\" or
        pe.pdb_path matches /\\t\\t[0-9]\\/ or
        pe.pdb_path endswith "\\sessionmanagermodule.pdb"
}
Of course you could write a rule that looks for these strings in general within a sample without using the PE module, but the regex \t\t[0-9]\ might not perform as efficiently on larger samples as opposed to just evaluating on the much smaller PDB path variable.
Day 5 - Introducing the YARA LNK module
The Windows Shell Link file format (or LNK) has been used by threat actors for years for malicious purposes (reference: https://attack.mitre.org/techniques/T1204/001/)! Whether to download a next-stage payload, or set persistence on an infected system, the LNK file format can be quite versatile. It has also seen an uptick in use as part of initial infection chains due to Microsoft disabling macros by default from documents downloaded from the internet.
With all this combined, I wanted to put together a YARA module for LNK files to aid defenders in being able to triage, parse, and detect them.
The next few weeks of posts will go into detail of how to use the module, and some rules that are possible to write using it. Along the way, we’ll hopefully learn some cool features of the LNK file format that will be useful to consider in general (check out Greg Lesnewich’s #100DaysofYARA contributions so far to see some cool LNK rules).
Shoutouts
I wouldn’t have been able to write this module without being able to see the source code of other YARA modules, and through the variety of currently available LNK parsers to help validate my output (such as exiftool or Silas Cutler’s LnkParse Python module).
Also shoutouts to Ollie Whitehouse who gave me some great tips to avoid bugs in my C code (which was very much needed!), and Wesley Shields for an early tip to make sure I didn’t do silly things dereferencing pointers in C.
And of course, shoutout to Victor Alvarez and all the YARA maintainers for creating and developing this awesome tool!
Acknowledgments
While I think the LNK module will give a great deal of flexibility to writing YARA rules for LNK files, a great deal of work has already done by others to write rules for LNKs! Please go check out rules from the following authors:
- Bart (@bartblaze): https://github.com/bartblaze/Yara-rules/blob/master/rules/generic/LNK_Ruleset.yar
- Florian Roth (@cyb3rops): https://github.com/Neo23x0/signature-base/blob/05ef26965be930fade49e5dcba73b9fefc04757e/yara/gen_susp_lnk_files.yar
If you know of any other open source LNK YARA rulesets, please give me a shout and I can update this page with them! Check out the repo set up for #100DaysofYARA to see some further LNK rules available as well: https://github.com/100DaysofYARA/2023
Day 6 - Installing YARA with the LNK module
The LNK is currently not included by default with YARA; at the time of writing, it is still awaiting approval to be merged in via a pull request on GitHub.
As such, if you want to test out the LNK module, you’ll need to:
- Clone the LNK module branch from here: https://github.com/BitsOfBinary/yara/tree/lnk-module
- Follow the instructions in the docs to install YARA: https://yara.readthedocs.io/en/stable/gettingstarted.html
The rough set of commands you’ll need to run if installing on Linux are as follows:
sudo apt-get install automake libtool make gcc pkg-config flex bison
./bootstrap.sh
./configure
make
sudo make install
You can optionally run make check to see if all the tests pass for YARA as well, although if you’re able to run yara --help at this stage as see output then you’ll know it has compiled and installed correctly!
The LNK module is available for any operating system, so you can compile it as normal for Linux/macOS, or use the Visual Studio projects to build it for Windows. @r0ny_123 also pointed out to me that you can grab Windows binaries from the AppVeyor builds (i.e. part of the regular CI/CD applied to YARA), e.g.: https://ci.appveyor.com/project/plusvic/yara/build/job/wthlb30bklmlns0a/artifacts
You can test if it the LNK module itself is working properly by trying to run the following rule and making sure there are no errors:
import "lnk"

rule test {
    condition:
        filesize > 0
}
The branch that the LNK module is on will install it by default, so you don’t need to add any flags to configure when compiling YARA.
I’m aiming to keep the LNK module branch up to date with the main branch of YARA, so all other features of YARA will be available if you compile the LNK module branch!
Troubleshooting
Let me know if you have any issues installing the module. Personally I’ve found that when compiling via WSL on Windows that the ./bootstrap.sh command doesn’t work as expected, but if I manually run the command inside the script file, that is autoreconf --force --install, then it works as expected!
Any feedback on the module?
If you have any feedback on the module (whether suggestions for how it could be used, support for it being merged in, etc.) please feel free to drop a comment on the open pull request on GitHub!
I hope that the module will be merged in by default into YARA one day (or at least, optionally available when compiling YARA from source).
Day 7 - Parsing an LNK file with the LNK module
The nice thing about the YARA file parsing modules is that you can output the populated variables by adding the -D flag on the command line. If you would like to test this out, and don’t have LNKs to hand, then sample LNK files can be found in the tests\data directory of the LNK module branch (all prefixed with lnk-). So if you save the following rule to test_lnk.yar:
import "lnk"

rule test {
    condition:
        filesize > 0
}
And run the command yara -D test_lnk.yar tests/data/lnk-standard (where lnk-standard is provided in the LNK documentation), you should see the following output:
lnk
        is_malformed = 0
        overlay_offset = YR_UNDEFINED
        has_overlay = 0
        vista_and_above_id_list_data
                item_id_list
                number_of_item_ids = YR_UNDEFINED
                block_signature = YR_UNDEFINED
                block_size = YR_UNDEFINED
        has_vista_and_above_id_list_data = 0
        tracker_data
                droid_birth_file_identifier = "\xecF\xcd{"\x7f\xdd\x11\x94\x99\x00\x13r\x16\x87J"
                droid_birth_volume_identifier = "@x\xc7\x94G\xfa\xc7F\xb3V\-\xc6\xb6\xd1\x15"
                droid_file_identifier = "\xecF\xcd{"\x7f\xdd\x11\x94\x99\x00\x13r\x16\x87J"
                droid_volume_identifier = "@x\xc7\x94G\xfa\xc7F\xb3V\-\xc6\xb6\xd1\x15"
                machine_id = "chris-xps"
                block_signature = 2684354563
                block_size = 96
        has_tracker_data = 1
        special_folder_data
                offset = YR_UNDEFINED
                special_folder_id = YR_UNDEFINED
                block_signature = YR_UNDEFINED
                block_size = YR_UNDEFINED
        has_special_folder_data = 0
        shim_data
                layer_name = YR_UNDEFINED
                block_signature = YR_UNDEFINED
                block_size = YR_UNDEFINED
        has_shim_data = 0
        property_store_data
                block_signature = YR_UNDEFINED
                block_size = YR_UNDEFINED
        has_property_store_data = 0
        known_folder_data
                known_folder_id
                offset = YR_UNDEFINED
                block_signature = YR_UNDEFINED
                block_size = YR_UNDEFINED
        has_known_folder_data = 0
        icon_environment_data
                target_unicode = YR_UNDEFINED
                target_ansi = YR_UNDEFINED
                block_signature = YR_UNDEFINED
                block_size = YR_UNDEFINED
        has_icon_environment_data = 0
        environment_variable_data
                target_unicode = YR_UNDEFINED
                target_ansi = YR_UNDEFINED
                block_signature = YR_UNDEFINED
                block_size = YR_UNDEFINED
        has_environment_variable_data = 0
        darwin_data
                darwin_data_unicode = YR_UNDEFINED
                darwin_data_ansi = YR_UNDEFINED
                block_signature = YR_UNDEFINED
                block_size = YR_UNDEFINED
        has_darwin_data = 0
        console_fe_data
                code_page = YR_UNDEFINED
                block_signature = YR_UNDEFINED
                block_size = YR_UNDEFINED
        has_console_fe_data = 0
        console_data
                color_table
                history_no_dup = YR_UNDEFINED
                number_of_history_buffers = YR_UNDEFINED
                history_buffer_size = YR_UNDEFINED
                auto_position = YR_UNDEFINED
                insert_mode = YR_UNDEFINED
                quick_edit = YR_UNDEFINED
                full_screen = YR_UNDEFINED
                cursor_size = YR_UNDEFINED
                face_name = YR_UNDEFINED
                font_weight = YR_UNDEFINED
                font_family = YR_UNDEFINED
                font_size = YR_UNDEFINED
                window_origin_y = YR_UNDEFINED
                window_origin_x = YR_UNDEFINED
                window_size_y = YR_UNDEFINED
                window_size_x = YR_UNDEFINED
                screen_buffer_size_y = YR_UNDEFINED
                screen_buffer_size_x = YR_UNDEFINED
                popup_fill_attributes = YR_UNDEFINED
                fill_attributes = YR_UNDEFINED
                block_signature = YR_UNDEFINED
                block_size = YR_UNDEFINED
        has_console_data = 0
        icon_location = YR_UNDEFINED
        command_line_arguments = YR_UNDEFINED
        working_dir = "C\x00:\x00\\x00t\x00e\x00s\x00t\x00"
        relative_path = ".\x00\\x00a\x00.\x00t\x00x\x00t\x00"
        name_string = YR_UNDEFINED
        link_info
                common_path_suffix_unicode = YR_UNDEFINED
                local_base_path_unicode = YR_UNDEFINED
                common_path_suffix = "\x00"
                common_network_relative_link
                        device_name_unicode = YR_UNDEFINED
                        net_name_unicode = YR_UNDEFINED
                        device_name = YR_UNDEFINED
                        net_name = YR_UNDEFINED
                        device_name_offset_unicode = YR_UNDEFINED
                        net_name_offset_unicode = YR_UNDEFINED
                        network_provider_type = YR_UNDEFINED
                        device_name_offset = YR_UNDEFINED
                        net_name_offset = YR_UNDEFINED
                        flags = YR_UNDEFINED
                        size = YR_UNDEFINED
                has_common_network_relative_link = YR_UNDEFINED
                local_base_path = "C:\test\a.txt"
                volume_id
                        data = "\x00"
                        volume_label_offset_unicode = YR_UNDEFINED
                        volume_label_offset = 16
                        drive_serial_number = 813337217
                        drive_type = 3
                        size = 17
                has_volume_id = 1
                common_path_suffix_offset_unicode = YR_UNDEFINED
                local_base_path_offset_unicode = YR_UNDEFINED
                common_path_suffix_offset = 59
                common_network_relative_link_offset = 0
                local_base_path_offset = 45
                volume_id_offset = 28
                flags = 1
                header_size = 28
                size = 60
        link_target_id_list
                item_id_list_size = 189
                number_of_item_ids = 4
                item_id_list
                        [0]
                                size = 18
                                data = "\x1fP\xe0O\xd0 \xea:i\x10\xa2\xd8\x08\x00+00\x9d"
                        [1]
                                size = 23
                                data = "/C:\\x00\x00\x00\x00\x00\x00\x00\x00\x00\x00\x00\x00\x00\x00\x00\x00\x00\x00\x00"
                        [2]
                                size = 68
                                data = "1\x00\x00\x00\x00\x00,9i\xa3\x10\x00test\x00\x002\x00\x07\x00\x04\x00\xef\xbe,9e\xa3,9i\xa3&\x00\x00\x00\x03\x1e\x00\x00\x00\x00\xf5\x1e\x00\x00\x00\x00\x00\x00\x00\x00\x00\x00t\x00e\x00s\x00t\x00\x00\x00\x14\x00"
                        [3]
                                size = 70
                                data = "2\x00\x00\x00\x00\x00,9i\xa3 \x00a.txt\x004\x00\x07\x00\x04\x00\xef\xbe,9i\xa3,9i\xa3&\x00\x00\x00-n\x00\x00\x00\x00\x96\x01\x00\x00\x00\x00\x00\x00\x00\x00\x00\x00a\x00.\x00t\x00x\x00t\x00\x00\x00\x14\x00"
        has_hotkey = 0
        hotkey_modifier_flags = 0
        hotkey = YR_UNDEFINED
        hotkey_flags = 0
        show_command = 1
        icon_index = 0
        file_attributes_flags = 32
        link_flags = 524443
        file_size = 0
        write_time = 1221251237
        access_time = 1221251237
        creation_time = 1221251237
        is_lnk = 1
        TMPF_DEVICE = 8
        TMPF_TRUETYPE = 4
        TMPF_VECTOR = 2
        TMPF_FIXED_PITCH = 1
        TMPF_NONE = 0
        FF_DECORATIVE = 80
        FF_SCRIPT = 64
        FF_MODERN = 48
        FF_SWISS = 32
        FF_ROMAN = 16
        FF_DONTCARE = 0
        BACKGROUND_INTENSITY = 128
        BACKGROUND_RED = 64
        BACKGROUND_GREEN = 32
        BACKGROUND_BLUE = 16
        FOREGROUND_INTENSITY = 8
        FOREGROUND_RED = 4
        FOREGROUND_GREEN = 2
        FOREGROUND_BLUE = 1
        WNNC_NET_GOOGLE = 4390912
        WNNC_NET_MS_NFS = 4325376
        WNNC_NET_MFILES = 4259840
        WNNC_NET_RSFX = 4194304
        WNNC_NET_VMWARE = 4128768
        WNNC_NET_DRIVEONWEB = 4063232
        WNNC_NET_ZENWORKS = 3997696
        WNNC_NET_KWNP = 3932160
        WNNC_NET_DFS = 3866624
        WNNC_NET_AVID1 = 3801088
        WNNC_NET_OPENAFS = 3735552
        WNNC_NET_QUINCY = 3670016
        WNNC_NET_SRT = 3604480
        WNNC_NET_TERMSRV = 3538944
        WNNC_NET_LOCK = 3473408
        WNNC_NET_IBMAL = 3407872
        WNNC_NET_SHIVA = 3342336
        WNNC_NET_HOB_NFS = 3276800
        WNNC_NET_MASFAX = 3211264
        WNNC_NET_OBJECT_DIRE = 3145728
        WNNC_NET_KNOWARE = 3080192
        WNNC_NET_DAV = 3014656
        WNNC_NET_EXIFS = 2949120
        WNNC_NET_YAHOO = 2883584
        WNNC_NET_FOXBAT = 2818048
        WNNC_NET_STAC = 2752512
        WNNC_NET_EXTENDNET = 2686976
        WNNC_NET_3IN1 = 2555904
        WNNC_NET_CSC = 2490368
        WNNC_NET_RDR2SAMPLE = 2424832
        WNNC_NET_TWINS = 2359296
        WNNC_NET_DISTINCT = 2293760
        WNNC_NET_FJ_REDIR = 2228224
        WNNC_NET_PROTSTOR = 2162688
        WNNC_NET_DECORB = 2097152
        WNNC_NET_RIVERFRONT2 = 2031616
        WNNC_NET_RIVERFRONT1 = 1966080
        WNNC_NET_SERNET = 1900544
        WNNC_NET_MANGOSOFT = 1835008
        WNNC_NET_DOCUSPACE = 1769472
        WNNC_NET_AVID = 1703936
        VALID_NET_TYPE = 2
        VALID_DEVICE = 1
        DRIVE_RAMDISK = 6
        DRIVE_CDROM = 5
        DRIVE_REMOTE = 4
        DRIVE_FIXED = 3
        DRIVE_REMOVABLE = 2
        DRIVE_NO_ROOT_DIR = 1
        DRIVE_UNKNOWN = 0
        COMMON_NETWORK_RELATIVE_LINK_AND_PATH_SUFFIX = 2
        VOLUME_ID_AND_LOCAL_BASE_PATH = 1
        HOTKEYF_ALT = 4
        HOTKEYF_CONTROL = 2
        HOTKEYF_SHIFT = 1
        SW_SHOWMINNOACTIVE = 7
        SW_SHOWMAXIMIZED = 3
        SW_SHOWNORMAL = 1
        FILE_ATTRIBUTE_ENCRYPTED = 16384
        FILE_ATTRIBUTE_NOT_CONTENT_INDEXED = 8192
        FILE_ATTRIBUTE_OFFLINE = 4096
        FILE_ATTRIBUTE_COMPRESSED = 2048
        FILE_ATTRIBUTE_REPARSE_POINT = 1024
        FILE_ATTRIBUTE_SPARSE_FILE = 512
        FILE_ATTRIBUTE_TEMPORARY = 256
        FILE_ATTRIBUTE_NORMAL = 128
        RESERVED_2 = 64
        FILE_ATTRIBUTE_ARCHIVE = 32
        FILE_ATTRIBUTE_DIRECTORY = 16
        RESERVED_1 = 8
        FILE_ATTRIBUTE_SYSTEM = 4
        FILE_ATTRIBUTE_HIDDEN = 2
        FILE_ATTRIBUTE_READONLY = 1
        KEEP_LOCAL_ID_LIST_FOR_UNC_TARGET = 67108864
        PREFER_ENVIRONMENT_PATH = 33554432
        UNALIAS_ON_SAVE = 16777216
        ALLOW_LINK_TO_LINK = 8388608
        DISABLE_KNOWN_FOLDER_ALIAS = 4194304
        DISABLE_KNOWN_FOLDER_TRACKING = 2097152
        DISABLE_LINK_PATH_TRACKING = 1048576
        ENABLE_TARGET_METADATA = 524288
        FORCE_NO_LINK_TRACK = 262144
        RUN_WITH_SHIM_LAYER = 131072
        UNUSED_2 = 65536
        NO_PIDL_ALIAS = 32768
        HAS_EXP_ICON = 16384
        RUN_AS_USER = 8192
        HAS_DARWIN_ID = 4096
        UNUSED_1 = 2048
        RUN_IN_SEPARATE_PROCESS = 1024
        HAS_EXP_STRING = 512
        FORCE_NO_LINK_INFO = 256
        IS_UNICODE = 128
        HAS_ICON_LOCATION = 64
        HAS_ARGUMENTS = 32
        HAS_WORKING_DIR = 16
        HAS_RELATIVE_PATH = 8
        HAS_NAME = 4
        HAS_LINK_INFO = 2
        HAS_LINK_TARGET_ID_LIST = 1
test tests/data/lnk-standard
The variables printed are the ones that are set by the LNK module, in reverse order of when they have been parsed. They are a combination of fixed values (i.e. the symbolic constants defined in the LNK docs), parsed values from the LNK (either as single variables, or arrays/dictionaries), and some boolean values set about general information of the LNK.
The layer of indentation corresponds to how you can access the variable. If you want to access the file_size variable, you would do so via lnk.file_size. If you want to access number_of_item_ids, you can via lnk.link_target_id_list.number_of_item_ids.
As you can see, not all variables are set. The LNK file specification points out that many sections of the file format are optional, so don’t expect the majority of variables to be set on each LNK file you parse!
If you want detail on each of the variables parsed out/available, they are documented in docs\modules\lnk.rst (which you’ll have to build yourself or just read the .rst file in a text editor). I’ve also manually converted these docs to markdown for these blog posts (although they won’t remain up to date with any changes) which you can find here: https://bitsofbinary.github.io/yara/2023/01/05/lnk_module_documentation.html
Day 8 - Testing if a file is an LNK
Let’s start with a straightforward rule: determining whether a file is an LNK in the first place. This is possible due to the LNK file header size and CLSID being fixed values:

If you are doing this with “pure” YARA, the rule would look like this:
rule is_lnk {
    condition:
        uint32(0) == 0x0000004C and
        uint32(4) == 0x00021401 and
        uint32(8) == 0x00000000 and
        uint32(12) == 0x000000C0 and
        uint32(16) == 0x46000000
}
If you’re unfamiliar with the syntax used, YARA has a variety of operators to compare byte values at specific offsets in a file. These come in the form of the int and uint operators (which are both signed and unsigned respectively), and are available for 8-bit, 16-bit and 32-bit values. Later versions of YARA have also added big endian versions of these operators, so the first line of the condition of this rule could also be written as uint32be(0) == 0x4C000000.
As such, it is possible to determine whether a file is an LNK using this method, but requires you to go and read the LNK docs/keep a copy of this condition somewhere for use each time (plus it’s a little verbose if you’re replicating it across many rules).
With the LNK module, this same rule reduces to:
import "lnk"

rule is_lnk {
    condition:
        lnk.is_lnk
}
The lnk.is_lnk variable is a boolean value, set to 1 if the file being scanned is an LNK, and 0 if it isn’t. As such, just validating that this value is true is enough to determine whether you’re scanning an LNK or not!
(Note: you don’t need to do lnk.is_lnk == true, as it is implicitly checking if it is true)
Aside - Thoughts on file header validation
If you’ve been following #100DaysofYARA so far and seen @greglesnewich’s LNK rules, you’ll notice that he does the check uint32be(0x0) == 0x4C000000 to see if a file is an LNK.
I can’t think of any cases where this won’t be sufficient! Files starting with those 4 bytes are almost certainly going to be LNKs. It’s similar to how a lot of us will write uint16(0) == 0x5A4D to check that a file is a PE; we’re not actually checking the PE header or even validating the rest of the header itself, but just seeing the MZ string at the start is enough for us.
Checking both the header size and CLSID is a bit overkill for a rule’s condition I will admit. However, if you want the assurance of the full header being present, then I think lnk.is_lnk is a lot more concise than the five uint32 checks required.
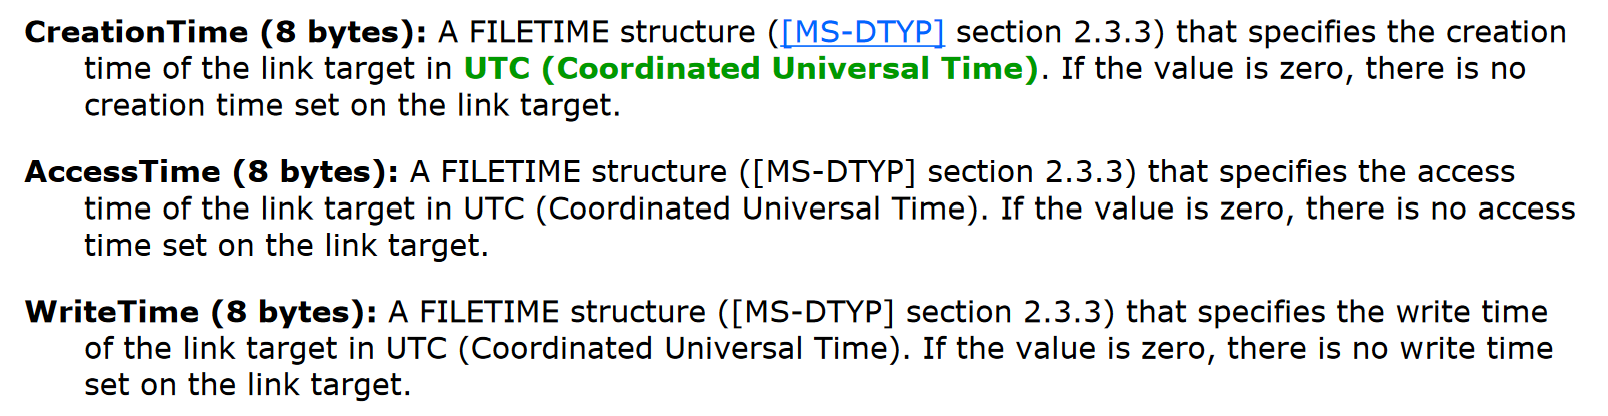
Day 9 - Checking LNK Timestamps
LNKs have three timestamps in their headers: creation time, access time, and write time. All of these are timestamps are in the FILETIME structure format, but for ease of use the LNK module converts them to Unix timestamps (e.g. to make them compatible with the time module).
As such, you can write rules based on these timestamps for a variety of purposes, such as:
- Clustering LNK files with the same timestamps
- Looking for anomalies in LNK timestamps
For example, the following rule will look for an LNK file that has supposedly been created after it has been accessed/last been written to:
import "lnk"

rule Heuristic_LNK_Created_After_Access_or_Write {
    meta:
        description = "Detects an LNK file with a creation timestamp later than that of its access/write timestamp"

    condition:
        lnk.creation_time > lnk.access_time or
        lnk.creation_time > lnk.write_time
}
And here’s another one that finds LNK files that have been created in the future:
import "lnk"
import "time"

rule Heuristic_LNK_Created_in_Future {
    meta:
        description = "Detects LNK files with a creation timestamp in the future"

    condition:
        lnk.creation_time > time.now()
}
Or maybe, you want to look for LNKs where the timestamp has been removed:
import "lnk"

rule Heuristic_LNK_Empty_Timestamp {
    meta:
        description = "Detects an LNK file with a creation/write/access timestamp that has been zero'ed out"

    condition:
        lnk.creation_time == 0 or
        lnk.write_time == 0 or
        lnk.access_time == 0
}
This last rule can be written in pure YARA as follows:
rule Heuristic_LNK_Zeroed_Header_Timestamp {
    meta:
        description = "Detects an LNK file with a creation/write/access timestamp that has been zeroed out"

    condition:
        uint32(0) == 0x0000004C and
        uint32(4) == 0x00021401 and
        uint32(8) == 0x00000000 and
        uint32(12) == 0x000000C0 and
        uint32(16) == 0x46000000 and
        (
            // Creation timestamp
            (
                uint32(28) == 0 and uint32(32) == 0
            ) or
            // Access timestamp
            (
                uint32(36) == 0 and uint32(40) == 0
            ) or
            // Write timestamp
            (
                uint32(44) == 0 and uint32(48) == 0
            )
        )
}
This is possible to do due to the fixed offsets in the LNK header, but makes for a more verbose rule!
(EDIT: it actually looks fairly common that LNKs will have no timestamps; go figure!)
Think about timestamps in different ways
Timestamp anomalies can lead to some really interesting rules! For example, check out Costin Raiu’s slides from a presentation on writing good YARA rules, where slides 48-50 describe how it is possible to track TripleFantasy based on an impossible timestamp in a PE.
Maybe there are more possibilities to create YARA rules for LNKs based on strange timestamp features? Have a go if you’ve got an idea!
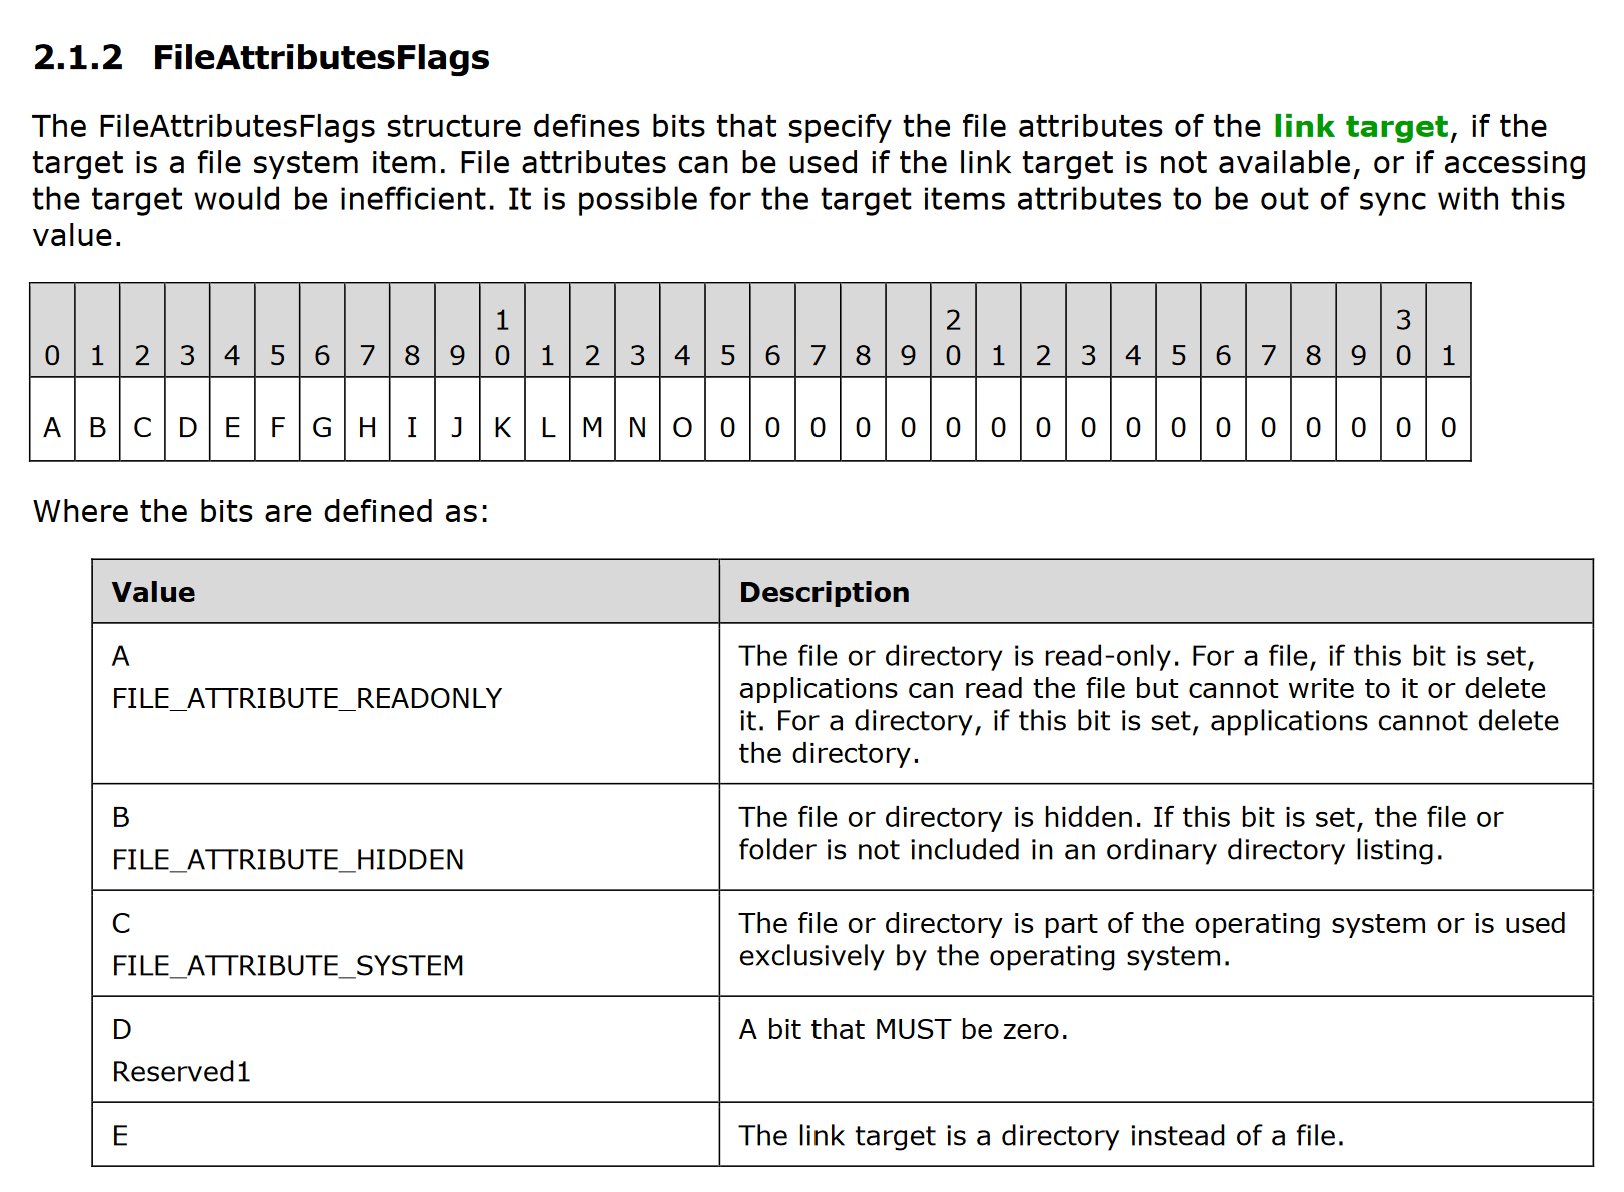
Day 10 - LNK File Attributes
The LNK file headers (and some variables throughout the file format) have flags set with each bit corresponding to different attributes. While a lot of these are more for contextual purposes, some can tell us information about the LNK file or its target, which can be used for heuristics/anomaly detection.
For example, one of the flags present is FileAttributesFlags, which specify the attributes of the link target. An example rule could be to look for LNKs with the FILE_ATTRIBUTE_HIDDEN bit (i.e. 0x00000002) set:
import "lnk"

rule Heuristic_LNK_Hidden_Link_Target {
    meta:
        description = "Detects LNK files with link targets that are hidden"

    condition:
        lnk.file_attributes_flags & lnk.FILE_ATTRIBUTE_HIDDEN
}
You can find what all these values correspond to in yara/libyara/include/yara/lnk.h. For example, this rule would be the following in pure YARA:
rule Heuristic_LNK_Hidden_Link_Target {
    meta:
        description = "Detects LNK files with link targets that are hidden"

    condition:
        uint32(0) == 0x0000004C and
        uint32(4) == 0x00021401 and
        uint32(8) == 0x00000000 and
        uint32(12) == 0x000000C0 and
        uint32(16) == 0x46000000 and
        uint32(24) & 0x00000002
}
(Note: this bit being set appears to be very common, so on it’s own may not be enough for a good hunting rule, but combined with other values could lead to some interesting ones)
Day 11 - LNK Hotkeys
While I’m not sure how much value this will have from a threat hunting perspective, LNK files can be run via keyboard shortcuts. Maybe you find a threat actor has a particular shortcut it likes? You can track that with YARA:
import "lnk"

rule Heuristic_LNK_using_Shortcut_F5 {
    meta:
        description = "Detects LNKs using the keyboard shortcut 'F5'"

    condition:
        lnk.hotkey == "F5"
}
There is also a corresponding hotkey_modifier_flags value that specifies if any/a combination of HOTKEYF_SHIFT, HOTKEYF_CONTROL, or HOTKEYF_ALT need to be pressed to activate the hotkey:
import "lnk"

rule Heuristic_LNK_using_Shift_Modifier {
    meta:
        description = "Detects LNKs using a keyboard shortcut, with modifier shift"

    condition:
        lnk.hotkey_modifier_flags & lnk.HOTKEYF_SHIFT
}
A potential way to hunt for interesting LNK samples may be to look for ones using common keyboard shortcuts for the LNK shortcut. For example, I find myself using Ctrl-C a lot to copy text, so perhaps a threat actor could abuse that to delay execution of an LNK dropped to my system until I next pressed CTRL-C?
import "lnk"

rule Heuristic_LNK_using_Hotkey_Ctrl_C {
    meta:
        description = "Detects LNKs using the keyboard hotkey Ctrl-C"

    condition:
        lnk.hotkey == "C" and
        lnk.hotkey_modifier_flags & lnk.HOTKEYF_CONTROL
}
Day 12 - LNK LinkInfo - Part 1
One of the useful structures to signature in LNK files is LinkInfo. Microsoft’s description can be seen below:

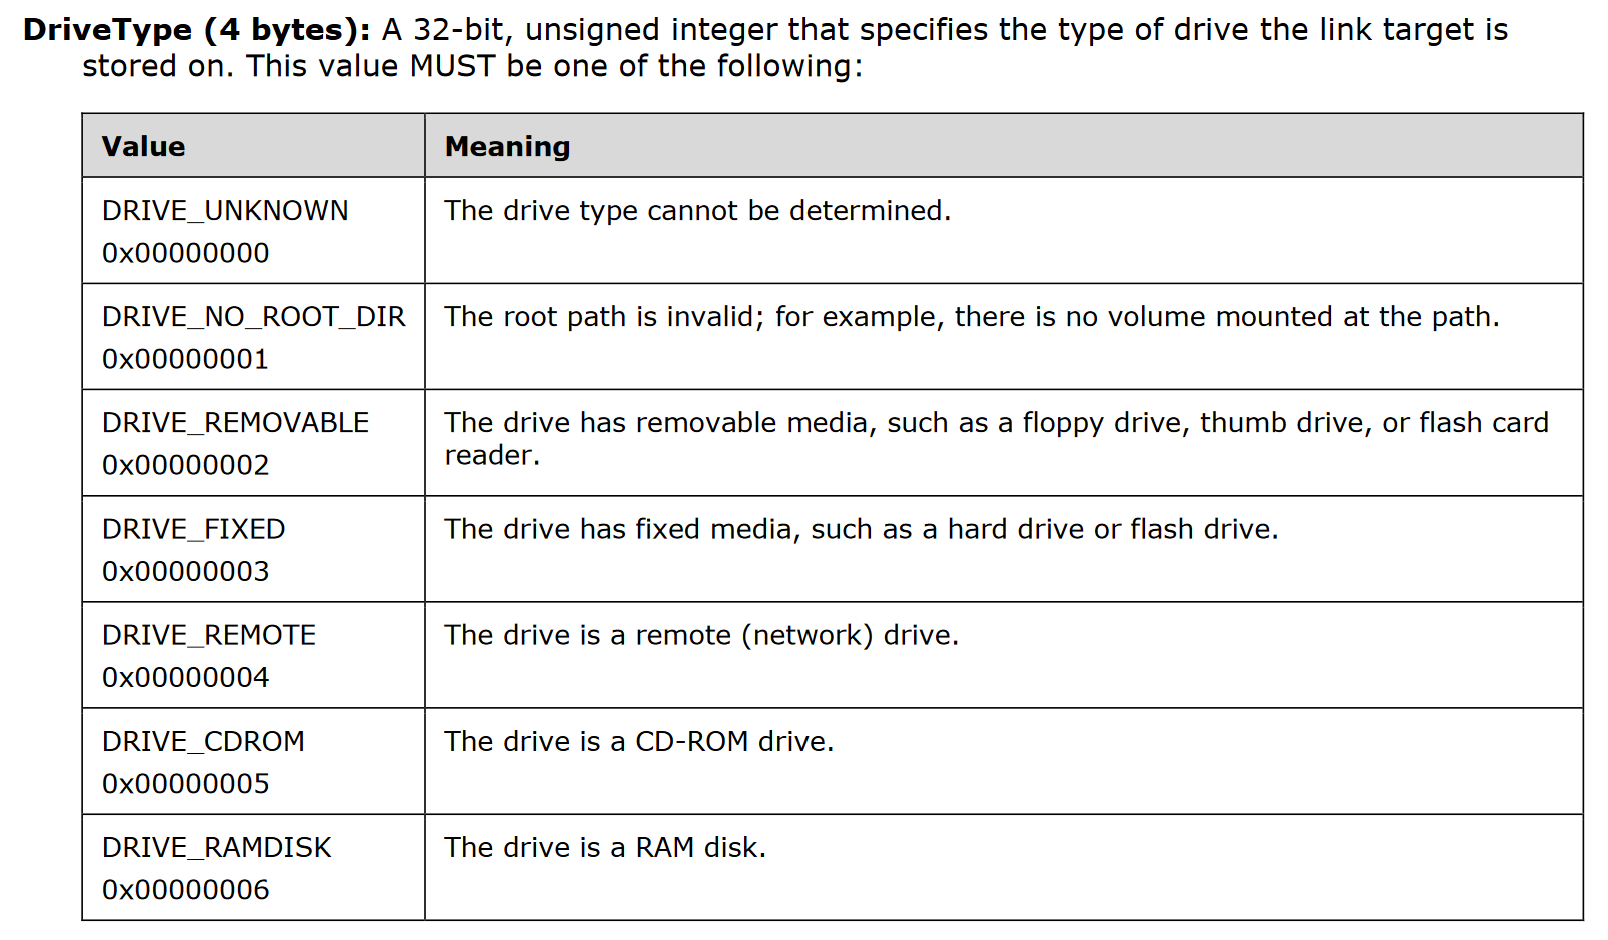
The first section of this structure to focus on is the VolumeID, which specifies information about the volume that a link target was on when the link was created. This could therefore give some very useful information about the system used to generate the LNK file (which may well be a threat actor’s system).
An entry in VolumeID is the DriveType, which specifies the type of drive the link target is stored on. This could be a fixed drive, a remote drive, or even removable media or a RAM disk!
Here’s an example rule to pick up LNKs targeting files on removable media:
import "lnk"

rule Heuristic_LNK_Targeting_File_On_Removable_Media {
    condition:
        lnk.link_info.volume_id.drive_type & lnk.DRIVE_REMOVABLE
}
Day 13 - LNK LinkInfo - Part 2
Perhaps an even more useful component of the VolumeID structure is DriveSerialNumber, which could be used to cluster samples together generated on the same hard drive. This is one I’ve not seen used as much in clustering of LNK files so far:
import "lnk"

rule LNK_Specific_DriveSerialNumber {
    condition:
        lnk.link_info.volume_id.drive_serial_number == 0x307A8A81
}
It would be interesting to see how much clustering could be done with LNKs that have had other metadata stripped/modified (such as the MachineID which I’ll talk about later on).
An example rule using this value can be seen below, which detects an LNK dropping Emotet from May 2022:
import "lnk"

rule Emotet_LNK_Drive_Serial_May_2022 {
    meta:
        description = "Detects an LNK from May 2022 tagged as dropping Emotet based on a unique drive serial"
        hash = "b7d217f13550227bb6d80d05bde26e43cd752a870973052080a72a510c444b5a"

    condition:
        lnk.link_info.volume_id.drive_serial_number == 0x1c853811
}
As I like to highlight, this could be done in pure YARA with the following rule:
rule Emotet_LNK_Drive_Serial_May_2022 {
    meta:
        description = "Detects an LNK from May 2022 tagged as dropping Emotet based on a unique drive serial"
        hash = "b7d217f13550227bb6d80d05bde26e43cd752a870973052080a72a510c444b5a"

    strings:
        $drive_serial = {11 38 85 1c}

    condition:
        uint32(0) == 0x0000004c and any of them
}
The lnk.link_info.volume_id.data also contains the volume label of the drive, but I’m not sure how useful this would be for clustering purposes.
Day 14 - LNK LinkInfo - Part 3
The LocalBasePath variable which is used to construct the full path to the link item or link target can another good indicator. This variable will either point to the file you want to open with the shortcut, or to the binary you wish to execute with a shortcut (minus the command line arguments, that’s in another variable that we’ll get to later). For example, looking for a specific path:
import "lnk"

rule LNK_LocalBasePath_Example {
    condition:
        lnk.link_info.local_base_path == "C:\\test\\a.txt"
}
Or, maybe for more heuristic rules:
import "lnk"

rule Heuristic_LNK_LocalBasePath_in_TEMP {
    meta:
        description = "Detects LNK files with a local base path pointing at the %TEMP% folder"

    condition:
        lnk.link_info.local_base_path icontains "TEMP"
}
Generally, if you’re looking for execution of non-standard binaries via LNKs, this variable will be useful for you, e.g.:
import "lnk"

rule Heuristic_LNK_LocalBasePath_mshta {
    meta:
        description = "Detects LNK files pointing at mshta"

    condition:
        lnk.link_info.local_base_path icontains "mshta"
}
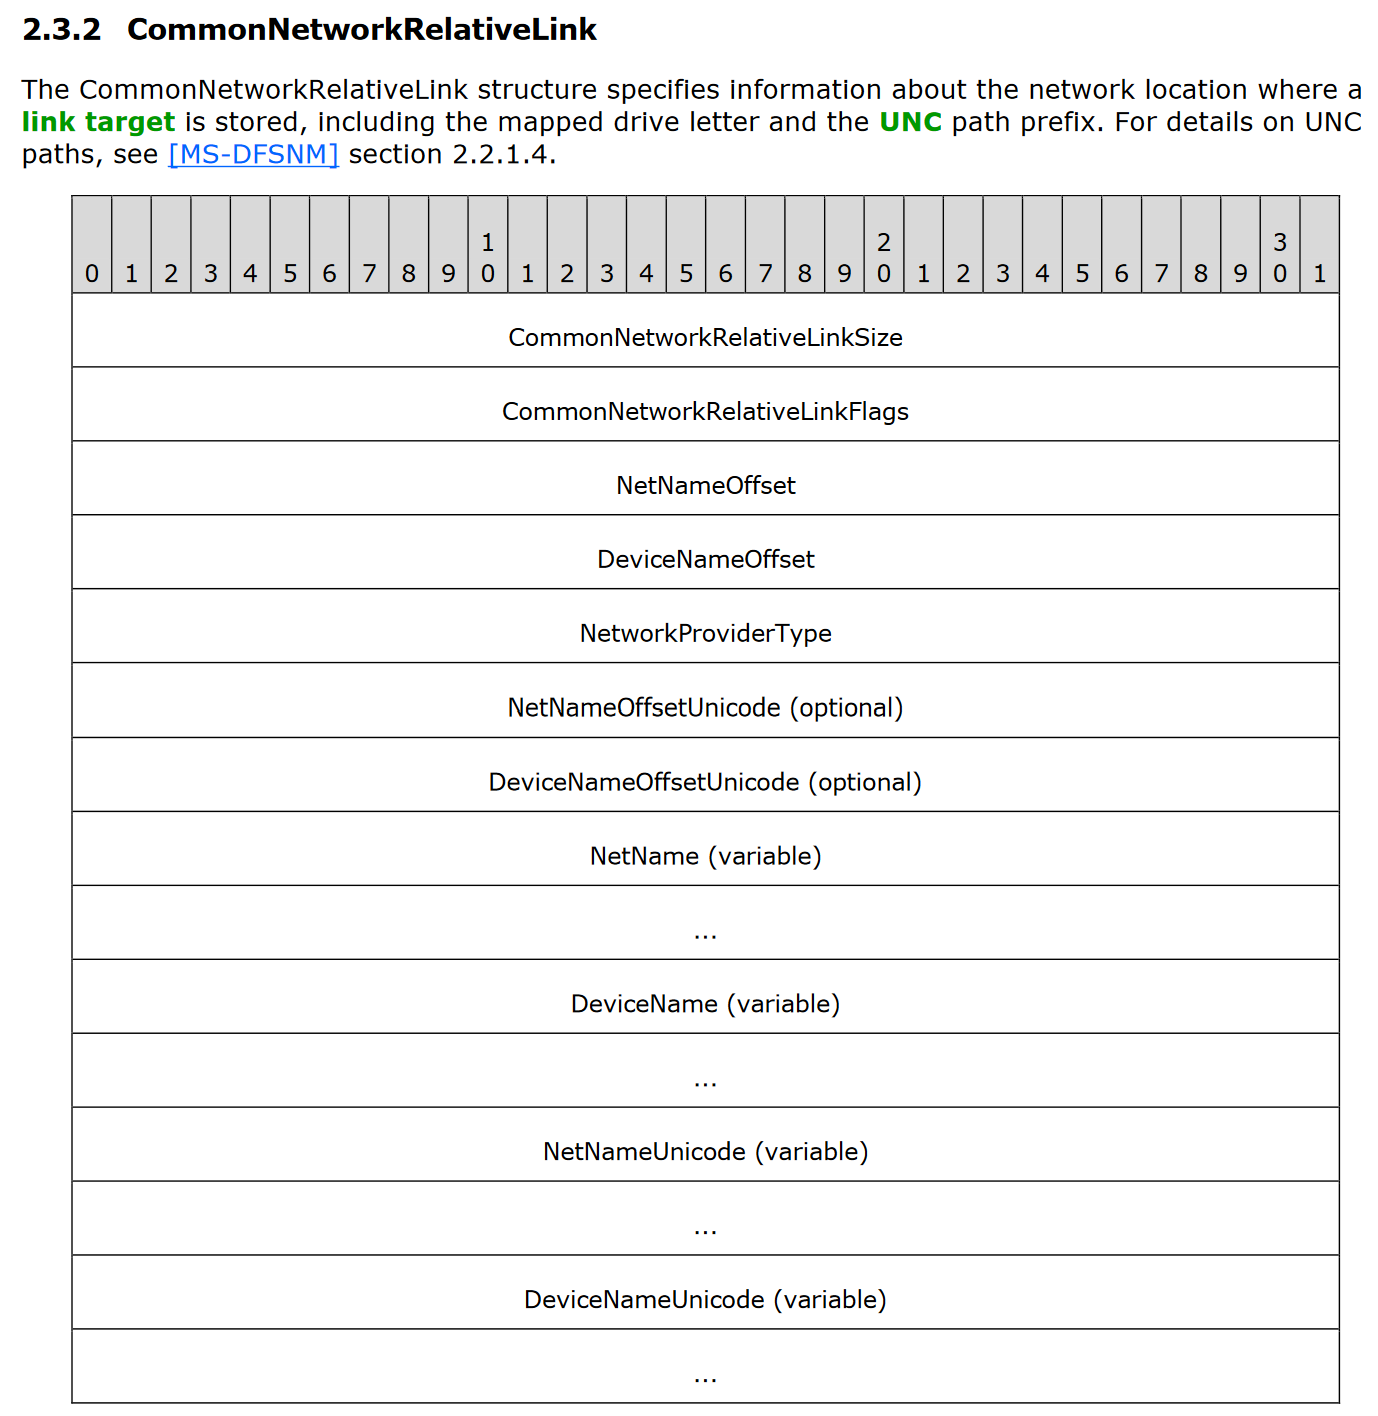
Day 15 - LNK LinkInfo - Part 4
In reading the LNK documentation, all kinds of structures can be seen that are otherwise uncommon, but may be useful in more niche circumstances! For example, the CommonNetworkRelativeLink is a structure present when an LNK points to a file on a network share.
While I’ve not seen this structure in practice for malicious LNKs myself, this could still be useful for hunting purposes to find suspicious LNKs:
import "lnk"

rule Heuristic_LNK_Pointing_to_Network_Share {
    meta:
        description = "Detects an LNK pointing to the network share '\\\\server\\share'"

    condition:
        lnk.link_info.common_network_relative_link.net_name == "\\\\server\\share"
}
Day 16 - LNK StringData - Part 1
Now that we’ve looked through LinkInfo, we can move to the next optional section of LNK files: StringData. This optional set of structures can contain five different entries:
NAME_STRINGRELATIVE_PATHWORKING_DIRCOMMAND_LINE_ARGUMENTSICON_LOCATION
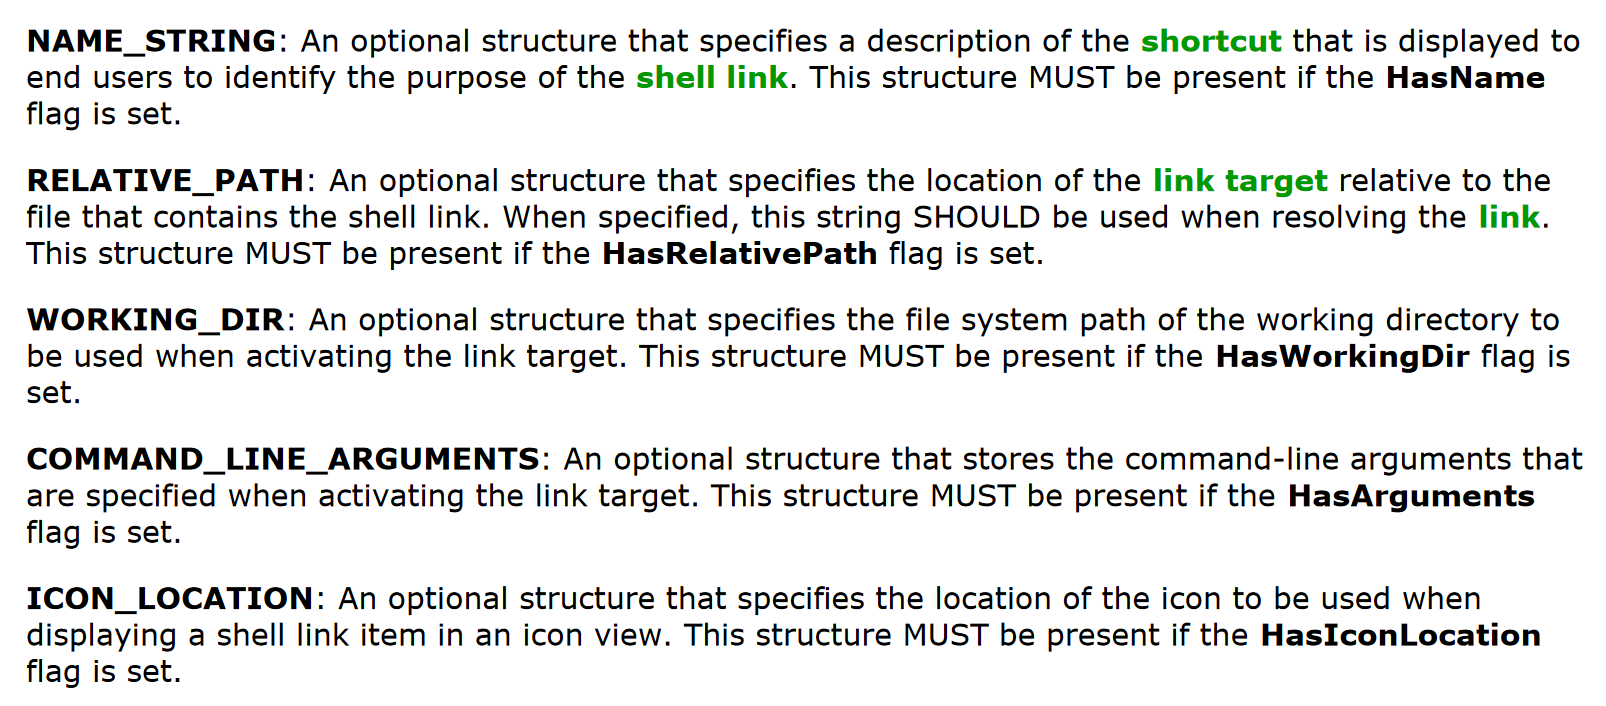
It’s worth spending a bit of time on these structures, as they can contain some useful information. I’ll spend the next couple of posts going into detail on these.
To start off with, the NAME_STRING entry is perhaps the least useful of the five from a detection/threat hunting perspective, unless you want to hunt for LNKs that have it set to spoof some specific software, for example:
import "lnk"

rule LNK_With_WinRAR_Description {
    meta:
        description = "Detects LNK files with a description matching that of the WinRAR"

    condition:
        // Process RAR, ZIP and other archive formats
        lnk.name_string == "P\x00r\x00o\x00c\x00e\x00s\x00s\x00 \x00R\x00A\x00R\x00,\x00 \x00Z\x00I\x00P\x00 \x00a\x00n\x00d\x00 \x00o\x00t\x00h\x00e\x00r\x00 \x00a\x00r\x00c\x00h\x00i\x00v\x00e\x00 \x00f\x00o\x00r\x00m\x00a\x00t\x00s\x00"
}
Day 17 - LNK StringData - Part 2
The RELATIVE_PATH, WORKING_DIR and COMMAND_LINE_ARGUMENTS are all somewhat related StringData entries. That is, they collectively describe the filename, directory, and command line arguments for the file the LNK is targeting. These can lead to a lot of useful data points from a detection perspective; particularly COMMAND_LINE_ARGUMENTS.
In fact, a lot of current open source YARA rules implicitly use these fields, even if they don’t target them directly. Bart’s LNK ruleset contains rules looking for references to scripting languages (i.e. in the command line), long relative paths, and references to binaries used to execute files (such as rundll32.exe).
Many different types of YARA rules for LNKs are possible without the LNK module, and that’s a good thing! However, I hope that these fields being exposed directly through a YARA module will allow us all to be much more specific in the types of rules we want to write.
So for instance, if we want to look for /c in a command line argument of an LNK file (i.e. to run them command then terminate the instance of cmd.exe), this is currently a bit harder to specify without it potentially being more false positive-prone (and having some performance concerns):
rule Heuristic_LNK_Slash_c_In_Command_Line {
    meta:
        description = "Detects LNK files that have '/c' in its command line"

    strings:
        $ = "/c" ascii wide

    condition:
        uint32be(0) == 0x4C000000 and
        uint32be(4) == 0x01140200 and
        uint32be(8) == 0x00000000 and
        uint32be(12) == 0xC0000000 and
        uint32be(16) == 0x00000046 and
        any of them
}
However, using the LNK module, we can be more precise, and hopefully avoid looking in large files for all occurances of /c:
import "lnk"

rule Heuristic_LNK_Slash_c_In_Command_Line {
    meta:
        description = "Detects LNK files that have '/c' in its command line"

    condition:
        lnk.command_line_arguments contains "/\\x00c"
}
Asides
- The benefit of using the LNK module is we can drop the condition using all the
uint32bestatements checking whether a file is an LNK, as the module will guarantee that the file is an LNK if the fieldlnk.command_line_argumentsis present - At the moment you can see an annoying design of LNKs in that the
StringDatafields are either unicode, or whatever the default code page of the system the LNK is generated on is. This means we have to include null characters in the string to check. While I’d like the module to convert these fields to ASCII, this could lose information that might otherwise be important. Let me know what you think about having something like alnk.command_line_arguments_asciifield. Potentially another solution would be to add support to YARA for wide character string comparisons, such aslnk.command_line_arguments contains L"/c"(Lis the default syntax used to define wide character strings in C).
Edit: I’ve added an issue to YARA to add L"" as a modifier: https://github.com/VirusTotal/yara/issues/1863
Day 18 - LNK StringData - Part 3
Last but not least in the StringData section is ICON_LOCATION, which specifies the location of the icon to be used when displaying a shell link item in an icon view. This structure has an interesting case study I observed in some research I conducted into APT41 as part of my job.
In some LNK files related to the threat actor, it used icon locations such as .\1.pdf and .\1.doc. While these icon locations may not point to a real file on the system, this value being present will set the icon for the LNK file being that of either a PDF or Microsoft Office file respectively. This can make the LNK file look more convincing.
I shared the following open source YARA rule for this technique:
rule APT41_Icon_Location_LNK : Red_Kelpie
{
    meta:
        description = "Detects LNK files masquerading as PDFs likely used by APT41"
        TLP = "WHITE"
        author = "PwC Cyber Threat Operations :: BitsOfBinary"
        copyright = "Copyright PwC UK 2021 (C)"
        license = "Apache License, Version 2.0"
        created_date = "2021-08-26"
        modified_date = "2021-08-26"
        revision = "0"
        hash = "2218904238dc4f8bb5bb838ed4fa779f7873814d7711a28ba59603826ae020aa"
        hash = "5904bc90aec64b12caa5d352199bd4ec2f5a3a9ac0a08adf954689a58eff3f2a"
        hash = "c98ac83685cb5f7f72e832998fec753910e77d1b8eee638acb508252912f6cf6"
        hash = "a44b35f376f6e493580c988cd697e8a2d64c82ab665dfd100115fb6f700bb82a"

    strings:
        $pdf = ".\\1.pdf" ascii wide
        $doc = ".\\1.doc" ascii wide

    condition:
        uint32be(0) == 0x4C000000 and
        uint32be(4) == 0x01140200 and
        uint32be(8) == 0x00000000 and
        uint32be(12) == 0xC0000000 and
        uint32be(16) == 0x00000046 and
        any of them
}
While in hindsight I don’t believe that all samples with these icon locations are related to APT41 (hence the fortunate use of likely in the rule description), this rule has generally been useful in finding malicious LNK files masquerading as either PDFs or Word documents.
If you wanted to recreate this rule with the LNK module, you could do it as such:
import "lnk"

rule Heuristic_LNK_Icon_Location_Masquerading_as_Doc_or_PDF {
    condition:
        lnk.icon_location contains ".\\x00\\\\x001\\x00.\\x00p\\x00d\\x00f" or
        lnk.icon_location contains ".\\x00\\\\x001\\x00.\\x00d\\x00o\\x00c"
}
No strings: section needed here.
If you’re interested in this research into APT41, you can find the slides, full set of YARA rules, and link to the recording here: https://github.com/PwCUK-CTO/TheSAS2021-Red-Kelpie/blob/main/yara/red_kelpie.yar
Day 19 - LNK ExtraData
The next few posts will focus on the final set of optional structures in LNK files, which are in the ExtraData section.

As you can see, these consist of 11 different structures, which I’ll list below with a description from the LNK docs:
CONSOLE_PROPS: specifies the display settings to use when a link target specifies an application that is run in a console window.CONSOLE_FE_PROPS: specifies the code page to use for displaying text when a link target specifies an application that is run in a console window.DARWIN_PROPS: specifies an application identifier that can be used instead of a link target IDList to install an application when a shell link is activated.ENVIRONMENT_PROPS: specifies a path to environment variable information when the link target refers to a location that has a corresponding environment variable.ICON_ENVIRONMENT_PROPS: specifies the path to an icon. The path is encoded using environment variables, which makes it possible to find the icon across machines where the locations vary but are expressed using environment variables.KNOWN_FOLDER_PROPS: specifies the location of a known folder. This data can be used when a link target is a known folder to keep track of the folder so that the link target IDList can be translated when the link is loaded.PROPERTY_STORE_PROPS: specifies a set of properties that can be used by applications to store extra data in the shell link.SHIM_PROPS: specifies the name of a shim that can be applied when activating a link target.SPECIAL_FOLDER_PROPS: specifies the location of a special folder. This data can be used when a link target is a special folder to keep track of the folder, so that the link target IDList can be translated when the link is loaded.TRACKER_PROPS: specifies data that can be used to resolve a link target if it is not found in its original location when the link is resolved. This data is passed to the Link Tracking service to find the link target.VISTA_AND_ABOVE_IDLIST_PROPS: specifies an alternate IDList that can be used instead of the LinkTargetIDList structure (section 2.2) on platforms that support it.
As such, there is a lot of possibilities for detection rules based on these structures! Let’s start looking into those in the next posts.
Day 20 - LNK CONSOLE_PROPS - Part 1
The LNK CONSOLE_PROPS gives information on how to display the LNK to the user. @greglesnewich has done a really cool Jupyter notebook used to analyse and write some YARA rules based on this section. In particular, he has written a rule that will look for LNKs that have set both WindowSizeX and WindowSizeY to 1 pixel, and ScreenBufferSizeX and ScreenBufferSizeY to also be of size 1, and done it using pure YARA (i.e. no modules involved!).
rule SUSP_LNK_SmallScreenSize
{
    meta:
        author = "Greg Lesnewich"
        description = "check for LNKs that have a screen buffer size and WindowSize dimensions of 1x1"
        date = "2023-01-01"
        version = "1.0"
        DaysofYARA = "1/100"

    strings:
        $dimensions = {02 00 00 A0 ?? 00 ?? ?? 01 00 01 00 01}
        // struct ConsoleDataBlock sConsoleDataBlock
        // uint32 Size
        // uint32 Signature
        // enum FillAttributes
        // enum PopupFillAttributes
        // uint16 ScreenBufferSizeX
        // uint16 ScreenBufferSizeY
        // uint16 WindowSizeX
        // uint16 WindowSizeY
    condition:
        uint32be(0x0) == 0x4c000000 and all of them
}
I love this rule, as it shows how capable YARA is without even needing anything extra. Greg is using the fact that the ConsoleDataBlock structure has a fixed BlockSignature of 0xA0000002 to “parse” out the relevant variables in a hex string (using wildcards to skip the ones he doesn’t care about). No LNK module needed!
So why do I still think the LNK module is useful? First, this approach will not always be possible in LNKs using pure YARA (we can fortunately rely on BlockSignature values here to find the right structure). Second, even when it’s possible, it requires some understanding enough about the YARA syntax (as Greg clearly does) to write a rule to take advantage of this!
Creating an LNK with CONSOLE_PROPS
Not all LNKs come with with ConsoleDataBlock structure, so if we want to experiment with values we’ll need to be able to generate them! The best way I’ve found to do this on Windows 11 is:
- Create shortcut link for
cmd.exe - Right click on the shortcut and go to
Properties - Go on the
Layouttab - Edit the
Screen buffer sizeandWindow sizevalues to all be1
![]()
In the next post we’ll recreate Greg’s rule using the LNK module.
Day 21 - LNK CONSOLE_PROPS - Part 2
If we dump the module information using the -D flag of the LNK generated in the previous post, we’ll see the following for the CONSOLE_PROPS section:
console_data
    color_table
            [0] = 789516
            [1] = 14300928
            [2] = 958739
            [3] = 14521914
            [4] = 2035653
            [5] = 9967496
            [6] = 40129
            [7] = 13421772
            [8] = 7763574
            [9] = 16742459
            [10] = 837142
            [11] = 14079585
            [12] = 5654759
            [13] = 10354868
            [14] = 10875385
            [15] = 15921906
    history_no_dup = 0
    number_of_history_buffers = 4
    history_buffer_size = 50
    auto_position = 1
    insert_mode = 1
    quick_edit = 1
    full_screen = 0
    cursor_size = 25
    face_name = "C\x00o\x00n\x00s\x00o"
    font_weight = 400
    font_family = 54
    font_size = 1048576
    window_origin_y = 0
    window_origin_x = 0
    window_size_y = 1
    window_size_x = 1
    screen_buffer_size_y = 1
    screen_buffer_size_x = 1
    popup_fill_attributes = 245
    fill_attributes = 7
    block_signature = 2684354562
    block_size = 204
has_console_data = 1
As always, I’d recommend reading through the LNK documentation to make sense of each field (the docs I’ve generated for the LNK module will also give details on each of these). But we’re going to focus on recreating Greg’s rule highlighted in the previous post.
The fields of interest here are window_size_x, window_size_y, screen_buffer_size_x and screen_buffer_size_y, all of which are set to 1. Therefore, we can recreate Greg’s rule using the LNK module as follows:
import "lnk"

rule Heuristic_LNK_SmallScreenSize {
    meta:
        description = "Adaptation of @greglesnewich's rule to find LNKs with a 1x1 console size"

    condition:
        lnk.console_data.window_size_x == 1 and
        lnk.console_data.window_size_y == 1 and
        lnk.console_data.screen_buffer_size_x == 1 and
        lnk.console_data.screen_buffer_size_y == 1
}
Hopefully the LNK module makes this rule both more readable (Greg did a great job commenting his rule to be clear), and more accessible to those who don’t want to go and comb through the LNK documentation like Greg and I both have!
What else can we do?
As can be seen in the data available, there are lots of different variables in this structure, including data to do with fonts, number of buffers available, etc.
Maybe we could also write a rule based on the window origin? I realised when re-reading the docs that the following variables in the CONSOLE_PROPS section are treated as signed integers:
ScreenBufferSizeX;ScreenBufferSizeY;WindowSizeX;WindowSizeY;WindowOriginX;WindowOriginY;
When manually editing the properties of the cmd.exe LNK, I could only get the window origin values to go down to -5. However, it still may be worth looking for LNKs that have a negative size window origin (maybe in an attempt to hide the LNK off the side of the main window?):
import "lnk"

rule Heuristic_LNK_Negative_Window_Origin {
    meta:
        description = "Detects LNKs that have a negative value window origin location"

    condition:
        lnk.console_data.window_origin_x < 0 and
        lnk.console_data.window_origin_y < 0
}
There’s no doubt that there are more possibilities for detections/clustering of LNKs based on the CONSOLE_PROPS values, so I’d be interested to see what people come up with based on the data available!
Day 22 - LNK CONSOLE_FE_PROPS
As you can hopefully see already, these ExtraData structure can provide a lot of useful data to work with from a threat hunting perspective.
Take the next section, CONSOLE_FE_PROPS for example. While this structure only really has one variable of interest, the CodePage which specifies a code page language code identifier may give away a crucial piece of information from an attribution/clustering perspective about the threat actor that generated it! I haven’t come across this structure in practice yet, but it could prove to be a useful field to write some heuristic rules based on different code page values.
If you would like to hunt for different LNKs with different ExtraData structures, each structure has a boolean variable that will indicate whether it is present or not. For example, lnk.has_console_fe_data will be set if the CONSOLE_FE_PROPS structure is in the LNK you are targeting.
import "lnk"

rule Heuristic_LNK_With_ConsoleFEData {
    meta:
        description = "Detects LNK with ConsoleFEData structure"

    condition:
        lnk.has_console_fe_data
}
Day 23 - LNK TRACKER_PROPS - Part 1
An ExtraData section I want to focus on is TRACKER_PROPS; one which people who have tried writing YARA rules for LNKs have likely come up against before. The structure specifies data that can be used to resolve a link target if it is not found in its original location when the link is resolved. In particular, the field MachineID which specifies the NetBIOS name of the machine where the link target was last known to reside can be a very valuable IoC for writing rules for LNKs.
The NetBIOS name is used as a human-friendly way of identifying Windows devices on a network. You can find out what you own NetBIOS name is by running nbtstat -n.
Luckily for us threat hunters, this field is left in by default in a lot of LNK files. This means that if a threat actor generates multiple LNK files from the same Windows instance (whether a physical device or a VM), this MachineID will be consistent across them if left unedited.
I’ve used this value several times to cluster LNK files together. For an example of this, let’s take an LNK from the IoCs of a Palo Alto blog on Trident Ursa (more commonly known as Gamaredon Group) and write a rule based on the MachineID:
import "lnk"

rule TridentUrsa_LNK_Machine_ID {
    meta:
        description = "Rule to pick up LNKs used by Gamaredon Group/Trident Ursa based on a unique MachineID"
        hash = "f119cc4cb5a7972bdc80548982b2b63fac5b48d5fce1517270db67c858e9e8b0"
        reference = "https://unit42.paloaltonetworks.com/trident-ursa/"
        reference = "https://github.com/pan-unit42/iocs/blob/master/Gamaredon/Gamaredon_IoCs_DEC2022.txt"

    condition:
        lnk.tracker_data.machine_id == "desktop-farl139"
}
Of course, this rule can also be written without the LNK module by relying just on strings. In a way, this is preferable, as you can hunt for this MachineID for LNKs attached to emails, dropped via HTML pages, etc.:
rule TridentUrsa_LNK_Machine_ID {
    meta:
        description = "Rule to pick up LNKs used by Gamaredon Group/Trident Ursa based on a unique MachineID"
        hash = "f119cc4cb5a7972bdc80548982b2b63fac5b48d5fce1517270db67c858e9e8b0"
        reference = "https://unit42.paloaltonetworks.com/trident-ursa/"
        reference = "https://github.com/pan-unit42/iocs/blob/master/Gamaredon/Gamaredon_IoCs_DEC2022.txt"

    strings:
        $ = "desktop-farl139"

    condition:
        any of them
}
Day 24 - LNK TRACKER_PROPS - Part 2
While I think the MachineID is the most useful component of the TRACKER_PROPS, it isn’t the only one we can use! There are two further variables called Droid and DroidBirth in this structure, which reprsent two GUID values to used to find the link target with the Link Tracking service.
I find the LNK documentation to be rather lacking in explaining how these GUIDs actually work/what they represent… Eric Zimmerman’s LECmd tool parses these values out as VolumeDroid and FileDroid, which maybe gives a bit more context, although these values aren’t specified in the LNK documentation.
Maybe these values are more well know to those who conduct forensics; but despite this, it is yet another value that could be useful in clustering LNK files together! (e.g. lnk.tracker_data.droid_volume_identifier == "\\x40\\x78\\xC7\\x94\\x47\\xFA\\xC7\\x46\\xB3\\x56\\x5C\\x2D\\xC6\\xB6\\xD1\\x15")
I elected in the LNK module to use the terms of droid_volume and droid_file to align with the LNK parsers, as I think these values are easier to reference.
So taking that example Trident Ursa LNK from the previous post, we can also write a YARA rule for its Droid values as well:
import "lnk"

rule TridentUrsa_LNK_Droid_Values {
    meta:
        description = "Rule to pick up LNKs used by Gamaredon Group/Trident Ursa based on unique Droid GUIDs"
        hash = "f119cc4cb5a7972bdc80548982b2b63fac5b48d5fce1517270db67c858e9e8b0"
        reference = "https://unit42.paloaltonetworks.com/trident-ursa/"
        reference = "https://github.com/pan-unit42/iocs/blob/master/Gamaredon/Gamaredon_IoCs_DEC2022.txt"

    condition:
        lnk.tracker_data.droid_birth_file_identifier == "\xc6\x1f\x17\xb9\xcc\x07\xeb\x11\xb4#\x08\x00'.\x05\x1d" or
        lnk.tracker_data.droid_birth_volume_identifier == "By\x013NQ\xa0G\xa1\xe0v\x7fh\xb9N\xa1" or
        lnk.tracker_data.droid_file_identifier == "\xc6\x1f\x17\xb9\xcc\x07\xeb\x11\xb4#\x08\x00'.\x05\x1d" or
        lnk.tracker_data.droid_volume_identifier == "By\x013NQ\xa0G\xa1\xe0v\x7fh\xb9N\xa1"
}
Day 25 - LNK Module Concessions
I’ve already raised this point, but to address something worth talking about, the LNK module isn’t always needed for the types of rules I’m showing. For example, you may have asked yourselves that for the two previous posts: “Why do I need the LNK module to write these LNK rules? Can’t I just use pure YARA?”. And you would be right! Here are the same two rules from the previous posts, but without needing the LNK module:
rule TridentUrsa_LNK_Machine_ID {
    meta:
        description = "Rule to pick up LNKs used by Gamaredon Group/Trident Ursa based on a unique MachineID"
        hash = "f119cc4cb5a7972bdc80548982b2b63fac5b48d5fce1517270db67c858e9e8b0"
        reference = "https://unit42.paloaltonetworks.com/trident-ursa/"
        reference = "https://github.com/pan-unit42/iocs/blob/master/Gamaredon/Gamaredon_IoCs_DEC2022.txt"

    strings:
        $ = "desktop-farl139"

    condition:
        any of them
}

rule TridentUrsa_LNK_Droid_Values {
    meta:
        description = "Rule to pick up LNKs used by Gamaredon Group/Trident Ursa based on unique Droid GUIDs"
        hash = "f119cc4cb5a7972bdc80548982b2b63fac5b48d5fce1517270db67c858e9e8b0"
        reference = "https://unit42.paloaltonetworks.com/trident-ursa/"
        reference = "https://github.com/pan-unit42/iocs/blob/master/Gamaredon/Gamaredon_IoCs_DEC2022.txt"

    strings:
        $file_identifier = {c6 1f 17 b9 cc 07 eb 11 b4 23 08 00 27 2e 05 1d}
        $volume_identifier = {42 79 01 33 4e 51 a0 47 a1 e0 76 7f 68 b9 4e a1}

    condition:
        any of them
}
These rules will pick up the same samples as the ones using the LNK module. In some ways you could argue that they’re even simpler:
- They don’t need to import any modules
- They can rely purely on strings
- If you don’t care about validating it’s an LNK, you can have much simpler condition
So why go to all the bother of writing a module for LNKs? Because I think that there is a lot of power in being able to manipulate these variables yourself.
For example, if you wanted to write a rule looking for LNKs with a MachineID that doesn’t start with desktop-, how would you do that using pure YARA? It’s not so straightforward, whereas the LNK module means you can do this:
import "lnk"

rule Heuristic_LNK_MachineID_Not_Starting_with_desktop {
    meta:
        description = "Detects LNK files that have a MachineID that doesn't start with 'desktop-'"

    condition:
        not lnk.tracker_data.machine_id startswith "desktop-"
}
The LNK module won’t always be ideal for your use case; but with the data parsed and served to you for you to work with and write rules on, I think it can give you a lot of flexibility to writing rules of your liking.
Day 26 - LNK Overlay
Capability I wanted to add to the LNK module was to allow for the creation of rules depending on if data is appended to an LNK! As such, there are two variables added:
lnk.has_overlay- A boolean value that is true if the LNK has extra data appended to itlnk.overlay_offset- An unsigned integer representing the offset into the LNK file of where the overlay starts (only set if the has_overlay flag is true)
This means it is possible to write rules based on looking for data from the end of an LNK file, such as the following:
import "lnk"

rule Heuristic_LNK_with_PE_Appended {
    meta:
        description = "Detects an LNK file that has had a PE file appended to it"

    condition:
        uint16(lnk.overlay_offset) == 0x5A4D
}
While you could equally look for strings like This program cannot be run in DOS mode in an LNK to try and find embedded PE files, these variables allow you to be more precise. For example, if you wanted to look for LNKs that have encrypted data appended to them, you could use a rule like this:
import "lnk"
import "math"

rule Heuristic_LNK_with_High_Entropy_Data_Appended {
    meta:
        description = "Detects LNK files appended with high entropy data (i.e. likely encrypted data)"

    condition:
        math.entropy(lnk.overlay_offset, filesize - lnk.overlay_offset) > 7.9
}
Day 27 - Malformed LNK Detection
A more experimental field I’ve added to the LNK module is lnk.is_malformed. This is a boolean field set if the LNK module fails to parse a file that otherwise has a valid LNK header.
Something that I learnt the hard way through writing the C code for the LNK module is about not trusting the data that is used as an input! If you assume a field is a particular size (either through a fixed length, or through parsing a field), then you can run into all kinds of vulnerabilities that could be exploited.
So the main purpose of this field is that if an LNK were designed to purposefully try to cause exceptions in a parser, this is something I’d want to catch; both from the perspective of making the code fail gracefully, but also from a potential detection standpoint! The dream would be that this variable is able to find an LNK exploiting some kind of vulnerability in a parser (I’m realistic in my expectations that this won’t happen, but I can dream).
The reality is that it’ll almost certainly catch either broken LNKs, or just be a useful way of finding edge cases that the LNK module doesn’t handle correctly.
Anyway, here’s a rule using this variable:
import "lnk"

rule Heuristic_Malformed_LNK {
    meta:
        description = "Detects a malformed LNK"

    condition:
        lnk.is_malformed
}
Day 28 - Future Considerations for the LNK Module
Like any of the YARA modules, I don’t see the LNK module as being “complete”. There have been some fantastic additions to the PE module over the years which create many more opportunities for detection, so there’s always more we can add.
First up, I would like for the LNK module to be merged into YARA. This may be a big undertaking in of itself; I wouldn’t want it to get merged in without proper review, as to not introduce any vulnerabilities, and to make sure that all the variables are laid out sensibly. However, if it gets merged in I will be happy. If it gets merged in, and available as a default module, I will be very happy.
So what is there to build on top of the LNK module? To start with, there needs to be a little more work done to parse all structures. For example, lnk.property_store_data has not had a parser written up for it yet, so that would be next on my todo list.
There are some structures in LNKs that I don’t fully understand yet. For example, the IDList structures aren’t that descriptively documented in the LNK documentation, but look to hold some useful data that we could parse for detection purposes.
Several of the parsed fields are awkward to use in their current format, such as the StringData values which are in unicode. I’d like to figure out how better to surface those.
And in general, I’d like to research what other variables would be useful to create in the LNK module. My motivation for this module was to make it as useful as possible for analysts trying to signature LNKs; if there’s something you’d want added to make your life easier, I would love to hear about it!
Day 29 - Combining the LNK Module with the Console Module
One of my earlier posts highlighted that you could print out all the variables parsed by the LNK module with the -D flag. This is really useful for getting a complete picture of a file, but would potentially need extra parsing to get the values you want.
Say you had a large set of LNK files and you wanted to get all the MachineID values out of them. Dumping all the information for every sample would be a bit excessive, and you may not want to dig out an LNK parser from elsewhere to work with.
With YARA’s recent Console module addition, this task becomes a lot more straightforward! In short, the Console module will log messages to stdout via the console.log() API. There are several different formats you can apply to this function, which involve either just printing strings, or printing messages alongside what you print. console.log() will also always evaluate to try, so you can insert it into rules without the fear of breaking their conditions.
So, to print all the MachineID values of a set of LNKs, we can use the following rule:
import "lnk"
import "console"

rule LNK_MachineID {
    condition:
        lnk.is_lnk and
        console.log("MachineID: ", lnk.tracker_data.machine_id)
}
You’ll need to do a little extra processing to get the results in a nice format (e.g. in this case using grep "MachineID: " to only parse out the MachineID values rather than the rule results), but hopefully this shows that YARA can be used for quick/straightforward file processing if you want it to!
Day 30 - Other Module Ideas
I’ve spent many posts now describing the capability of the LNK module; a module which I believe will make YARA more versatile. So what other modules would be good ideas to develop/include in YARA? Here are a few ideas:
- ZIP module
- RAR module
- ISO module
- Assembler module
- File identification module
ZIP/RAR module
This may be a bit misleading, as I don’t think YARA should be designed to decompress archive files. If you write YARA rules frequently, you’ve probably come up against the frustration of not being able to see in archives; but I think that’s a limitation we have to accept. It would remove a lot of the efficiency of YARA to start doing decompression.
However, a module to parse the metadata/file structure of these archives might be something very useful! That would open up possibilities to do some nice heuristics on compressed files without having to decompress them.
ISO module
Same reasoning as the ZIP/RAR module ideas, but highlighting this separately given the increased use of ISO files by threat actors!
Assembler module
This is a bit out there, but what if we could write rules using assembly language instead of hex bytes? Maybe this could make rules more readable? Maybe it could allow YARA to more easily convert bytes to assembly, and back again? Maybe it’s a silly idea? Sometimes we won’t know the answers unless we try!
File identification module
If you’re a malware analyst, chances are you’ll love tools like Detect It Easy (DIE). What if similar functionality was built into YARA itself? I know a lot of the signatures that DIE use could be converted directly into YARA rules, but this would potentially make YARA more convenient to use when writing signatures for specific file types.
Modules everywhere
What ideas would you want to see for a YARA module?
Day 31 - YARA Tip - Hex values in text strings - Part 1
Did you know that you can put specific hex values in YARA text strings?
You can write YARA rules specifically for hexadecimal strings, as follows:
rule Hex_String_Test {
    strings:
        $ = {AB CD EF 00}

    condition:
        any of them
}
You can write an equivalent for this rule using text strings by prepending each byte with \x, as follows:
rule Hex_Chars_in_Text_String_Test {
    strings:
        $ = "\xAB\xCD\xEF\x00"

    condition:
        any of them
}
This rule is equivalent to the one above! It can be useful if you want to have a mixture of ASCII/non-ASCII characters in a text string (and some other benefits that I’ll go into tomorrow).
Thank you to David Cannings (@edeca) for teaching me this (among many other YARA tips/tricks over the years!).
Day 32 - YARA Tip - Hex values in text strings - Part 2
A benefit of writing hex values in text strings is that it allows you to apply modifiers to these strings. For example, if you wanted to look for all one-byte XOR values of {AB CD EF 00}, you would have to compute those values yourself and write a rule with all 255 versions of them:
rule One_Byte_XOR_Hex_Strings {
    meta:
        description = "Detects all one-byte XOR values of {AB CD EF 00}"

    strings:
        $key_01 = {aa cc ee 01}
        $key_02 = {a9 cf ed 02}
        // ... truncated for size ...
        $key_fe = {55 33 11 fe}
        $key_ff = {54 32 10 ff}

    condition:
        any of them
}
Instead of going to all this effort yourself, and having a rule that has 255 lines of strings, you can use the xor modifier like this:
rule One_Byte_XOR_Hex_Strings {
    meta:
        description = "Detects all one-byte XOR values of {AB CD EF 00}"

    strings:
        $ = "\xAB\xCD\xEF\x00" xor(0x01-0xff)

    condition:
        any of them
}
Both of these rules are equivalent in what they achieve/the efficiency in which they achieve it (the xor modifier will still have to generate and check for each variation as specified), but the second one is much more succinct and requires a lot less effort on your part.
Day 33 - YARA Tip - Hex values in text strings - Part 3
To really drive home the point about the use of hex values in text strings, here’s a final example using the Base64 modifier in YARA:
rule Reflective_Loader_Shellcode_Base64_Encoded {
    meta:
        description = "Detects Base64 encoded reflective loader shellcode stub, seen for example in Meterpreter samples"
        hash = "ed48d56a47982c3c9b39ee8859e0b764454ab9ac6e7a7866cdef5c310521be19"
        hash = "76d54a57bf9521f6558b588acd0326249248f91b27ebc25fd94ebe92dc497809"
        hash = "1db32411a88725b259a7f079bdebd5602f11130f71ec35bec9d18134adbd4352"

    strings:
        // pop     r10
        // push    r10
        // push    rbp
        // mov     rbp, rsp
        // sub     rsp, 20h
        // and     rsp, 0FFFFFFFFFFFFFFF0h
        // call    $+5
        // pop     rbx
        $ = "\x4D\x5A\x41\x52\x55\x48\x89\xE5\x48\x83\xEC\x20\x48\x83\xE4\xF0\xE8\x00\x00\x00\x00\x5B" base64 base64wide

    condition:
        any of them
}
Here, I have taken the shellcode stub seen in Reflective loader samples, such as Meterpreter payloads. You can obviously just search for this hex string to find the PE/shellcode payloads; however given those may possibly only ever end up in memory, it might be better to hunt for the loaders as well.
So using the fact that we can use hex values in text strings, I’ve taken that shellcode stub, converted it to a text string, and applied the base64 and base64wide modifiers to find samples which have this shellcode Base64 encoded in them, which will catch PowerShell loaders for example!
This is one of those examples where you can take the string of one rule (i.e. finding Reflective Loader samples) and easily repurpose it for another one. You could also repeat this for one-byte XOR values too if you wanted!
Day 34 - Text strings vs. Hexadecimal strings
I’ve just spent the last few posts suggesting how effective it can be converting hexadecimal strings into text strings. However, as is usually the case, there are tradeoffs to using this approach.
You may have noticed already that the strings I used in the previous rules are “fixed”; there are no wildcards or variable chunks. Yet, these are the most useful features of using hexadecimal strings, as it allows you to write rules for code where you apply wildcards to mask off specific bytes to write more generic rules!
Wildcards and variable chunks are not possible in YARA text strings; instead you would need to start using regular expressions, but this also then loses the ability to apply certain modifiers:
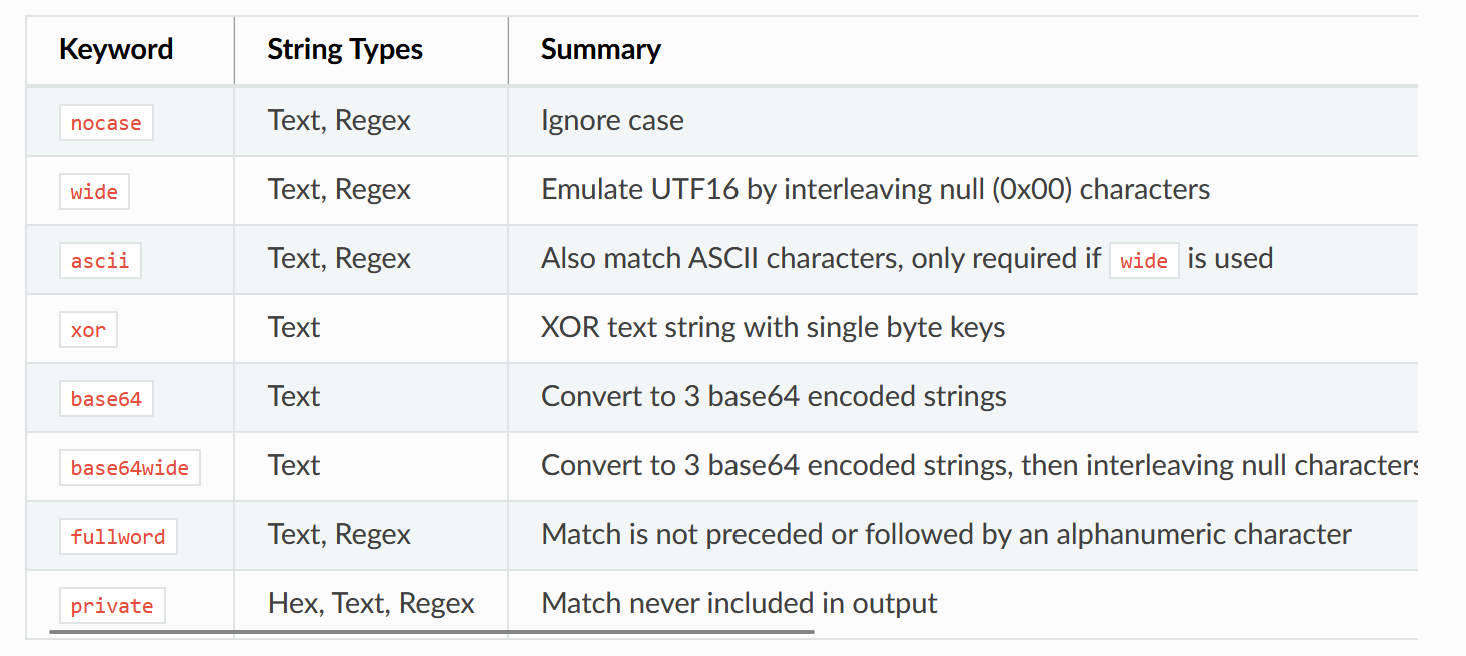
In summary, there’s usually going to be some tradeoff for the type of string you pick (text, hex, or regex) in YARA, but the more familiar you are with these tradeoffs, the better decisions you can make on which one to use!
Day 35 - YARA Atoms - Introduction
As you start getting more advanced in your usage of YARA, you will want to make sure you’re writing efficient rules. A good concept to understand in YARA is that of atoms, which are well explained in the code that implements them: https://github.com/VirusTotal/yara/blob/2b631d0ee47650923955398921c1ceccc3e38cb1/libyara/atoms.c
As the code points out:
Atoms are undivided substrings found in a regexps and hex strings. … When searching for regexps/hex strings matching a file, YARA uses these atoms to find locations inside the file where the regexp/hex string could match.
As such, if you are using using hex/regex strings which use wildcards/variable ranges, YARA will do some work behind the scenes to work out the best substrings to try and match the whole string you have specified. The code points out that sometimes this is straightforward, and you only need to search for one atom in a string to evaluate whether it matches. However, the more alternative sequences you add into your hex/regex strings (e.g. {ab cd (ef | 00)}), the more atoms may be needed to successfully evaluate a string match.
YARA will create an atom tree which it will then use to try and optimise using the least number of high quality atoms for searching in files. In the next post, we’ll discuss what makes good quality atoms.
Day 36 - YARA Atoms - Scoring atoms
The YARA code helpfully describes the heuristics used to score atoms, and provides some examples: https://github.com/VirusTotal/yara/blob/2b631d0ee47650923955398921c1ceccc3e38cb1/libyara/atoms.c#L117
It is worth noting before discussing this that by default the maximum atom length (set in the variable YR_MAX_ATOM_LENGTH) is set to 4, and as such the code discusses examples which are 4 bytes in length.
In ascending order, the scores given to each byte in an atom are as follows:
- Any fully masked byte (i.e.
0x??): -10 points - Any partially masked byte (e.g.
0x0?,0x?F): 4 points - Common bytes (i.e.
0x00,0x20,0xFF): 12 points - Letters (i.e.
[A-Za-z]): 18 points - All other bytes: 20 points
An extra score is added at the end which consists of twice the number of unique bytes in the atom. There is also a hidden check which heavily penalises atoms if all the bytes are equal and common (e.g. {00 00 00 00} is worth 12 + 12 + 12 + 12 + 2 = 50, but then has 10 * atom->length = 40 subtracted, meaning it’s only worth 10 points overal).
Example scores can be seen in the docs:
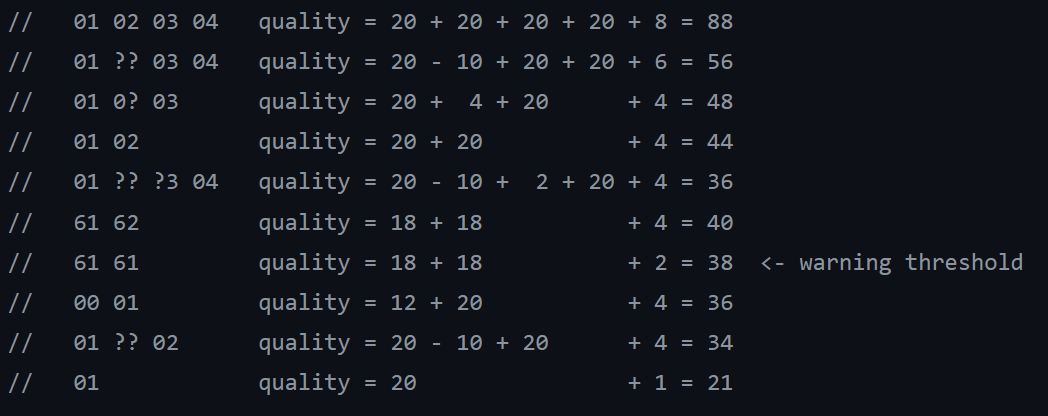
A warning threshold is set to 38 points (a set value found here, which is used to compare against atom qualities here). Any strings with the “best” atom falling below this threshold will yield a warning from YARA, which will look like: string "$" may slow down scanning
Day 37 - YARA Atoms - Writing rules using strings with good atoms
So what’s the takeaway from this discussion of atoms? You want good atoms in all your strings, and this will be focused around substrings that are of maximum length 4 and scored according to the rules specified in the previous post.
So to ensure you’re writing efficient rules, make sure to:
- Avoid strings with very short substrings (e.g.
{AB ?? ?? ?? CD}will only be able to useAB ?? ?? ??or?? ?? ?? CDas an atom, which are below the threshold) - Avoid relying on short substrings of only common bytes (e.g.
{00 20}is below threshold) - Avoid too many partial masked bytes (e.g.
{A? ?B C? ?D}is below threshold)
Instead, try to use strings that you know have good length atoms, and that have unique bytes.
It’s okay in some instances to have strings with bad atoms in them, provided that you have good atoms to make up for it. E.g. {00 20} is a bad string on its own, but {AB CD EF 00 20} is a good string, as YARA can use the atom AB CD EF 00.
YARA will still work even if you have bad atom strings, but don’t ignore those string "$" may slow down scanning warnings! Hunt down the rules which are causing issues, and see if you can fix those strings - it’ll help you out in the long run.
Day 38 - Math Module - Intro
So far we’ve discussed a few different types of YARA modules, mostly around file parsing. However, there are several modules that can be used on any file type, the math module being one of them.
It is described as such in the docs:
The Math module allows you to calculate certain values from portions of your file and create signatures based on those results.
Personally I’ve found it trickier to write rules using these functions, as it may be quite circumstantial how you want to use them. Regardless, let’s see what we can do with some of the available functions.
To start with, I’d recommend reading Wesley Shields’ (@wxs) intro guide to the math module which gives some great examples and explanations: https://gist.github.com/wxsBSD/019740e83faa7a7206f4
Day 39 - Math Module - Entropy
The function that I’ve seen used (and which I’ve used) the most from the math module, is math.entropy(). This returns the entropy of the input, which is described as “information density of the contents of the file”. The higher number returned out (which goes up to a maximum of 8), this means the more dense it is with information, i.e. it is closer to being “random”.
As such, a high entropy can indicate “random” data, which in some scenarios could indicate that the data itself is encrypted (i.e. good encryption algorithms will make the ciphertext look as random as possible).
Threat actors use encryption to obfuscate sections of malware (e.g. strings, configuration, next stages, etc.), meaning we can use entropy to try and find these. How you decide which parts of a file to scan for encrypted data is up to you. A rule that I’ve written before looking for possible samples possibly abusing MS13-098 can be found here: https://github.com/PwCUK-CTO/TheSAS2021-Red-Kelpie/blob/main/yara/ms13_098.yar
In this case, I’m looking for extra data at the end of a Microsoft digital signature, and checking to see if the entropy is high; that is, there is potentially an encrypted payload at the end of it.
Looking for anomalies like this (i.e. high entropy in unexpected places) can lead to some good heuristic rules!
Day 40 - Math Module - Entropy of PE sections
Some success of using the entropy function can be found in targeting specific sections of PE files. For example, as Tony Lambert points out in a blog, he uses a rule looking for encrypted resources in PE files: https://forensicitguy.github.io/adventures-in-yara-hashing-entropy/#matching-on-resource-entropy
Something that may help us to use the entropy function successfully is understanding the expected entropy of PE sections, to give us a rough idea of what is “normal”.
So, for example, using YARA itself I could run the following rule to print the entropy value of the .text section (i.e. the code section) of a PE file:
import "math"
import "console"
import "pe"

rule PE_Entropy_dottext_Section {
    condition:
        for any section in pe.sections : (
            section.name == ".text" and
            console.log(math.entropy(section.raw_data_offset, section.raw_data_size))
        )
}
On windows, if I run this rule across C:\Windows\system32, I can print out each .text entropy and save off the values. I can copy and paste the results from this straight into CyberChef, and using these formulas get the average entropy of a PE in this folder.
For my Windows installation, this mean value comes to 5.80 (with standard deviation 1.27). This makes sense, as code itself can appear “quite” random, but will have some structure to it based on consistent use of specific assembly instructions.
If I do the same for the .rdata section (i.e. the read-only data section which usually stores things like strings), the average is 3.54 (with standard deviation 1.46). This value is a lot lower than the .text section, which is to be expected as strings are generally “less random” than code.
Day 41 - Math Module - Entropy Performance
If you use the entropy function in your YARA rules, you may notice that the performance of these rules are slower in general compared to string only rules. This gets worse the bigger the data is that you are computing the entropy for. As such, it is undesirable to perform blind entropy checks against arbitrary files.
Instead, it is better to be smarter with your entropy checks. Florian Roth recommends using the fact that functions like math.entropy will only be evaluated in the condition if/when they need to reorder your conditions to not run them in every instance.
Another suggestion I remember seeing was that if you needed to compute entropy of a large amount of data, consider only checking the entropy of small chunks of the data instead. This may not give as accurate results, may give a performance boost! If you need more accurate results, you could first compute the entropy of a smaller chunk, and only then compute the entropy of the rest of the file.
For example, here is the same rule from the previous post, but only computing entropy of the first 2048 bytes of the .text section (if the section is smaller than this it will just compute the whole thing):
import "math"
import "console"
import "pe"

rule PE_Entropy_dottext_Section {
    condition:
        for any section in pe.sections : (
            section.name == ".text" and
            console.log(math.entropy(section.raw_data_offset, math.min(2048, section.raw_data_size)))
        )
}
Day 42 - Math Module - Monte Carlo Pi
The entropy function is the only measure of “randomness” in the math module (as an aside, see this Twitter thread started by @notareverser that gives a more nuanced look on what the entropy is measuring: https://twitter.com/notareverser/status/1623842328044527616). Another one to consider is the math.monte_carlo_pi function.
This function will use a Monte Carlo method of estimating the value of pi (3.14159265359...). This is done by taking the values which are input into the function, scaling them and placing them on a graph of a circle. By comparing the number of points that are inside vs. outside the circle, the value of pi can be estimated. The idea is that the more random points there are plotted in/out of the circle, the more accurate the estimation of pi will be. If the data isn’t very “random” though, the estimation won’t be as good.

The output of math.monte_carlo_pi is not the estimated value of pi, but rather the percentage difference between the true value of pi compared to the estimated one. As such, the lower the output of the function, the closer the estimation to pi was, and the more “random” the data was. The higher the number, the further away from pi the estimation, so the less random it was.
If I take a string that has no randomness, then we can see what a bad estimation looks like:
import "math"
import "console"

rule Bad_Monte_Carlo_Pi_Estimate {
    condition:
        console.log(math.monte_carlo_pi("\x00\x00\x00\x00\x00\x00\x00\x00\x00\x00\x00\x00\x00\x00\x00\x00\x00"))
}
In this case, the result is 0.273240, which is approximately (4 - pi) / pi (i.e. the estimated value of pi with this data is the value 4 - maybe good enough for engineering, not good enough for maths!). So this can be considered a bad estimation.
If I do the same test but instead of for null I use 0xFF:
import "math"
import "console"

rule Bad_Monte_Carlo_Pi_Estimate {
    condition:
        console.log(math.monte_carlo_pi("\xFF\xFF\xFF\xFF\xFF\xFF\xFF\xFF\xFF\xFF\xFF\xFF\xFF\xFF\xFF\xFF\xFF"))
}
Then the output for this is 1.000000 (i.e. pi would be computed to be 0, and so is 100% off the true value).
Alternatively, if I take some random data (10,000 bytes worth) and repeat this test against a file with the random data in it:
import "math"
import "console"

rule Monte_Carlo_Pi_Estimate {
    condition:
        console.log(math.monte_carlo_pi(0, filesize))
}
I get 0.019468, i.e. much closer to zero. For context, on the same data I get the entropy result of 7.981289.
So in short, data the appears random/compressed etc. is going to have a low value from this function as it better estimates pi, whereas as very ordered data is going to be higher in value. More experimentation is need to figure out what kind of outputs are good at “predicting” certain types of data!
Day 43 - Math Module - Serial Correlation
There’s still one more function used to determine “randomness” in the math module! And that is math.serial_correlation. This computation compares how much each byte depends upon the previous byte(s).
Whereas entropy and Monte Carlo pi had somewhat arbitrary upper and lower limits, the serial correlation will be between 0.0 and 1.0 (note: like with most of the math module output, it will be a floating point number), with closer to zero corresponding to more “random” data, and closer to one being more ordered data.
I’ve found in practice that this value will be negative sometimes, so that is something that might need to be considered in calculations. E.g., applying the following rule to the same random data as in the previous post using the following rule:
import "math"
import "console"

rule Serial_Correlation {
    condition:
        console.log(math.serial_correlation(0, filesize))
}
I got -0.019990, which feels like it’s too big to be a floating point rounding error! So it’s potentially worth applying two ranges checks to make sure you’re not missing negative numbers.
Day 44 - Math Module - Randomness Functions Efficiency Comparison
So we’ve got three different measures of “randomness” in the math module: entropy, Monte Carlo pi, and serial correlation. So, which one should you use?
Disregarding the mathematical nuances of each function, a potential way of answering this is by determing which is the most efficient function to use. Using Florian Roth and Arnim Rupp’s tool for measuring YARA performance, Panopticon, I ran each function against a bunch of files I grabbed from C:\Windows\system32 to get the following output:
[WARNING] Rule "entropy" slows down a search with 50 rules by 12.8011 % (Measured by best of 3 runs)
[WARNING] Rule "monte_carlo" slows down a search with 50 rules by 35.2246 % (Measured by best of 3 runs)
[WARNING] Rule "serial_correlation" slows down a search with 50 rules by 20.0926 % (Measured by best of 3 runs)
While this is somewhat anectodal, and results will vary between the baseline rules you use/samples you target/general reruns, this run of the tool shows that entropy performs the best, followed by serial correlation then Monte Carlo pi.
This is quite a gratifying result, as I (and many others) have used entropy as the main way of measuring “randomness” in YARA, so to know this is likely the most efficient of the functions means we don’t have to change too much in our approach.
However, hopefully what these posts/discussion around them have shown is that there is value in looking at these functions more closely to figure out how best they can be used! I know I will personally be trying to find new ways to use Monte Carlo pi and serial correlation in my rules going forward.
Day 45 - Math Module - Using min to bound loops
The math module comes with several convenient functions, including math.max() and math.min(). While you could certainly use these for maths related operations, they can have some other uses within your conditions.
In particular, if you’re using loops in YARA, you may find your self in positions where performance may become an issue; especially if you have nested loops (note: in general, try to avoid nested loops). Take the following hypothetical, convoluted rule for instance:
rule Loop_Test {
    strings:
        $foo = "foo"
        $bar = "bar"

    condition:
        for any i in (1 .. #foo) : (
            for any j in (1 .. #bar) : (
                @foo[i] ^ @bar[j] == 0xdeadbeef
            )
        )
}
This rule has a double for loop, looking for any instance where the addresses of two strings XOR to a specific value. The problem with this rule is that depending on how common the strings are, it may be searching for a long time! If you had say 500 occurances of $foo and 200 occurances of $bar, that’s up to 100,000 iterations in total to evaluate.
Instead, to ensure that the performance isn’t terrible for a loop like this, consider using math.min() to limit the number of iterations:
import "math"

rule Loop_Test {
    strings:
        $foo = "foo"
        $bar = "bar"

    condition:
        for any i in (1 .. math.min(#foo, 10)) : (
            for any j in (1 .. math.min(#bar, 10)) : (
                @foo[i] ^ @bar[j] == 0xdeadbeef
            )
        )
}
This will ensure that only the first 10 instances of each string are compared, which is a max 100 iterations in comparison.
Note that using this approach has the chance of missing many checks, so bear that in mind. In practice, your circumstances will change a lot between rules, but considering that you should bound these loops should be a priority for the sake of performance!
Day 46 - YARA Command Line Flags - Intro
Let’s look at something a bit different from talking about writing rules themselves, and instead think about how we run them. YARA comes with a variety of flags that can be added when running the tool from the command line.
Using the pre-release for YARA 4.3.0, the following commands are available:
YARA 4.3.0, the pattern matching swiss army knife.
Usage: yara [OPTION]... [NAMESPACE:]RULES_FILE... FILE | DIR | PID

Mandatory arguments to long options are mandatory for short options too.

       --atom-quality-table=FILE           path to a file with the atom quality table
  -C,  --compiled-rules                    load compiled rules
  -c,  --count                             print only number of matches
  -d,  --define=VAR=VALUE                  define external variable
       --fail-on-warnings                  fail on warnings
  -f,  --fast-scan                         fast matching mode
  -h,  --help                              show this help and exit
  -i,  --identifier=IDENTIFIER             print only rules named IDENTIFIER
       --max-process-memory-chunk=NUMBER   set maximum chunk size while reading process memory (default=1073741824)
  -l,  --max-rules=NUMBER                  abort scanning after matching a NUMBER of rules
       --max-strings-per-rule=NUMBER       set maximum number of strings per rule (default=10000)
  -x,  --module-data=MODULE=FILE           pass FILE's content as extra data to MODULE
  -n,  --negate                            print only not satisfied rules (negate)
  -N,  --no-follow-symlinks                do not follow symlinks when scanning
  -w,  --no-warnings                       disable warnings
  -m,  --print-meta                        print metadata
  -D,  --print-module-data                 print module data
  -M,  --module-names                      show module names
  -e,  --print-namespace                   print rules' namespace
  -S,  --print-stats                       print rules' statistics
  -s,  --print-strings                     print matching strings
  -L,  --print-string-length               print length of matched strings
  -X,  --print-xor-key                     print xor key of matched strings
  -g,  --print-tags                        print tags
  -r,  --recursive                         recursively search directories
       --scan-list                         scan files listed in FILE, one per line
  -z,  --skip-larger=NUMBER                skip files larger than the given size when scanning a directory
  -k,  --stack-size=SLOTS                  set maximum stack size (default=16384)
  -t,  --tag=TAG                           print only rules tagged as TAG
  -p,  --threads=NUMBER                    use the specified NUMBER of threads to scan a directory
  -a,  --timeout=SECONDS                   abort scanning after the given number of SECONDS
  -v,  --version                           show version information

Send bug reports and suggestions to: vmalvarez@virustotal.com.
In the next few posts we’ll talk about some tips for using the different command lines flags! I’ll be running commands on Windows, which means the binary for YARA will be named yara64 (you may just have a binary called yara if you’re running on Linux/macOS).
I’ll aim to put these tips into the categories of utility (i.e. helping those who are writing the rules) and performance (i.e. options to make YARA perform better).
First tip is to check on occasion that you’re using an up to date version of YARA. You can check this with yara64 --version.
Day 47 - YARA Command line: Performance - Compiled YARA Rules
One of the first flags you may spot for YARA is -C to load compiled rules. Before YARA can start evaluating rules against files, it will compile them into a format that can be read by the tool.
You may have noticed that when you download/compile YARA that you have an additional binary called yarac64 (or just yarac), which has the following command line arguments:
Usage: yarac [OPTION]... [NAMESPACE:]SOURCE_FILE... OUTPUT_FILE

       --atom-quality-table=FILE        path to a file with the atom quality table
  -d,  --define=VAR=VALUE               define external variable
       --fail-on-warnings               fail on warnings
  -h,  --help                           show this help and exit
       --max-strings-per-rule=NUMBER    set maximum number of strings per rule (default=10000)
  -w,  --no-warnings                    disable warnings
  -v,  --version                        show version information

Send bug reports and suggestions to: vmalvarez@virustotal.com
As such, you can use this to pre-compile your rules for YARA. There are some downsides to this, including:
- the compiled rules will only work with the version of YARA that they’ve been compiled for
- the filesize of the compiled rules will be signficantly bigger than the original rule files
- you won’t be able to YARA rules directly in the compiled ruleset
However, the big advantages come into play if you’re constantly running YARA rules against samples (i.e. in some kind of automated fashion), as by compiling them in advance you are saving a lot of processing that YARA needs to do each time it is run.
Day 48 - Decompiling YARA rules
As an aside, don’t consider it impossible for the compiled YARA rulesets to be “decompiled”. For example, Hilko Bengen (@_hillu) gave a great talk on the YARA compiler itself (reference: https://www.youtube.com/watch?v=zPRLxNq8XbQ) which included tools for disassembling YARA bytecode. There is also an old (archived) project for decompiling YARA rules, although I haven’t tested whether this still works as expected.
Why is this important? If you’re using open source rules to scan files, then this isn’t going to be a concern for you. However, if you’re running proprietary rulesets, and assume that compiling them means they cannot be returned to source code, then that is a bad assumption. If someone really wanted to, they could go to the effort of reversing them.
Day 49 - YARA Command line: Performance - Timeout
If you don’t want your YARA rules to run for too long, you can manually provide a timeout setting with the -a flag. From my testing, this value in seconds will give a timeout to all rules input. If you’re running against an individual file, each rule will sequentially evaluate against the file, and stop if the timeout is reached. If running against a directory, then files will be processed one at a time, evaluating each rule, and will stop if the timeout is reached.
Therefore, you may get partial results against directories/subdirectories, but the timeout will cut off all further processing once reached.
This flag is useful if, for instance, you want to run against a live system and don’t want to tank the CPU for too long, but only use it if you’re comfortable not getting a full set of results if the timeout is reached!
Day 50 - YARA Command line: Performance - Fast scan
The -f flag enables YARA to run in fast scan mode, but it isn’t immediately clear what this means. However, there is some documentation on this feature (search for SCAN_FLAGS_FAST_MODE on the following page): https://yara.readthedocs.io/en/stable/capi.html?highlight=fast#scanning-data-1
As the docs point out:
The SCAN_FLAGS_FAST_MODE flag makes the scanning a little faster by avoiding multiple matches of the same string when not necessary. Once the string was found in the file it’s subsequently ignored, implying that you’ll have a single match for the string, even if it appears multiple times in the scanned data. This flag has the same effect of the -f command-line option described in Running YARA from the command-line.
For strings that are common and appear multiple times in files, this flag will speed things up/possibly prevent errors. However, as the description mentions, this comes at a cost: implying that you'll have a single match for the string, even if it appears multiple times in the scanned data
As such, any rules that rely on the count of a string (i.e. the count of string $test can be obtained via #test), or iterating over offsets to string (i.e. the 5th occurance of $test would be @test[5] - yes, they are indexed from 1) will not properly evaluate.
Edit
CORRECTION: Wesley Shields pointed out a threat to me that explains some of the nuance of fast mode better: https://twitter.com/wxs/status/1627278414926184450
In short, fast mode will still mean rules evaluate correctly no matter what condition you use; it’s more about the fact that YARA won’t need to store references to every string depending on the condition, which can save some processing at the expense of not displaying those strings to the user.
For example, the following rule:
rule test {
    strings:
        $foo = "foo"

    condition:
        any of them
}
when run on the following data:
foobarfoo
will give the following output with -s:
0x0:$foo: foo
0x6:$foo: foo
and the following with -f -s:
0x0:$foo: foo
As you can see, it doesn’t return the second instance of foo. But, if we update the rule to the following:
rule test {
    strings:
        $foo = "foo"

    condition:
        #foo == 2
}
it will still evaluate correctly whether in fast mode or not, and give the following strings as output:
0x0:$foo: foo
0x6:$foo: foo
I.e. you’re still running in fast mode, but getting every string returned, as the condition still needs to rely on the count of them!
Thank you Wesley for pointing this out, I feel like I understand this mode a lot better now!
Day 51 - YARA Command line: Performance - Skip larger
If you’re running YARA rules over a large file system, a challenge you may run into is that you may scan very large files. While this may be what you want, depending on your rules this could also lead to a lot of processing being necessary.
Since YARA v4.2.0, there is a --skip-larger (or -z) flag, which can be used to ignore files past a specified size when running in recursive mode (i.e. with the -r flag). If you use this flag, for every file larger than the specified size you will get an error message sent to stderr with the following format:
skipping FILENAME (SIZE_OF_FILE bytes) because it's larger than SPECIFIED_SKIP_SIZE bytes.
Consider using this to save some processing time, accepting the fact that you might miss some files in the process!
Day 52 - YARA Command line: Performance - Multi-threading
When scanning directories (or scanning a list of files), YARA can run in a multi-threading mode. You can use the --threads (or -p) to specify the maximum number of threads you want to use.
The maximum number of threads is set in the variable YR_MAX_THREADS, which is set to 32 by default. In reading the code, it appears that YARA will set the default threads count to be that of the maximum, so this flag is more so used for if you want to set a lower amount of threads to run (which may be advisable if you’re running on a live system that you don’t want to slow down too much, for example).
Day 53 - YARA Command line: Performance - Memory scanning
Did you know that YARA scan be used to scan the memory of a system? You don’t need to necessarily aquire a copy of the memory to run rules over it; rather you can specify the process ID (PID) as specified in the usage:
Usage: yara [OPTION]... [NAMESPACE:]RULES_FILE... FILE | DIR | PID
You can limit the size of the largest memory chunk with the --max-process-memory-chunk=NUMBER flag (which by default is 1GB).
In practice I don’t find myself using YARA to scan memory that often, but it’s a nice option to have, especially if you want to test things like in-memory config extraction!
Day 54 - YARA Command line: Utility - Count flag
A flag I forget about a lot is the -c flag (note that it’s lowercase this time). Rather than displaying the rulename + filepath of each rule hit, it will instead display each file that has been scanned, and return the number of rules that have hit against it.
While you lose the context of which rules have evaluated to true against which files, it can be a useful way of getting an idea of if you’re missing any samples with the rules you’ve written. E.g. if you’ve collected your samples of interest in a specific directory, and all your rules in one file, you can quickly an easily see what samples you’re missing rules for/still need to signature.
Day 55 - YARA Command line: Utility - Negate
A really useful flag to use when testing whether your rules are working properly is the negate flag. By using --negate (or -n), YARA will return every rule that doesn’t hit on a file.
I use this option for if I’m testing a rule, and can’t figure out why a more complicated condition isn’t hitting on a file. If the rule doesn’t hit, I combine -n with -s to see which string are found in the file, which means I can then go and fix the ones that potentially aren’t working as expected.
Day 56 - YARA Command line: Utility - String lengths
So you probably know you can displayed matched strings with the -s flag. But did you know, that you can display the matched string lengths with with --print-string-length (or -L) flag?
This is a pretty cool flag, that may not have immediately understandable benefits. You might be thinking “don’t I already know the length of my strings?”. And the answer is yes, but not in all cases. In fact, if you’ve used wildcards/ranges in hex/regex strings, the length of your string may be variable!
You can retrieve the length of a matched string by using the ! operator (i.e. the first occurance string of $s will have length !s[1]).
Day 57 - YARA Command line: Utility - Scan list
If you want to use YARA to scan only a specific set of files, rather than every file/subdirectory of directory, you can use the --scan-list flag. Here you can pass individual files, or directories themselves, as a newline separated list, which YARA will then run through.
This could be really useful if you want to do a targeted scan of an endpoint. Be pre-determining the directories you want to scan (or not scan), this could make your life a lot easier!
At the time of writing, I’m having some issues getting this to work as expected on Windows, but it works fine on Linux. Might be on that needs a pull request to fix for Windows!
Day 58 - Accessing data at specified offsets
A feature of YARA I’ve used a few times so far in these posts are the operations to do comparisons of (unsigned) integer values at specific offsets in files. You can see the documentation for this feature here: https://yara.readthedocs.io/en/stable/writingrules.html#accessing-data-at-a-given-position
As highlighted in the docs, there are several types of functions you can use to access data at certain offsets:
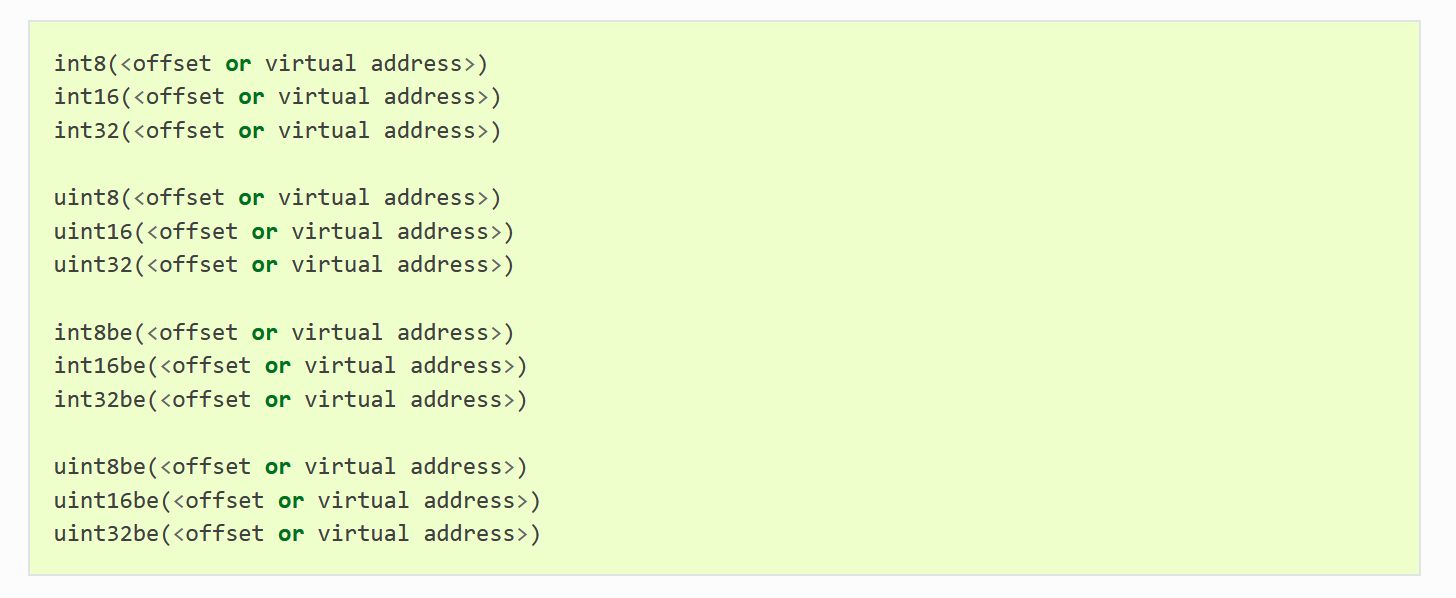
In short, you can either access signed or unsigned integer values, which are either of size:
- 8-bits (i.e. 1 byte)
- 16-bits (i.e. 2 bytes)
- 32-bits (i.e. 4 bytes)
For each variation of these, you can also choose the endianess (that is, the order of the bytes). By default, little endian is used (i.e. the least signficant byte is evaluated first), but you can add be into the function to change it to big endian. Personally, I prefer using big endian where possible, as that is as if bytes are in the order that they appear in the file.
Why is this useful?
Whereas YARA is primarily designed for string matching, the fact you can access data at certain offsets means you can be very specific in how you write your rules. In particular, it makes it possible to be specific in the types of files you want to run your rules over, based on checking file headers. We’ll spend a few posts discussing this.
Day 59 - File classification: PE files
If you write a lot of YARA rules for Windows malware, you will get very used to writing this condition.
As can be seen in the docs, the following rule can be used to identify portable executable (PE) files, which is the executable file format for Windows:
rule IsPE
{
    condition:
        // MZ signature at offset 0 and ...
        uint16(0) == 0x5A4D and
        // ... PE signature at offset stored in MZ header at 0x3C
        uint32(uint32(0x3C)) == 0x00004550
}
This rule is very useful in how descriptive it is. The comments explain the reasoning behind the checks.
The first check is looking for the bytes MZ, which is the start of the DOS stub (an artefact of MS-DOS). If you read the PE documentation that I’ve linked to, you’ll see that it specifies that at offset 0x3c is a pointer to where the PE header begins, which should start with the bytes PE\x00\x00. As such, this is why the second check uses two uint32 calls; one to get the pointer, and the other to get the data pointed to.
If you look closely at the rule, you’ll realise that both the MZ and PE strings are reversed. This is because, as highlighted in the previous post, the default for these functions is little endian. So you could equivalently write the rule as:
rule IsPE
{
    condition:
        // MZ signature at offset 0 and ...
        uint16be(0) == 0x4D5A and
        // ... PE signature at offset stored in MZ header at 0x3C
        uint32be(uint32(0x3C)) == 0x50450000
}
Note: I can’t change the inner uint32 comparison as that pointer will be little endian; but I can change the comparisons.
Why would you choose one over the other? It’s really a matter of preference. The only technical limitation is that the big endian versions were only added in YARA v3.2.0, which was released in November 2014. Ideally, you should be using the latest version, but I believe some tools out there still rely on older versions of YARA.
Day 60 - File classification: PE files - Alternative approaches
It can be worth building in some redundancy into the ways you can classify files, in case obfuscation is applied to throw off standard signatures!
For the PE file format, an alternative way of signaturing this file may be to look at the MS-DOS stub: https://learn.microsoft.com/en-us/windows/win32/debug/pe-format#ms-dos-stub-image-only
As described in the documentation:
The MS-DOS stub is a valid application that runs under MS-DOS. It is placed at the front of the EXE image. The linker places a default stub here, which prints out the message “This program cannot be run in DOS mode” when the image is run in MS-DOS. The user can specify a different stub by using the /STUB linker option.
So we have two options. Either looking for the string This program cannot be run in DOS mode, or having a signature for the DOS stub itself. Given we’re focusing on offsets at the moment, we’ll do the latter.
Take for example calc.exe, the DOS stub begins at offset 0x40, and is made up of the following bytes:
0E 1F BA 0E 00 B4 09 CD 21 B8 01 4C CD 21
The following blog post has an annotated screenshot of this code: https://osandamalith.com/2020/07/19/exploring-the-ms-dos-stub/
So if we take the first few bytes of this stub, we could create the following rule:
rule IsPE {
    condition:
        uint32be(0x40) == 0x0E1FBA0E
}
So this is a potential alternative approach to finding PE files! What I would caution though is that the documentation above states that The user can specify a different stub by using the /STUB linker option, meaning that these bytes won’t be as consistent. However, it may be interesting to look for alternative DOS stubs in PE files to see what is being used!
Day 61 - File classification: PE files - Sufficient checks
Most of the time if I’m writing a rule to classify PE files, I will abbreviate my condition to:
rule IsPE
{
    condition:
        uint16(0) == 0x5A4D
}
That is, I’m only checking for the MZ string. Is that enough? Is that sufficient to determine whether a file is a valid PE?
The short answer is no. By doing this, I’m avoiding checking the PE\x00\x00 string. Neither am I checking for the This program cannot be run in DOS mode string which would be printed out by the DOS stub. I’m certainly not checking for whether the rest of the PE header is valid, or if the sections fit the specific provided, etc.
However, the check uint16(0) == 0x5A4D is “good enough”. If a file on a machine starts with the characters MZ, chances are it is a PE file (there’s always the PE module you can use if you want a more thorough check). However, if it isn’t a valid PE, this is potentially already a good chance to start writing rules for anomalous files…
Consider the following for instance:
rule `Heuristic_MZ_Bytes_At_File_Start_Without_DOS_String {
    strings:
        $dos_string = "This program cannot be run in DOS mode"

    condition:
        uint16(0) == 0x5A4D and not $dos_string
As described, this rule will fire if there is no DOS string in a file that starts with MZ. While I can imagine this will yield a lot of FPs, it is one of those rules that could be a useful threat hunting edge case, in case threat actors are trying to hide data in weird ways!
Day 62 - File classification: ELF files
What other file types can we write conditions for? Let’s consider some other executable file formats, starting with Executable and Linkable Format (ELF).
This file format is used in Linux, and like PE files it has some “magic bytes” at the start of the binary (as seen in this example from Wikipedia):

As the specification lays out, ELF files will start with the byte 0x7f followed by the characters ELF. We can write a YARA rule for this as follows:
rule IsELF {
    condition:
        uint32be(0) == 0x7f454c46
}
Note that I’m using the big endian version here, as it means I can copy the bytes straight into the rule in order. You can do a little endian equivalent using uint32(0) == 0x464c457f. Again, up to you what you prefer.
Day 63 - File classification: ELF files - 32 bit or 64 bit?
Let’s say we wanted to write a YARA condition to find 64-bit ELF binaries (without using the ELF module). Let’s look at the specification again: https://en.wikipedia.org/wiki/Executable_and_Linkable_Format
The byte at offset 0x4 is either set to 1 for 32-bit binaries, and 2 for 64-bit binaries. Now we can’t write this rule with just one check; there is no uint40 operator unfortunately. However, we can combine multiple checks together to make this work:
rule IsELF_64bit {
    condition:
        // Check for ELF header
        uint32be(0) == 0x7f454c46 and
        // Byte at offset 0x4 is 1 for 32-bit, 2 for 64-bit
        uint8(4) == 2
}
Couple of notes for this rule:
- It doesn’t really matter if I use
uint8oruint8befor the 32-bit/64-bit check, as the endianess doesn’t matter when we’re dealing with one byte; - You can either use decimal or hexadecimal representations of numbers in YARA; here I’m using the fact that
0x4is equivalent to decimal4in the rule (equally I could use that0x7f454c46is equivalent to2135247942, but that makes the rule a lot less clear about what it is checking); and, - You can use
intoruintas long as you’re careful. Here, if I make both checksint, it will still work. But you’ll need to be careful if you’re doing checks against large values (especially if you don’t know what they are ahead of time), as you might have to factor in that theintversions can also be negative numbers. I tend to useuintfor ease of knowing the number will always be positive.
Day 64 - File classification: ELF files - Number of sections case study - Part 1
As a case study for ELF files, let’s consider a slightly more complicated case. Again, we’ll reference the specification: https://en.wikipedia.org/wiki/Executable_and_Linkable_Format
If I want to write a rule without using the ELF module to find ELF binaries with only one section (which could be an anomaly if combined with other heuristics), then I need to check a specific offset in the file. However, this offset changes depending on whether the binary is 32-bit or 64-bit; the offets at 0x30 and 0x3c respectively.
Fortunately, the rule in our previous post guides us on how to check for 32/64-bit binaries. But we run into another problem in that YARA doesn’t have if/elseif/else statements. So how do we make sure we use the right offset?
By using or statements, we can make branching statements based on the fact that if one statement in total evaluates to false, it will move on to the next one. As such, we can create an implicit if/elseif statement using the following:
rule Heuristic_ELF_with_One_Section {
    condition:
        uint32be(0) == 0x7f454c46 and
        (
            // 32-bit
            (
                uint8(4) == 1 and
                uint16(0x30) == 1
            )
            or
            // 64-bit
            (
                uint8(4) == 2 and
                uint16(0x3c) == 1
            )
        )
}
I.e., if we see it is 32-bit, we check offset 0x30; if either of the statements in that block are false, the or statement will then check the second block, which will do a 64-bit check (i.e. checking offset 0x3c).
I’ll talk in the next post about ways of simplifying this condition a bit.
Day 65 - File classification: ELF files - Number of sections case study - Part 2
If you trust the ELF file format enough, we could convert the if/elseif equivalent statements from the rule in the previous post to an if/else equivalent statement, relying on the fact that if it isn’t 32-bit, it must be 64-bit:
rule Heuristic_ELF_with_One_Section {
    condition:
        uint32be(0) == 0x7f454c46 and
        (
            // 32-bit check
            (
                uint8(4) == 1 and
                uint16(0x30) == 1
            )
            or
            // Assume 64-bit if 32-bit check fails
            uint16(0x3c) == 1
        )
}
This is a condition with less checks involved, but is maybe a little less clear than the previous rule! Adding some comments can clear things up a bit, and I think in general we should strive to make our rules as clear as possible (so maybe in your use case, the rule in the previous post is better as it is more clear on how it works).
That said, I’ll show in the next post how to reduce this condition even further…
Day 66 - File classification: ELF files - Number of sections case study - Part 3
If you want to get more creative, and decide you want the number of sections computation done in one line, you could do the following:
rule Heuristic_ELF_with_One_Section {
    condition:
        uint32be(0) == 0x7f454c46 and
        uint16(0x30 + ((uint8(4) - 1) * 0xc)) == 1
}
I.e., if the binary is 32-bit, the expression (uint8(4) - 1) * 0xc will collapse to zero, meaning the uint16 check will point at the 0x30 offset. If it is 64-bit, it will become 0xc, which will then be added to the 0x30 offset (i.e. 0x3c). To be honest I think this is unnecessary, and maybe even less efficient (i.e. the previous post’s rule will do up to three equals comparisons for the sections check, and while this rule only does one equals comparison it adds three mathematical operations), but I wanted to show this is possible! There’s probably an even more efficient way of doing it using logical & operations; let me know if you have a better approach!
I hope that by highlighting that despite YARA not having the traditional conditional statements that are expected of programming languages, you can still use the conditions available to create the logical statements you’re after.
Or just use a module…
Overall, these conditions can start to get quite complicated, so if you’ve got a module available to help, it might just be easier to use that. Here’s the same rule but in its module form:
import "elf"

rule Heuristic_ELF_with_One_Section {
    condition:
        elf.number_of_sections == 1
}
Day 67 - File classification: Mach-O files
Another executable file format is Mach-O, which is used in macOS. The magic bytes at the start of a Mach-O binary can vary, as highlighted in this blog: https://redmaple.tech/blogs/macho-files/
In particular, something I saw when looking up these values is that 0xCAFEBABE (used for Mach-O FAT binaries) is also used for Java .class files, meaning we might misclassify some files if just relying on this value! However, Apple has a hacky approach of getting around this based on Java versions: https://opensource.apple.com/source/file/file-80.40.2/file/magic/Magdir/cafebabe.auto.html
In short, the the 16-bit value at offset 0x4 would tell us the Java version, the lowest value of which is apparently 0x30. For Mach-0, the 32-bit value at offset 0x4 identifies the architecture, which according to the linked docs (which were written in 2018 so there may be later versions) only goes up to version 18. So, we could rely on the following to avoid trying to get false positives:
rule IsMacho {
    condition:
        uint32(0) == 0xfeedface or    // the mach magic number
        uint32(0) == 0xcefaedfe or    // NXSwapInt(MH_MAGIC)
        uint32(0) == 0xfeedfacf or    // the 64-bit mach magic number
        uint32(0) == 0xcffaedfe or    // NXSwapInt(MH_MAGIC_64)
        (
            uint32(0) == 0xcafebabe and    // Mach-O FAT binaries
            uint16(4) < 0x30               // Avoid Java classes
        )
}
I definitely want to learn more about macOS; I can highly recommend checking about Daniel Stinson’s (@shellcromancer) posts for #100DaysofYARA, as he has covered so far several different macOS malware families/heuristic rules: https://github.com/shellcromancer/DaysOfYARA-2023/tree/main/shellcromancer
Day 68 - File classification: ISO files
We’ve looked at some of the most common executable file formats so far, but there are so many more types of files out there that we may want to classify with YARA! One of the best resources I’ve seen to list a large variety of file signatures is the following: https://www.garykessler.net/library/file_sigs.html
For example, for optical disk images (ISO), which have been increasingly used by threat actors in recent times, has the following description from the above linked resource:
43 44 30 30 31 	  CD001
ISO               ISO-9660 CD Disc Image
This signature usually occurs at byte offset 32769 (0x8001), 34817 (0x8801), or 36865 (0x9001).
This gives us the exact information we need to write a condition to target ISO files. We can either do this using the uint functions:
rule IsISO {
    condition:
        (uint32be(0x8001) == 0x43443030 and uint8(0x8005) == 0x31) or
        (uint32be(0x8801) == 0x43443030 and uint8(0x8805) == 0x31) or
        (uint32be(0x9001) == 0x43443030 and uint8(0x9005) == 0x31)
}
Or using strings:
rule IsISO {
    strings:
        $iso_sig = "CD001"

    condition:
        $iso_sig at 0x8001 or
        $iso_sig at 0x8801 or
        $iso_sig at 0x9001
}
Day 69 - File classification: Strings vs. offsets - Part 1
In the previous psot, I showed two different ways to classify ISO files; one using uint checks, and another using strings. Why would you pick one over the other?
One way I see people write rules to check if a file is a PE is as follows:
rule IsPE {
    strings:
        $mz = "MZ"
        // equally you could use $mz = {4d 5a}

    condition:
        $mz at 0
}
As a rule, this is fine. The atom {4d 5a} is not going to be flagged by YARA as “slowing down your scanning”. And it follows the same logic that the uint16(0) == 0x5A4D check. In fact, when testing this in the current version of YARA, the simple condition of just $mz at 0 means that YARA will stop trying to find other instances of MZ once it has found the first one!
EDIT: As Wesley Shields pointed out to me, there are some inaccuracies in the following section. I believe some of my testing was inaccurate due to a typo in one of my rules, and so I would not rely on the following description that has been struck through (I want to leave it in for reference).
The following post will do some further tests to try and make some more sense of what is going on!
A potential performance issue appears when you start to introduce other strings/parts of the condition. For instance, the following rule:
rule IsPE {
    strings:
        $mz = {4d 5a}
        // equally you could use $mz = {4d 5a}

        $foobar = "foobar"

    condition:
        $mz at 0 and any of them
}
If you run this rule, and print out the matched strings, you will see that it will try to search for every instance of MZ unlike the other rule, even though we only care about whether it appears at offset 0. This is not as good performance-wise; if you’re scanning compressed/encrypted data, the chances of the bytes {4d 5a} appearing in many places increases! This means YARA will have to scan for the atom {4d 5a} everywhere, and record each location of its appearence (unless we specify YARA to run in fast mode with the -f flag that is).
Alternatively, the check uint16(0) == 0x5A4D doesn’t rely on strings, meaning we don’t have to search for MZ everywhere to evaluate the condition. These bytes will either be at the start of the file where we have specified, or they won’t, meaning the check is usually quicker.
Day 70 - File classification: Strings vs. offsets - Part 2
In the previous post I attempted to discuss some of the potential tradeoffs of using strings vs. offsets. However, there were some inaccuracies in my approach (thank you to Wesley Shields for pointing this out). I still need to look at the source code of YARA more in detail to see how the YARA searching algorithm changes depending on how large the file, but for now let’s do some further tests to see what potential differences there could be between strings and offsets.
Let’s consider the worst case scenario - large files of random data where the bytes {4d 5a} may occur often. To simulate this, I generated some random files of varying size:
import os

with open("1kb.bin", "wb") as outfile:
    outfile.write(os.urandom(1024))

with open("200kb.bin", "wb") as outfile:
    outfile.write(os.urandom(1024 * 200))

with open("500kb.bin", "wb") as outfile:
    outfile.write(os.urandom(1024 * 500))

with open("1mb.bin", "wb") as outfile:
    outfile.write(os.urandom(1024 * 1024))

with open("200mb.bin", "wb") as outfile:
    outfile.write(os.urandom(1024 * 1024 * 200))

with open("500mb.bin", "wb") as outfile:
    outfile.write(os.urandom(1024 * 1024 * 500))

with open("1gb.bin", "wb") as outfile:
    outfile.write(os.urandom(1024 * 1024 * 1024))

with open("10gb.bin", "wb") as outfile:
    outfile.write(os.urandom(1024 * 1024 * 1024 * 10))
And ran the following rules through Panopticon:
rule Just_Str_MZ_At_0 {
    strings:
        $mz = "MZ"

    condition:
        $mz at 0
}

rule Str_MZ_At_0_And_Extra_String {
    strings:
        $mz = "MZ"

        $foobar = "foobar"

    condition:
        $mz at 0 and $foobar
}

rule Str_MZ_Anywhere {
    strings:
        $mz = "MZ"

    condition:
        any of them
}

rule Just_Offset_MZ_At_0 {
    condition:
        uint16(0) == 0x5A4D
}

rule Offset_MZ_At_0_And_Extra_String {
    strings:
        $foobar = "foobar"

    condition:
        uint16(0) == 0x5A4D and $foobar
}
In general, I wanted to test different cases of checking if a file is a PE based on offset checks vs. strings. Unfortunately, I seem to be getting inconsistent results in terms of the performance. These are the results I got on my system when running them against the random files:
[INFO   ] Rule "Just_Str_MZ_At_0" is fast enough, not measuring any further due to fast mode, diff 7.2349 % below
alerting level: 18.9697 %
[INFO   ] Rule "Str_MZ_At_0_And_Extra_String" is fast enough, not measuring any further due to fast mode, diff -17.0396
% below alerting level: 18.9697 %
[INFO   ] Rule "Str_MZ_Anywhere" is fast enough, not measuring any further due to fast mode, diff -16.6793 % below
alerting level: 18.9697 %
[INFO   ] Rule "Just_Offset_MZ_At_0" is fast enough, not measuring any further due to fast mode, diff -48.4826 % below
alerting level: 18.9697 %
[INFO   ] Rule "Offset_MZ_At_0_And_Extra_String" is fast enough, not measuring any further due to fast mode, diff
-50.0343 % below alerting level: 18.9697 %
And these are results from a second run of the same rules (in which I changed the order of the rules a bit):
[INFO   ] Rule "Just_Offset_MZ_At_0" is fast enough, not measuring any further due to fast mode, diff -51.9545 % below
alerting level: 3.0000 %
[INFO   ] Rule "Offset_MZ_At_0_And_Extra_String" is fast enough, not measuring any further due to fast mode, diff
-50.7250 % below alerting level: 3.0000 %
[INFO   ] Rule "Just_Str_MZ_At_0" is fast enough, not measuring any further due to fast mode, diff -25.8056 % below
alerting level: 3.0000 %
[INFO   ] Rule "Str_MZ_At_0_And_Extra_String" is fast enough, not measuring any further due to fast mode, diff -48.6145
% below alerting level: 3.0000 %
[INFO   ] Rule "Str_MZ_Anywhere" is fast enough, not measuring any further due to fast mode, diff -49.0124 % below
alerting level: 3.0000 %
What can be seen in both sets of results is that all of the rules I’ve run here are fast, but that that the offset check rules are consistently fast, while the string checks are inconsistent (sometimes just as fast as the offset rules, sometimes not).
While I would like to do more testing, I’m not sure that this is necessarily the right approach at this stage!
Some caveats: bear in mind that:
- These rules are being run against large random files, which is going to be the worst case scenario
- Are doing very basic checks, whereas as other rules will have more strings/checks alongside them
- When run on their own vs. a larger set of rules the performance will likely change
In conclusion
I have a bias against $mz at 0 rules, due to my belief that they did not perform as well. While there may be some edge cases where there are differences in performance, it does not appear that this is the case in general!
In short, there’s unlikely to be a practical difference in whether you use strings or offsets to check for specific conditions. It is your preference for how you want to write these rules.
Day 71 - File classification: OneNote files
If you follow the latest threat vectors being used by threat actors in the wild, you may have seen that there has been an increase in OneNote files used in phishing campaigns: https://www.proofpoint.com/uk/blog/threat-insight/onenote-documents-increasingly-used-to-deliver-malware
With the changes made by Microsoft to by default disable macros in documents downloaded from the internet, it can be expected that threat actors will continue to experiment with different file formats! Using OneNote in particular seemed to be quite effective at the start, as not all security tooling was necessarily prepared to handle the file format.
So what can we do with YARA? As with many cases I’ve highlighted so far, the first thing we want to do is classify files as OneNote files. According to this document, they have the following signature at the start of a file:
E4 52 5C 7B 8C D8 A7 4D
AE B1 53 78 D0 29 96 D3
While we could write a condition for the whole header, it should be sufficient to look at the first 4 bytes:
rule IsOneNote {
    condition:
        uint32be(0) == 0xE4525C7B
}
Day 72 - File classification: OneNote Case Study - Embedded Files - Part 1
So now that we can classify OneNote files, what kind of heuristics can we perform? Let’s use the official file specification as a reference: https://interoperability.blob.core.windows.net/files/MS-ONE/%5bMS-ONE%5d.pdf
The general approach threat actors have been taking so far is to embed files within OneNote documents (such as PowerShell, HTA, PE, etc.), which when double clicked on within the notebook will be executed. If you go to the section 2.1.12 Properties of the file specification, you will see that many of the structures of OneNote have PropertyID values associated with them. In particular, I could see the following:
EmbeddedFileContainer 0x20001D9B
Even though we don’t currently have a YARA module to parse OneNote files, using this information we can write the following heuristic rule:
rule Heuristic_OneNote_Notebook_with_Embedded_File {
    meta:
        description = "Detects OneNote notebooks with an embedded file"
        reference = "https://interoperability.blob.core.windows.net/files/MS-ONE/%5bMS-ONE%5d.pdf"

    strings:
        $embedded_file_container_property_id = {9B 1D 00 20}

    condition:
        uint32be(0) == 0xE4525C7B and any of them
}
While this rule will almost certainly pick up a legitimate OneNote files (embedding files is a feature of OneNote after all that will have some legitimate use), it is a starting point to apply more heuristics to search for suspicious OneNote files.
Day 73 - File classification: OneNote Case Study - Embedded Files - Part 2
So how can we add heuristics to the rule in the previous post? From what I’ve seen, for it to be possible to execute files embedded within OneNote files, they need a valid file extension.
In the OneNote file specification, the following PropertyID is listed:
EmbeddedFileName 0x1C001D9C
In particular, a jcidEmbeddedFileNode structure in a OneNote file may contain both a EmbeddedFileContainer and EmbeddedFileName structure. So a further heuristic could be to look for embedded files which we know have filenames listed:
rule Heuristic_OneNote_Notebook_with_Embedded_File_with_Filename {
    meta:
        reference = "https://interoperability.blob.core.windows.net/files/MS-ONE/%5bMS-ONE%5d.pdf"

    strings:
        $embedded_file_container = {9B 1D 00 20}
        $embedded_file_name = {9C 1D 00 1C}

    condition:
        uint32be(0) == 0xE4525C7B and
        $embedded_file_container and
        for any i in (1 .. #embedded_file_container) : (
            $embedded_file_name in (@embedded_file_container[i] .. @embedded_file_container[i] + 0x30)
        )
}
This rule extends the previous post’s rule by adding a for loop which iterates over each instance of $embedded_file_container, and looks to see if a $embedded_file_name string lies within the first 0x30 bytes of an occurance of any of them.
Day 74 - File classification: OneNote Case Study - Embedded Files - Part 3
To turn these heuristics into useful rules, let’s consider what we want to look for in the filenames of embedded files.
We want to look for any occurances of “executable” files (that is, files that will be run in some format when double clicked). There are some obvious choices, such as .exe files, but there are also scripts such as .bat, or shortcut .lnk files.
As it turns out, there are quite a lot of valid executable extensions! I’ve not seen a complete list yet (please let me know if you have one), but here are some references that contain some good lists:
- https://help.proofpoint.com/Proofpoint_Essentials/Email_Security/Administrator_Topics/090_filtersandsenderlists/Essentials_Filters%3A_File_extensions
- https://community.spiceworks.com/topic/2107142-what-are-all-of-the-file-types-on-a-windows-pc-that-contain-executable-code
By picking out some of the most relevant extensions, we can complete our heuristic rule as follows:
rule Heuristic_OneNote_Notebook_with_Embedded_Executable_File {
    meta:
        description = "Detects OneNote notebooks with suspicious embedded executable files"
        reference = "https://interoperability.blob.core.windows.net/files/MS-ONE/%5bMS-ONE%5d.pdf"

    strings:
        $embedded_file_container = {9B 1D 00 20}
        $embedded_file_name = {9C 1D 00 1C}

        $ext1 = ".ade" ascii wide nocase
        $ext2 = ".adp" ascii wide nocase
        $ext3 = ".ai" ascii wide nocase
        $ext4 = ".bat" ascii wide nocase
        $ext5 = ".chm" ascii wide nocase
        $ext6 = ".cmd" ascii wide nocase
        $ext7 = ".com" ascii wide nocase
        $ext8 = ".cpl" ascii wide nocase
        $ext9 = ".dll" ascii wide nocase
        $ext10 = ".exe" ascii wide nocase
        $ext11 = ".hlp" ascii wide nocase
        $ext12 = ".hta" ascii wide nocase
        $ext13 = ".inf" ascii wide nocase
        $ext14 = ".ins" ascii wide nocase
        $ext15 = ".isp" ascii wide nocase
        $ext16 = ".jar" ascii wide nocase
        $ext17 = ".js" ascii wide nocase
        $ext18 = ".jse" ascii wide nocase
        $ext19 = ".lib" ascii wide nocase
        $ext20 = ".lnk" ascii wide nocase
        $ext21 = ".mde" ascii wide nocase
        $ext22 = ".msc" ascii wide nocase
        $ext23 = ".msi" ascii wide nocase
        $ext24 = ".msp" ascii wide nocase
        $ext25 = ".mst" ascii wide nocase
        $ext26 = ".nsh" ascii wide nocase
        $ext27 = ".pif" ascii wide nocase
        $ext28 = ".ps" ascii wide nocase
        $ext29 = ".ps1" ascii wide nocase
        $ext30 = ".reg" ascii wide nocase
        $ext31 = ".scr" ascii wide nocase
        $ext32 = ".sct" ascii wide nocase
        $ext33 = ".shb" ascii wide nocase
        $ext34 = ".shs" ascii wide nocase
        $ext35 = ".sys" ascii wide nocase
        $ext36 = ".vb" ascii wide nocase
        $ext37 = ".vbe" ascii wide nocase
        $ext38 = ".vbs" ascii wide nocase
        $ext39 = ".vxd" ascii wide nocase
        $ext40 = ".wsc" ascii wide nocase
        $ext41 = ".wsf" ascii wide nocase
        $ext42 = ".wsh" ascii wide nocase

    condition:
        uint32be(0) == 0xE4525C7B and
        $embedded_file_container and
        for any i in (1 .. #embedded_file_container) : (
            $embedded_file_name in (@embedded_file_container[i] .. @embedded_file_container[i] + 0x30) and
            any of ($ext*) in (@embedded_file_container[i] .. @embedded_file_container[i] + 0x100)
        )
}
Extending the previous post’s rule futher, we are now also looking for embedded filenames with a list of known extensions.
From the samples I was looking at, the filenames were UTF-16, meaning that we have to apply the wide modifier. I include the ascii modifier just in case as well. I also apply nocase, as threat actors could change the casing in order to evade detection.
From my tests, this appears to pick up a lot of malicious OneNote files! I will add it to the 100 Days of YARA GitHub repo, so please feel free to use it: https://github.com/100DaysofYARA/2023/tree/main/bitsofbinary
Day 75 - File classification: OneNote Case Study - Embedded Files - Part 4
Let’s do a critique the rule from the previous post. Reviewing your own rules is always a good opportunity to learn how to improve.
Redundant string check?
The $embedded_file_container and line in the rule is actually redundant, as the line for any i in (1 .. #embedded_file_container) : ( won’t evaluate if there are no occurances of $embedded_file_container! So we could cut that line.
Unnecessary embedded filename check?
Is the $embedded_file_name in ... check really needed? On one hand, we may want to check if there is actually a filename to check at all; but on the other, it could be worthwhile just doing the file extensions check anyway. I think we could safely cut this line and the rule would function the same.
Is the range check for file extensions good enough?
The any of ($ext*) in ... line checks the first 0x100 bytes after an occurance of $embedded_file_container. Given that we’re doing some pretty rough parsing of a OneNote file, is this good enough? Or should we build in more slack? If so, what range should we check instead?
Is the for loop necessary at all?
Arguably, do we even need the for loop? Could we not just check for OneNote files that have those file extensions in them via strings section? I think there is a good case to be made for doing either; the rule in its current format I think is less FP-prone (i.e. it is less likely to hit on samples that have text containing those file extensions), but if my condition isn’t loose enough then perhaps I’m missing malicious samples?
Too many file modifiers?
Each string has ascii wide nocase applied to it. This will create quite a lot of atoms to check for, as each casing variation of both the ascii and wide string variants will need to be computed. However, given that these strings are relatively short, I think that the performance could be a lot worse, and I’d personally be happy including this in my ruleset.
Alternative rule
Based on the above, a variation of the rule from the previous post could look like this:
rule Heuristic_OneNote_Notebook_with_Embedded_Executable_File {
    meta:
        description = "Detects OneNote notebooks with suspicious embedded executable files"
        reference = "https://interoperability.blob.core.windows.net/files/MS-ONE/%5bMS-ONE%5d.pdf"

    strings:
        $embedded_file_container = {9B 1D 00 20}

        $ext1 = ".ade" ascii wide nocase
        $ext2 = ".adp" ascii wide nocase
        $ext3 = ".ai" ascii wide nocase
        $ext4 = ".bat" ascii wide nocase
        $ext5 = ".chm" ascii wide nocase
        $ext6 = ".cmd" ascii wide nocase
        $ext7 = ".com" ascii wide nocase
        $ext8 = ".cpl" ascii wide nocase
        $ext9 = ".dll" ascii wide nocase
        $ext10 = ".exe" ascii wide nocase
        $ext11 = ".hlp" ascii wide nocase
        $ext12 = ".hta" ascii wide nocase
        $ext13 = ".inf" ascii wide nocase
        $ext14 = ".ins" ascii wide nocase
        $ext15 = ".isp" ascii wide nocase
        $ext16 = ".jar" ascii wide nocase
        $ext17 = ".js" ascii wide nocase
        $ext18 = ".jse" ascii wide nocase
        $ext19 = ".lib" ascii wide nocase
        $ext20 = ".lnk" ascii wide nocase
        $ext21 = ".mde" ascii wide nocase
        $ext22 = ".msc" ascii wide nocase
        $ext23 = ".msi" ascii wide nocase
        $ext24 = ".msp" ascii wide nocase
        $ext25 = ".mst" ascii wide nocase
        $ext26 = ".nsh" ascii wide nocase
        $ext27 = ".pif" ascii wide nocase
        $ext28 = ".ps" ascii wide nocase
        $ext29 = ".ps1" ascii wide nocase
        $ext30 = ".reg" ascii wide nocase
        $ext31 = ".scr" ascii wide nocase
        $ext32 = ".sct" ascii wide nocase
        $ext33 = ".shb" ascii wide nocase
        $ext34 = ".shs" ascii wide nocase
        $ext35 = ".sys" ascii wide nocase
        $ext36 = ".vb" ascii wide nocase
        $ext37 = ".vbe" ascii wide nocase
        $ext38 = ".vbs" ascii wide nocase
        $ext39 = ".vxd" ascii wide nocase
        $ext40 = ".wsc" ascii wide nocase
        $ext41 = ".wsf" ascii wide nocase
        $ext42 = ".wsh" ascii wide nocase

    condition:
        uint32be(0) == 0xE4525C7B and
        for any i in (1 .. #embedded_file_container) : (
            any of ($ext*) in (@embedded_file_container[i] .. @embedded_file_container[i] + 0x200)
        )
}
I.e. we lose the $embedded_file_name checks, and increase the range check; but we still keep the for loop looking over $embedded_file_container instances.
Hopefully this self critique shows that while there are usually “objective” ways of improving rules, there are also many “subjective” opinions that can be applied! How would you change this rule, for example?
Day 76 - Greg’s Challenge: Introduction
Greg Lesnewich (@greglesnewich) put out a challenge to write some YARA rules for a collection of samples: https://twitter.com/greglesnewich/status/1630615467776786458
As I had seen that other’s had picked Hikit and Reductor, I’ve decided to go for AcidBox.
Palo Alto’s Unit42 released a great blog on this malware family in 2020, which is nicely laid out, and shows a variety of samples as part of the framework: https://unit42.paloaltonetworks.com/acidbox-rare-malware/
Over the next set of posts, I will dive into how I’ve written some rules for this malware family!
Rule writing philosophy
Before I start writing some rules however, I think its worth discussing my general ideal approach/”philosophy” I have when writing rules for malware, which follow three ideas:
- Accessibility - make you rules as easy to understand and read as possible, and provide as much context as you can
- Simplicity - this doesn’t mean the logic of the rule needs to be simple, but as complexity increases consider breaking out ideas into smaller rules to keep the main idea of the rule simple
- Redundancy - write rules for multiple facets of the malware you’re trying to signature to have more of a chance of continuing to track it
I believe these three ideas combined can lead to rules being very context rich, clear, and effective. As such, I will be writing small, but clear rules over the next few posts.
Day 77 - Aside - Facets to Signature
When we write YARA rules, there are several different categories/facets that we can focus on. In roughly increasing order of complexity, I think these can fall into the following categories:
- Strings - plaintext (or encoded) strings seen within a sample
- Meta features - metadata associated with the file itself (such as headers or artefacts left in compiled samples)
- Code - signaturing the code of the sample itself (whether compiled, or the plaintext code that will be interpreted later on)
- Techniques - abstracting away from any of the previous facets to focus on having a signature for a technique being used
It may not always be possible to write rules for a sample covering all of these features; a packed sample may not have any plaintext strings to work with, or a webshell may not have enough unique code to make a reliable rule. However, if you can cover a variety of these categories, you’re already building in redundancy into your rules to cover a malware family, especially if you can cover a technique well.
The tools you use to analyse these facets can vary a lot depending on the sample! Sometimes you can get away with just a text editor if you’re looking at scripting languages like PowerShell, VBScript, or JavaScript. But for compiled languages, you may have to use more specific tooling.
While there are many commercial options available, you can use a mixture of the following free tools to do the analysis needed for writing rules:
- strings2 - extracts plaintext ASCII and unicode strings (alternatives like FLOSS are great for dumping out encoded strings, but I like to see what I have to work with in plaintext first)
- Detect It Easy - determines file types, and shows meta features of them
- Ghidra - a reverse engineering framework for a variety of processor types
- HxD - a great, free hex editor for copying/editing the hex representations of files
Day 78 - AcidBox - SSP DLL Strings - Format Strings Part 1
In Palo Alto Unit42’s blog on AcidBox, it breaks down the malware framework into roughly three components:
- A main worker DLL
- Security Support Provider (SSP) DLLs to load the main worker
- A kernel mode payload embedded in the main worker
I will start by looking at the SSP DLLs; in particular looking at 003669761229d3e1db0f5a5b333ef62b3dffcc8e27c821ce9018362e0a2df7e9. As highlighted in the previous post, I’ll start by looking at plaintext strings to see if there is anything obvious to base a YARA rule on.
At a first glance, there doesn’t appear to much to work with! There are some representing the exported functions (we’ll get to those later), some representing imported functions, and version information (which we’ll also get to later).
However, near the start of the file (more specifically near the beginning of the .text section), there are some format strings of interest:
%s\%s
%s\%s{%s}
s\{%s}
All of these strings in combination may be good enough for a first rule as follows:
rule AcidBox_SSP_DLL_Loader_Format_Strings {
    meta:
        description = "Detects AcidBox SSP DLL loaders, based on a combination of format strings"
        author = "BitsOfBinary"
        reference = "https://unit42.paloaltonetworks.com/acidbox-rare-malware/"
        hash = "003669761229d3e1db0f5a5b333ef62b3dffcc8e27c821ce9018362e0a2df7e9"

    strings:
        $ = "%s\\%s"
        $ = "%s\\%s{%s}"
        $ = "s\\{%s}"

    condition:
        all of them
}
Day 79 - AcidBox - SSP DLL Strings - Format Strings Part 2
An alternative way to search for the format strings in AcidBox would be to look for them all in one chunk. Each string is sequential to the other, separated by null bytes to make sure they’re aligned in 8-byte segments. So that rule would look like this:
rule AcidBox_SSP_DLL_Loader_Format_String_Chunk {
    meta:
        description = "Detects AcidBox SSP DLL loaders, based on a unique string chunk of format strings"
        author = "BitsOfBinary"
        reference = "https://unit42.paloaltonetworks.com/acidbox-rare-malware/"
        hash = "003669761229d3e1db0f5a5b333ef62b3dffcc8e27c821ce9018362e0a2df7e9"

    strings:
        // %s\%s
        // %s\%s{%s}
        // s\{%s}
        $ = {25 73 5C 25 73 00 00 00 00 00 00 00 25 73 5C 25 73 7B 25 73 7D 00 00 00 00 00 00 00 25 73 5C 7B 25 73 7D 00}

    condition:
        any of them
}
While this rule is stricter than the previous one, it guarantees to only hit on samples that have these format strings in order like this, making it potentially less FP-prone, at the risk of missing samples that have these format strings more spread out/out of order, etc.
Day 80 - AcidBox - SSP DLL Strings - Format Strings Part 3
Using the fact that that the AcidBox format strings all appear to be aligned by the same amount of bytes, we can create a further rule that is slightly more loose in that it doesn’t require all three format strings to be present. We can do this by listing out the different orders each format string could appear next to one another, to make the following rule:
rule AcidBox_SSP_DLL_Loader_Format_String_Combos {
    meta:
        description = "Detects AcidBox SSP DLL loaders, based on combinations of format strings seen in samples"
        author = "BitsOfBinary"
        reference = "https://unit42.paloaltonetworks.com/acidbox-rare-malware/"
        hash = "003669761229d3e1db0f5a5b333ef62b3dffcc8e27c821ce9018362e0a2df7e9"

    strings:
        // Combinations of the following (with alignment bytes):
        // %s\%s
        // %s\%s{%s}
        // s\{%s}
        $ = {25 73 5C 25 73 00 00 00 00 00 00 00 25 73 5C 25 73 7B 25 73 7D 00}
        $ = {25 73 5C 25 73 00 00 00 00 00 00 00 25 73 5C 7B 25 73 7D 00}
        $ = {25 73 5C 25 73 7B 25 73 7D 00 00 00 00 00 00 00 25 73 5C 25 73 00}
        $ = {25 73 5C 25 73 7B 25 73 7D 00 00 00 00 00 00 00 25 73 5C 7B 25 73 7D 00}
        $ = {25 73 5C 7B 25 73 7D 00 00 00 00 00 00 00 25 73 5C 25 73 00}
        $ = {25 73 5C 7B 25 73 7D 00 00 00 00 00 00 00 25 73 5C 25 73 7B 25 73 7D 00}

    condition:
        any of them
}
Day 81 - AcidBox - SSP DLL Strings - Format Strings Part 4
Finally for these format strings in AcidBox, if we wanted to hunt for more samples, we could attempt to loosen the rule further by adding in variable ranges into the hex strings (in case the number of alignment bytes changes):
rule AcidBox_SSP_DLL_Loader_Format_String_Combos_Loose {
    meta:
        description = "Detects AcidBox SSP DLL loaders, based on combinations of format strings seen in samples. This rule uses a looser set of strings, so may be more false positive-prone."
        author = "BitsOfBinary"
        reference = "https://unit42.paloaltonetworks.com/acidbox-rare-malware/"
        hash = "003669761229d3e1db0f5a5b333ef62b3dffcc8e27c821ce9018362e0a2df7e9"

    strings:
        // Combinations of the following (with alignment bytes):
        // %s\%s
        // %s\%s{%s}
        // s\{%s}
        $ = {25 73 5C 25 73 00 [0-16] 25 73 5C 25 73 7B 25 73 7D 00}
        $ = {25 73 5C 25 73 00 [0-16] 25 73 5C 7B 25 73 7D 00}
        $ = {25 73 5C 25 73 7B 25 73 7D 00 [0-16] 25 73 5C 25 73 00}
        $ = {25 73 5C 25 73 7B 25 73 7D 00 [0-16] 25 73 5C 7B 25 73 7D 00}
        $ = {25 73 5C 7B 25 73 7D 00 [0-16] 25 73 5C 25 73 00}
        $ = {25 73 5C 7B 25 73 7D 00 [0-16] 25 73 5C 25 73 7B 25 73 7D 00}

    condition:
        any of them
}
This version of the rule appears to yield some false positives vs. the previous rules, so may only be useful from a threat hunting perspective, with some possible extra heuristics applied (such as a filesize modifier).
I hope these first set of rules shows that even if there are no individual strings in samples that can used on their own for classification, by understanding ways you can combine them together in a condition you can still use a collection of them. In general, if I see strings that on there own yield FPs, but in chunked combination classify malicious samples, I try to use them as often as possible!
I also hope that this approach shows that we’re already building a bit of redundancy into our rules. We’ve written different versions of the same rule multiple times, but each has a slightly different aim that we’re being specific about in our rulename/description. If all four of the rules we’ve written hit on a sample, then that already gives us a different level of confidence about the sample vs. if only one rule hits on it.
Day 82 - AcidBox - SSP DLL PE Meta Features - Part 1
We’re done with strings for now, so let’s move on to some of the meta features of the sample. Specifically, what PE metadata can we see?
One that I always start with is both the import hash and rich header hash, as it is quick and easy to put these in rules:
import "pe"
import "hash"

rule AcidBox_SSP_DLL_Loader_Imphash {
    meta:
        description = "Detects AcidBox SSP DLL loaders, based on a unique import hash"
        author = "BitsOfBinary"
        reference = "https://unit42.paloaltonetworks.com/acidbox-rare-malware/"
        hash = "003669761229d3e1db0f5a5b333ef62b3dffcc8e27c821ce9018362e0a2df7e9"

    condition:
        pe.imphash() == "30851d4a2b31e9699084a06e765e21b0"
}

import "pe"
import "hash"

rule AcidBox_SSP_DLL_Loader_Rich_Header_Hash {
    meta:
        description = "Detects AcidBox SSP DLL loaders, based on a unique rich header hash"
        author = "BitsOfBinary"
        reference = "https://unit42.paloaltonetworks.com/acidbox-rare-malware/"
        hash = "003669761229d3e1db0f5a5b333ef62b3dffcc8e27c821ce9018362e0a2df7e9"

    condition:
        hash.md5(pe.rich_signature.clear_data) == "269af2751efee65b1ab00622816c83e6"
}
I’ve got a script that automatically can pull out these values and put them in a rule: https://github.com/BitsOfBinary/yarabuilder-examples/tree/main/pe
Day 83 - AcidBox - SSP DLL PE Meta Features - Part 2
Many PE files will have a VERSIONINFO resource: https://learn.microsoft.com/en-us/windows/win32/menurc/versioninfo-resource
As described, this resource contains information such as the intended operating system, and original name of the file. This resource is also parsed by the PE module: https://yara.readthedocs.io/en/stable/modules/pe.html#c.version_info
For the sample of AcidBox we’ve been looking at, it has an internal name of windigest.dll, and a file description of Windows Digest Access. Both these values appear to be unique, and can be the basis for a YARA rule:
import "pe"

rule AcidBox_SSP_DLL_Loader_windigest_Version_Info {
    meta:
        description = "Detects AcidBox SSP DLL loaders, based on a unique version information of 'windigest' and a description"
        author = "BitsOfBinary"
        reference = "https://unit42.paloaltonetworks.com/acidbox-rare-malware/"
        hash = "003669761229d3e1db0f5a5b333ef62b3dffcc8e27c821ce9018362e0a2df7e9"

    condition:
        pe.version_info["InternalName"] == "windigest.dll" or
        pe.version_info["FileDescription"] == "Windows Digest Access"
}
Day 84 - AcidBox - SSP DLL PE Meta Features - Part 3
While on the topic of version info, the Palo Alto blog for AcidBox mentions that the following filenames (which are similar to known Windows binaries) were used:
msv1_1.dllpku.dllwindigest.dll
We’ve covered windigest.dll in our previous post, and we can write rules for the two remaining filenames, even if we don’t have any samples to work with:
import "pe"

rule AcidBox_SSP_DLL_Loader_msv1_1_Version_Info {
    meta:
        description = "Detects AcidBox SSP DLL loaders, based on a unique version information of 'msv1_1.dll'"
        author = "BitsOfBinary"
        reference = "https://unit42.paloaltonetworks.com/acidbox-rare-malware/"

    condition:
        pe.version_info["InternalName"] == "msv1_1.dll"
}

import "pe"

rule AcidBox_SSP_DLL_Loader_pku_Version_Info {
    meta:
        description = "Detects AcidBox SSP DLL loaders, based on a unique version information of 'pku.dll'"
        author = "BitsOfBinary"
        reference = "https://unit42.paloaltonetworks.com/acidbox-rare-malware/"

    condition:
        pe.version_info["InternalName"] == "pku.dll"
}
It is worth looking for opportunities to write YARA rules for indicators of compromise mentioned in open source research, even if a sample isn’t available.
Day 85 - AcidBox - SSP DLL PE Meta Features - Part 4
The AcidBox loaders have four exported functions:
InitPhysicalInterfaceAInitSecurityInterfaceASpLsaModeInitializeUpdateSecurityContext
While the middle two exports appear to be named after standard Windows API functions (e.g. InitSecurityInterfaceA and SpLsaModeInitialize), the first and last exports appear to be unique. So we can look for DLLs that export those in our rules:
import "pe"

rule AcidBox_SSP_DLL_Loader_Unique_Exports {
    meta:
        description = "Detects AcidBox SSP DLL loaders, based on having unique exported functions"
        author = "BitsOfBinary"
        reference = "https://unit42.paloaltonetworks.com/acidbox-rare-malware/"
        hash = "003669761229d3e1db0f5a5b333ef62b3dffcc8e27c821ce9018362e0a2df7e9"

    condition:
        pe.exports("InitPhysicalInterfaceA") or
        pe.exports("UpdateSecurityContext")
}
While we can use the PE module for this purpose, it also makes sense to search for the strings too, in case they are embedded in another file, being called elsewhere, etc.
rule AcidBox_SSP_DLL_Loader_Unique_Exports_Strings {
    meta:
        description = "Detects the strings of unique exported functions of AcidBox SSP DLL loaders"
        author = "BitsOfBinary"
        reference = "https://unit42.paloaltonetworks.com/acidbox-rare-malware/"
        hash = "003669761229d3e1db0f5a5b333ef62b3dffcc8e27c821ce9018362e0a2df7e9"

    strings:
        $ = "InitPhysicalInterfaceA"
        $ = "UpdateSecurityContext"

    condition:
        any of them
}
Day 86 - AcidBox - SSP DLL Strings - PE Meta Features Part 5
I think it’s worth pointing out successful rule attempts, as well as failures. I wanted to see if I could write a rule based on the following information from the Palo Alto blog:
All of the AcidBox samples contain gaps between the single exported function entries…
Every AcidBox sample has a NumberOfFunctions value in the export directory that is bigger than the NumberOfNames value. This isn’t something unusual, as not every exported function has to have a name too. Unnamed functions can be also called by their ordinal values. What is uncommon, however, is that the function entries which are unnamed are also zeroed out, thus not used.
By looking at the information from the PE module, the following export details are parsed out:
export_details
	[0]
		offset = 28244
		name = "InitSecurityInterfaceA"
		forward_name = YR_UNDEFINED
		ordinal = 1
	[1]
		offset = 0
		name = YR_UNDEFINED
		forward_name = YR_UNDEFINED
		ordinal = 2
	[2]
		offset = 0
		name = YR_UNDEFINED
		forward_name = YR_UNDEFINED
		ordinal = 3
	[3]
		offset = 0
		name = YR_UNDEFINED
		forward_name = YR_UNDEFINED
		ordinal = 4
	[4]
		offset = 27964
		name = "InitPhysicalInterfaceA"
		forward_name = YR_UNDEFINED
		ordinal = 5
	[5]
		offset = 0
		name = YR_UNDEFINED
		forward_name = YR_UNDEFINED
		ordinal = 6
	[6]
		offset = 28408
		name = "UpdateSecurityContext"
		forward_name = YR_UNDEFINED
		ordinal = 7
	[7]
		offset = 0
		name = YR_UNDEFINED
		forward_name = YR_UNDEFINED
		ordinal = 8
	[8]
		offset = 28168
		name = "SpLsaModeInitialize"
		forward_name = YR_UNDEFINED
		ordinal = 9
In many cases, the export name member is YR_UNDEFINED, which we can check using the defined keyword. These exports also seem to have their export set to 0; I’m not sure if this is a default for the pe module or not. As such I wrote the following rule looking for DLL with multiple, low ordinal exports with no name:
import "pe"

rule Heuristic_Multiple_Undefined_Low_Ordinal_Exported_Functions {
    meta:
        description = "Detects DLLs with at least 2 different exported functions that are undefined, and which have low ordinals"
        note = "This returns a lot of results, do not use for threat hunting without extra heuristics"

    condition:
        for 2 export in pe.export_details : (
            export.offset == 0 and
            not defined export.name and
            export.ordinal <= 10
        )
}
Unfortunately, as Palo Alto points out, this is not uncommon! Turns out a lot of DLLs have empty exports, meaning you can’t rely on this alone. Still, the rule might be useful with some extra heuristics/context applied, but I wouldn’t recommend using it in general.
Day 87 - AcidBox - SSP DLL Code - Signaturing Crypto Routine - Part 1
We’ve written some rules for strings and meta features of the AcidBox SSP DLL. So let’s move on to code. Unfortunately, I think this starts to create a barrier to entry from a detection perspective, as a little bit of reverse engineering knowledge is usually required to make a start on this. However, I hope I can highlight some features that are worth looking at from a YARA perspective!
To analyse 003669761229d3e1db0f5a5b333ef62b3dffcc8e27c821ce9018362e0a2df7e9 I’m using Ghidra, which is free and open source.
So where should we start looking? Something I usually look for is custom cryptography routines, which can sometimes be useful for clustering samples together. FUN_180007fc8 appears to be loading a PE resource (which matches with what is described in the AcidBox blog). So by looking around, I can see that FUN_180013a14 appears to be some kind of cryptography routine (likely RSA, but we don’t necessarily need to know that for now) based on the fact that it has a for loop which contains an XOR.

Looking at the highlighted disassembly/decompiler view, I can see that there are some “nice” instructions to work with; that is, there are no fixed offsets (e.g. referencing string positions that may change throughout the samples), and the combination of registers/instructions used looks pretty unique! As such, I can use Ghidra’s Copy Special... option to copy out the Byte String of this code, and put it straight into a YARA rule.
rule AcidBox_SSP_DLL_Loader_Crypto_Routine_A {
    meta:
        description = "Detects AcidBox SSP DLL loaders, based on a unique cryptography routine"
        author = "BitsOfBinary"
        reference = "https://unit42.paloaltonetworks.com/acidbox-rare-malware/"
        hash = "003669761229d3e1db0f5a5b333ef62b3dffcc8e27c821ce9018362e0a2df7e9"

    strings:
        // 180013a71 0f  b6  04  32   MOVZX      EAX ,byte ptr [param_2  + RSI *0x1 ]
        // 180013a75 33  c8           XOR        param_1 ,EAX
        // 180013a77 88  0c  3a       MOV        byte ptr [param_2  + RDI *0x1 ],param_1
        // 180013a7a 41  ff  c0       INC        param_3
        // 180013a7d 44  89  44       MOV        dword ptr [RSP  + local_14 ],param_3
        //           24  04
        $ = {0f b6 04 32 33 c8 88 0c 3a 41 ff c0 44 89 44 24 04}

    condition:
        any of them
}
Note: I always find it useful to copy the code we’ve signatured into the rule itself as a comment. That way, anyone reading it can see what the bytes represent, rather than having to go disassemble them themselves.
Day 88 - AcidBox - SSP DLL Code - Signaturing Crypto Routine - Part 2
In the previous post’s example, I copied the code straight from the binary itself to the YARA rule. While, if done correctly, this is usually sufficient to write rules with, there may be some edits we can make to the copied code to make it possible to try and find even more related samples.
In particular, we are able to add wildcard operators to hex strings using ? characters, which we could use to mask bytes that may change between samples. This could be used for masking stack offsets that may change, changing the type of register used, or fully masking addresses that will likely change across variants.
While we could open the x86 manual and do this ourselves (which I still recommend trying at least once!), we can actually take advantage of a default Ghidra plugin to help us with this! That is, YaraGhidraGUIScript.java can come in very handy. If I select a block of code, and execute this plugin, we can see the following output:

As you can see from the default output, some instructions have already been masked, changing some default registers. So already, we have a slightly looser rule we can use:
rule AcidBox_SSP_DLL_Loader_Crypto_Routine_B {
    meta:
        description = "Detects AcidBox SSP DLL loaders, based on a unique cryptography routine"
        author = "BitsOfBinary"
        reference = "https://unit42.paloaltonetworks.com/acidbox-rare-malware/"
        hash = "003669761229d3e1db0f5a5b333ef62b3dffcc8e27c821ce9018362e0a2df7e9"

    strings:
        // 180013a71 0f  b6  04  32   MOVZX      EAX ,byte ptr [param_2  + RSI *0x1 ]
        // 180013a75 33  c8           XOR        param_1 ,EAX
        // 180013a77 88  0c  3a       MOV        byte ptr [param_2  + RDI *0x1 ],param_1
        // 180013a7a 41  ff  c0       INC        param_3
        // 180013a7d 44  89  44       MOV        dword ptr [RSP  + local_14 ],param_3
        //           24  04
        $ = {0f b6 04 32 33 c8 88 0c 3a 4? ff c0 4? 89 44 ?4 04}

    condition:
        any of them
}
We’ll discuss in the next post a bit more about this Ghidra script + masking code.
Day 89 - AcidBox - SSP DLL Code - Signaturing Crypto Routine - Part 3
Let’s take a look at the YaraGhidraGUIScript.java window again:
Each instruction, along with its operands can be toggled to be masked. So for instance, if I decided that I didn’t think the register R8D would be consistent across variants, I could toggle that value by clicking on the relevant boxes containing that register.
There are also options in the top of the window, which allow you to:
- Mask all non-instructions (data)
- Mask all operands
- Mask all scalars
- Mask all addresses
It’s worth playing around with these to see what the corresponding output would look like. For instance, I personally wouldn’t want to mask all operands in this case, although in larger blocks of code that may be useful. But masking all addresses may be useful here, which will mask the operand dword ptr [RSP + 0x4]. Here is an example of some of the instructions I have masked:

If I cut out the last 3 wildcards (as they are no longer really needed), I can get the following rule:
rule AcidBox_SSP_DLL_Loader_Crypto_Routine_C {
    meta:
        description = "Detects AcidBox SSP DLL loaders, based on a unique cryptography routine"
        author = "BitsOfBinary"
        reference = "https://unit42.paloaltonetworks.com/acidbox-rare-malware/"
        hash = "003669761229d3e1db0f5a5b333ef62b3dffcc8e27c821ce9018362e0a2df7e9"

    strings:
        // 180013a71 0f  b6  04  32   MOVZX      EAX ,byte ptr [param_2  + RSI *0x1 ]
        // 180013a75 33  c8           XOR        param_1 ,EAX
        // 180013a77 88  0c  3a       MOV        byte ptr [param_2  + RDI *0x1 ],param_1
        // 180013a7a 41  ff  c0       INC        param_3
        // 180013a7d 44  89  44       MOV        dword ptr [RSP  + local_14 ],param_3
        //           24  04
        $ = {0f b6 04 32 33 c8 88 0c 3a 4? ff c? 4? 89}

    condition:
        any of them
}
Overall, it is worth playing around with instruction masking to see how far you can go before you start getting false positives. The more you want to reverse engineer the sample, the more context you will get to help you decide what you can/can’t mask (e.g. in this case, most of the code is dealing with function parameters, which have been saved into specific registers, so the masking might not actually make that much of a difference).
Day 90 - AcidBox - SSP DLL Code - Error Return Codes - Part 1
Something I noticed when looking through the AcidBox code was that a lot of functions would return 4-byte codes when it appeared that functions had errors. For example, in the screenshot below, you can see highlighted one of these error codes which will be returned if the call to OpenMutexA fails:

This got me thinking that these values may be of interest from a detection perspective. But the first challenge is, how do we collect them all?
I could go through each function individually and copy them out, but that would take a while. So intead, I wrote the following Ghidra script:
max_steps = 100000
counter = 0

ins = getFirstInstruction()
last_ins = getLastInstruction()

while counter < max_steps and ins != last_ins:
    mne_str = ins.getMnemonicString()

    if mne_str == "MOV":
        num_ops = ins.getNumOperands()

        if num_ops == 2:
            reg = ins.getDefaultOperandRepresentation(0)

            if reg == "EAX" or reg == "EBX":
                val = ins.getDefaultOperandRepresentation(1)

                if val.startswith("0x") and len(val) == 10:
                    print(val)

    ins = getInstructionAfter(ins)
    counter += 1
It’s pretty hacky, but what it will do is iterate through the sample, find all instances of MOV instructions, and if a 4-byte value is being moved into EAX or EBX (the ones I saw commonly being used), it will print out those instructions.
The returned results cannot be used immediately, as there are some values returned that will cause lots of false positive (e.g. 0xfffffffe), and they are all the wrong endianess to use in YARA strings. As such, I put together a CyberChef script where I have removed some results, swapped the endianess, and put them in a nice format to use in YARA, which you can find here.
I’ll use the output in the next post to start writing rules with.
Day 91 - AcidBox - SSP DLL Code - Error Return Codes - Part 2
There are 133 error return codes output by the script in the previous post. None of these codes on their own are good enough to write a rule with; if I run a rule looking for any of them over system32, I get thousands of results.
If I increase the condition to 10 of them, I still get hits from system32, suggesting maybe these codes are used in some legitimate files/those bytes are too common?
So for a first pass at a rule, we should make sure we look for a sufficient amount of the strings, and apply some extra modifiers to reduce the chances of getting false positives.
rule AcidBox_SSP_DLL_Loader_Unique_Return_Codes_A {
    meta:
        description = "Detects AcidBox SSP DLL loaders, based on unique return codes seen in functions"
        author = "BitsOfBinary"
        reference = "https://unit42.paloaltonetworks.com/acidbox-rare-malware/"
        hash = "003669761229d3e1db0f5a5b333ef62b3dffcc8e27c821ce9018362e0a2df7e9"

    strings:
        $ = {06 04 00 a0}
        $ = {01 04 00 a0}
        $ = {02 04 00 a0}
        $ = {0c 0c 00 a0}
        $ = {02 0c 00 a0}
        $ = {01 07 00 a0}
        $ = {07 08 00 a0}
        $ = {02 07 00 a0}
        $ = {04 06 00 a0}
        $ = {08 06 00 a0}
        $ = {02 06 00 a0}
        $ = {0c 08 00 a0}
        $ = {06 08 00 a0}
        $ = {04 08 00 a0}
        $ = {07 10 03 a0}
        $ = {09 10 03 a0}
        $ = {11 10 03 a0}
        $ = {02 10 03 a0}
        $ = {04 04 08 a0}
        $ = {07 04 08 a0}
        $ = {02 03 00 a0}
        $ = {02 04 08 a0}
        $ = {04 01 08 a0}
        $ = {06 01 08 a0}
        $ = {0e 01 08 a0}
        $ = {01 02 08 a0}
        $ = {02 02 08 a0}
        $ = {04 02 08 a0}
        $ = {06 02 08 a0}
        $ = {01 00 00 c0}
        $ = {02 0a 08 a0}
        $ = {02 06 03 a0}
        $ = {04 06 03 a0}
        $ = {10 06 03 a0}
        $ = {0e 06 03 a0}
        $ = {02 08 02 80}
        $ = {06 08 02 80}
        $ = {01 08 02 80}
        $ = {04 08 02 80}
        $ = {07 08 02 80}
        $ = {71 80 07 80}
        $ = {06 01 03 80}
        $ = {02 01 03 80}
        $ = {02 06 03 80}
        $ = {01 06 03 80}
        $ = {02 07 03 80}
        $ = {06 07 03 80}
        $ = {07 06 04 80}
        $ = {04 06 04 80}
        $ = {05 06 04 80}
        $ = {02 06 04 80}
        $ = {07 16 04 80}
        $ = {04 16 04 80}
        $ = {06 16 04 80}
        $ = {02 16 04 80}
        $ = {02 28 04 80}
        $ = {07 28 04 80}
        $ = {06 0b 04 80}
        $ = {02 0b 04 80}
        $ = {02 0c 04 80}
        $ = {02 0d 04 80}
        $ = {06 0d 04 80}
        $ = {02 1c 04 80}
        $ = {04 1c 04 80}
        $ = {07 1c 04 80}
        $ = {06 1c 04 80}
        $ = {0c 1c 04 80}
        $ = {06 1d 04 80}
        $ = {09 22 04 80}
        $ = {09 08 04 80}
        $ = {09 09 04 80}
        $ = {09 07 04 80}
        $ = {02 22 04 80}
        $ = {0c 01 04 80}
        $ = {02 01 04 80}
        $ = {02 10 04 80}
        $ = {02 11 04 80}
        $ = {07 11 04 80}
        $ = {0a 11 04 80}
        $ = {02 12 04 80}
        $ = {0a 12 04 80}
        $ = {07 12 04 80}
        $ = {01 0f 04 80}
        $ = {07 0f 04 80}
        $ = {02 0f 04 80}
        $ = {0a 0f 04 80}
        $ = {0b 0f 04 80}
        $ = {02 02 04 80}
        $ = {07 04 04 80}
        $ = {0c 04 04 80}
        $ = {02 04 04 80}
        $ = {02 14 04 80}
        $ = {02 15 04 80}
        $ = {0a 14 04 80}
        $ = {07 15 04 80}
        $ = {0c 15 04 80}
        $ = {09 25 04 80}
        $ = {02 25 04 80}
        $ = {02 26 04 80}
        $ = {06 27 04 80}
        $ = {07 27 04 80}
        $ = {09 27 04 80}
        $ = {0c 27 04 80}
        $ = {0a 27 04 80}
        $ = {04 27 04 80}
        $ = {02 27 04 80}
        $ = {04 13 04 80}
        $ = {0c 13 04 80}
        $ = {06 13 04 80}
        $ = {01 13 04 80}
        $ = {02 13 04 80}
        $ = {0c 21 04 80}
        $ = {06 21 04 80}
        $ = {05 21 04 80}
        $ = {02 21 04 80}
        $ = {06 17 04 80}
        $ = {0c 17 04 80}
        $ = {02 17 04 80}
        $ = {02 05 05 80}
        $ = {06 05 05 80}
        $ = {06 07 05 80}
        $ = {04 07 05 80}
        $ = {02 07 05 80}
        $ = {02 09 05 80}
        $ = {06 09 05 80}
        $ = {01 0b 07 80}
        $ = {06 0b 07 80}
        $ = {02 0b 07 80}
        $ = {06 0c 07 80}
        $ = {02 0c 07 80}
        $ = {05 03 01 80}
        $ = {02 03 01 80}

    condition:
        uint16(0) == 0x5A4D and filesize < 500KB and 80 of them
}
Day 92 - AcidBox - SSP DLL Code - Error Return Codes - Part 3
My first attempt to try and reduce the number of error return codes to search for, was to combine the heuristics of only looking for them in the .text section, and ensure that they don’t appear more than 3 times per sample. As such, the updated condition looks like this:
uint16(0) == 0x5A4D and filesize < 500KB and 30 of them and not for any of them : (
    not $ in (pe.sections[0].raw_data_offset .. pe.sections[0].raw_data_offset + pe.sections[0].raw_data_size) and
    # > 3
)
To break this rule down:
not for any of them : ( ... )- this performs a for loop over every occurance of every string matched, and looks to see that the result isfalsevia thenotoperatornot $ in ( ... )- given we’re in a for loop, we can refer to the strings anonymously using just$(pe.sections[0].raw_data_offset .. pe.sections[0].raw_data_offset + pe.sections[0].raw_data_size)- I’m assuming here that the.textsection is the first section in the PE - and by doing this I can use this to construct a range to check the string in that will represent the whole.textsection# > 3- again, using the fact that the strings are anonymous to see if they appear more than 3 times
With some testing, I found that there were reduced FPs with this lower count of strings, but that there will still some files being detected that I don’t think were related. So while it is an improvement in that the rule is a bit more loose, it isn’t quite ideal! Find the full rule below:
import "pe"

rule AcidBox_SSP_DLL_Loader_Unique_Return_Codes_B {
    meta:
        description = "Detects AcidBox SSP DLL loaders, based on unique return codes seen in functions"
        author = "BitsOfBinary"
        reference = "https://unit42.paloaltonetworks.com/acidbox-rare-malware/"
        hash = "003669761229d3e1db0f5a5b333ef62b3dffcc8e27c821ce9018362e0a2df7e9"

    strings:
        $ = {06 04 00 a0}
        $ = {01 04 00 a0}
        $ = {02 04 00 a0}
        $ = {0c 0c 00 a0}
        $ = {02 0c 00 a0}
        $ = {01 07 00 a0}
        $ = {07 08 00 a0}
        $ = {02 07 00 a0}
        $ = {04 06 00 a0}
        $ = {08 06 00 a0}
        $ = {02 06 00 a0}
        $ = {0c 08 00 a0}
        $ = {06 08 00 a0}
        $ = {04 08 00 a0}
        $ = {07 10 03 a0}
        $ = {09 10 03 a0}
        $ = {11 10 03 a0}
        $ = {02 10 03 a0}
        $ = {04 04 08 a0}
        $ = {07 04 08 a0}
        $ = {02 03 00 a0}
        $ = {02 04 08 a0}
        $ = {04 01 08 a0}
        $ = {06 01 08 a0}
        $ = {0e 01 08 a0}
        $ = {01 02 08 a0}
        $ = {02 02 08 a0}
        $ = {04 02 08 a0}
        $ = {06 02 08 a0}
        $ = {01 00 00 c0}
        $ = {02 0a 08 a0}
        $ = {02 06 03 a0}
        $ = {04 06 03 a0}
        $ = {10 06 03 a0}
        $ = {0e 06 03 a0}
        $ = {02 08 02 80}
        $ = {06 08 02 80}
        $ = {01 08 02 80}
        $ = {04 08 02 80}
        $ = {07 08 02 80}
        $ = {71 80 07 80}
        $ = {06 01 03 80}
        $ = {02 01 03 80}
        $ = {02 06 03 80}
        $ = {01 06 03 80}
        $ = {02 07 03 80}
        $ = {06 07 03 80}
        $ = {07 06 04 80}
        $ = {04 06 04 80}
        $ = {05 06 04 80}
        $ = {02 06 04 80}
        $ = {07 16 04 80}
        $ = {04 16 04 80}
        $ = {06 16 04 80}
        $ = {02 16 04 80}
        $ = {02 28 04 80}
        $ = {07 28 04 80}
        $ = {06 0b 04 80}
        $ = {02 0b 04 80}
        $ = {02 0c 04 80}
        $ = {02 0d 04 80}
        $ = {06 0d 04 80}
        $ = {02 1c 04 80}
        $ = {04 1c 04 80}
        $ = {07 1c 04 80}
        $ = {06 1c 04 80}
        $ = {0c 1c 04 80}
        $ = {06 1d 04 80}
        $ = {09 22 04 80}
        $ = {09 08 04 80}
        $ = {09 09 04 80}
        $ = {09 07 04 80}
        $ = {02 22 04 80}
        $ = {0c 01 04 80}
        $ = {02 01 04 80}
        $ = {02 10 04 80}
        $ = {02 11 04 80}
        $ = {07 11 04 80}
        $ = {0a 11 04 80}
        $ = {02 12 04 80}
        $ = {0a 12 04 80}
        $ = {07 12 04 80}
        $ = {01 0f 04 80}
        $ = {07 0f 04 80}
        $ = {02 0f 04 80}
        $ = {0a 0f 04 80}
        $ = {0b 0f 04 80}
        $ = {02 02 04 80}
        $ = {07 04 04 80}
        $ = {0c 04 04 80}
        $ = {02 04 04 80}
        $ = {02 14 04 80}
        $ = {02 15 04 80}
        $ = {0a 14 04 80}
        $ = {07 15 04 80}
        $ = {0c 15 04 80}
        $ = {09 25 04 80}
        $ = {02 25 04 80}
        $ = {02 26 04 80}
        $ = {06 27 04 80}
        $ = {07 27 04 80}
        $ = {09 27 04 80}
        $ = {0c 27 04 80}
        $ = {0a 27 04 80}
        $ = {04 27 04 80}
        $ = {02 27 04 80}
        $ = {04 13 04 80}
        $ = {0c 13 04 80}
        $ = {06 13 04 80}
        $ = {01 13 04 80}
        $ = {02 13 04 80}
        $ = {0c 21 04 80}
        $ = {06 21 04 80}
        $ = {05 21 04 80}
        $ = {02 21 04 80}
        $ = {06 17 04 80}
        $ = {0c 17 04 80}
        $ = {02 17 04 80}
        $ = {02 05 05 80}
        $ = {06 05 05 80}
        $ = {06 07 05 80}
        $ = {04 07 05 80}
        $ = {02 07 05 80}
        $ = {02 09 05 80}
        $ = {06 09 05 80}
        $ = {01 0b 07 80}
        $ = {06 0b 07 80}
        $ = {02 0b 07 80}
        $ = {06 0c 07 80}
        $ = {02 0c 07 80}
        $ = {05 03 01 80}
        $ = {02 03 01 80}

    condition:
        uint16(0) == 0x5A4D and filesize < 500KB and 30 of them and not for any of them : (
            not $ in (pe.sections[0].raw_data_offset .. pe.sections[0].raw_data_offset + pe.sections[0].raw_data_size) and
            # > 3
        )
}
Day 93 - AcidBox - SSP DLL Code - Error Return Codes - Part 4
To use these error codes in a slightly different way, let’s consider what the script from part 1 of these posts was doing: it was looking for instances where 4-byte values were being loading into EAX or EBX (which are subsequently returned by a function).
Using this fact, we can rewrite our rules to only look for instances where these error codes are being loaded into either of these registers, e.g. $ = {(b8|bb) 06 04 00 a0}. I found that this approach meant that the overall number of strings required to be present could be significantly reduced!
rule AcidBox_SSP_DLL_Loader_Unique_Return_Codes_C {
    meta:
        description = "Detects AcidBox SSP DLL loaders, based on unique return codes seen in functions"
        author = "BitsOfBinary"
        reference = "https://unit42.paloaltonetworks.com/acidbox-rare-malware/"
        hash = "003669761229d3e1db0f5a5b333ef62b3dffcc8e27c821ce9018362e0a2df7e9"

    strings:
        $ = {(b8|bb) 06 04 00 a0}
        $ = {(b8|bb) 01 04 00 a0}
        $ = {(b8|bb) 02 04 00 a0}
        $ = {(b8|bb) 0c 0c 00 a0}
        $ = {(b8|bb) 02 0c 00 a0}
        $ = {(b8|bb) 01 07 00 a0}
        $ = {(b8|bb) 07 08 00 a0}
        $ = {(b8|bb) 02 07 00 a0}
        $ = {(b8|bb) 04 06 00 a0}
        $ = {(b8|bb) 08 06 00 a0}
        $ = {(b8|bb) 02 06 00 a0}
        $ = {(b8|bb) 0c 08 00 a0}
        $ = {(b8|bb) 06 08 00 a0}
        $ = {(b8|bb) 04 08 00 a0}
        $ = {(b8|bb) 07 10 03 a0}
        $ = {(b8|bb) 09 10 03 a0}
        $ = {(b8|bb) 11 10 03 a0}
        $ = {(b8|bb) 02 10 03 a0}
        $ = {(b8|bb) 04 04 08 a0}
        $ = {(b8|bb) 07 04 08 a0}
        $ = {(b8|bb) 02 03 00 a0}
        $ = {(b8|bb) 02 04 08 a0}
        $ = {(b8|bb) 04 01 08 a0}
        $ = {(b8|bb) 06 01 08 a0}
        $ = {(b8|bb) 0e 01 08 a0}
        $ = {(b8|bb) 01 02 08 a0}
        $ = {(b8|bb) 02 02 08 a0}
        $ = {(b8|bb) 04 02 08 a0}
        $ = {(b8|bb) 06 02 08 a0}
        $ = {(b8|bb) 01 00 00 c0}
        $ = {(b8|bb) 02 0a 08 a0}
        $ = {(b8|bb) 02 06 03 a0}
        $ = {(b8|bb) 04 06 03 a0}
        $ = {(b8|bb) 10 06 03 a0}
        $ = {(b8|bb) 0e 06 03 a0}
        $ = {(b8|bb) 02 08 02 80}
        $ = {(b8|bb) 06 08 02 80}
        $ = {(b8|bb) 01 08 02 80}
        $ = {(b8|bb) 04 08 02 80}
        $ = {(b8|bb) 07 08 02 80}
        $ = {(b8|bb) 71 80 07 80}
        $ = {(b8|bb) 06 01 03 80}
        $ = {(b8|bb) 02 01 03 80}
        $ = {(b8|bb) 02 06 03 80}
        $ = {(b8|bb) 01 06 03 80}
        $ = {(b8|bb) 02 07 03 80}
        $ = {(b8|bb) 06 07 03 80}
        $ = {(b8|bb) 07 06 04 80}
        $ = {(b8|bb) 04 06 04 80}
        $ = {(b8|bb) 05 06 04 80}
        $ = {(b8|bb) 02 06 04 80}
        $ = {(b8|bb) 07 16 04 80}
        $ = {(b8|bb) 04 16 04 80}
        $ = {(b8|bb) 06 16 04 80}
        $ = {(b8|bb) 02 16 04 80}
        $ = {(b8|bb) 02 28 04 80}
        $ = {(b8|bb) 07 28 04 80}
        $ = {(b8|bb) 06 0b 04 80}
        $ = {(b8|bb) 02 0b 04 80}
        $ = {(b8|bb) 02 0c 04 80}
        $ = {(b8|bb) 02 0d 04 80}
        $ = {(b8|bb) 06 0d 04 80}
        $ = {(b8|bb) 02 1c 04 80}
        $ = {(b8|bb) 04 1c 04 80}
        $ = {(b8|bb) 07 1c 04 80}
        $ = {(b8|bb) 06 1c 04 80}
        $ = {(b8|bb) 0c 1c 04 80}
        $ = {(b8|bb) 06 1d 04 80}
        $ = {(b8|bb) 09 22 04 80}
        $ = {(b8|bb) 09 08 04 80}
        $ = {(b8|bb) 09 09 04 80}
        $ = {(b8|bb) 09 07 04 80}
        $ = {(b8|bb) 02 22 04 80}
        $ = {(b8|bb) 0c 01 04 80}
        $ = {(b8|bb) 02 01 04 80}
        $ = {(b8|bb) 02 10 04 80}
        $ = {(b8|bb) 02 11 04 80}
        $ = {(b8|bb) 07 11 04 80}
        $ = {(b8|bb) 0a 11 04 80}
        $ = {(b8|bb) 02 12 04 80}
        $ = {(b8|bb) 0a 12 04 80}
        $ = {(b8|bb) 07 12 04 80}
        $ = {(b8|bb) 01 0f 04 80}
        $ = {(b8|bb) 07 0f 04 80}
        $ = {(b8|bb) 02 0f 04 80}
        $ = {(b8|bb) 0a 0f 04 80}
        $ = {(b8|bb) 0b 0f 04 80}
        $ = {(b8|bb) 02 02 04 80}
        $ = {(b8|bb) 07 04 04 80}
        $ = {(b8|bb) 0c 04 04 80}
        $ = {(b8|bb) 02 04 04 80}
        $ = {(b8|bb) 02 14 04 80}
        $ = {(b8|bb) 02 15 04 80}
        $ = {(b8|bb) 0a 14 04 80}
        $ = {(b8|bb) 07 15 04 80}
        $ = {(b8|bb) 0c 15 04 80}
        $ = {(b8|bb) 09 25 04 80}
        $ = {(b8|bb) 02 25 04 80}
        $ = {(b8|bb) 02 26 04 80}
        $ = {(b8|bb) 06 27 04 80}
        $ = {(b8|bb) 07 27 04 80}
        $ = {(b8|bb) 09 27 04 80}
        $ = {(b8|bb) 0c 27 04 80}
        $ = {(b8|bb) 0a 27 04 80}
        $ = {(b8|bb) 04 27 04 80}
        $ = {(b8|bb) 02 27 04 80}
        $ = {(b8|bb) 04 13 04 80}
        $ = {(b8|bb) 0c 13 04 80}
        $ = {(b8|bb) 06 13 04 80}
        $ = {(b8|bb) 01 13 04 80}
        $ = {(b8|bb) 02 13 04 80}
        $ = {(b8|bb) 0c 21 04 80}
        $ = {(b8|bb) 06 21 04 80}
        $ = {(b8|bb) 05 21 04 80}
        $ = {(b8|bb) 02 21 04 80}
        $ = {(b8|bb) 06 17 04 80}
        $ = {(b8|bb) 0c 17 04 80}
        $ = {(b8|bb) 02 17 04 80}
        $ = {(b8|bb) 02 05 05 80}
        $ = {(b8|bb) 06 05 05 80}
        $ = {(b8|bb) 06 07 05 80}
        $ = {(b8|bb) 04 07 05 80}
        $ = {(b8|bb) 02 07 05 80}
        $ = {(b8|bb) 02 09 05 80}
        $ = {(b8|bb) 06 09 05 80}
        $ = {(b8|bb) 01 0b 07 80}
        $ = {(b8|bb) 06 0b 07 80}
        $ = {(b8|bb) 02 0b 07 80}
        $ = {(b8|bb) 06 0c 07 80}
        $ = {(b8|bb) 02 0c 07 80}
        $ = {(b8|bb) 05 03 01 80}
        $ = {(b8|bb) 02 03 01 80}

    condition:
        uint16(0) == 0x5A4D and 10 of them
}
We could extend this further if we wanted, to include all possible registers that these values are being loaded into; but I’ll leave that up to you if you’d like to try that out.
Day 94 - AcidBox - Main Worker DLL Technique - SeLoadDriverPrivilege Stack String - Part 1
To change things up a bit, let’s look at the AcidBox main worker DLL referenced by Palo Alto: eb30a1822bd6f503f8151cb04bfd315a62fa67dbfe1f573e6fcfd74636ecedd5
A lot of our already written rules hit on this sample, including the format strings combo, crypto routine, and return codes. So we already have some good coverage! Instead of writing a YARA rule for strings, meta features, or code, let’s instead focus on a technique to signature.
The main worker DLL uses stack strings to obfuscate some of the important strings (which is similar to the loader, which explains why we weren’t seeing as many strings in plaintext). One in particular is the string SeLoadDriverPrivilege, which is being used to attempt to set a new privilege level for itself. The following blog has some explanations about why/how it can be used maliciously: https://www.tarlogic.com/blog/seloaddriverprivilege-privilege-escalation/

If you’re looking at stack strings, I can recommend @notareverser’s Python script to generate variations of possible stack strings for a provided input: https://gist.github.com/notareverser/4f6b9c644d4fe517889b3fbb0b4271ca
If we input SeLoadDriverPrivilege into this script, we get the following rule:
rule stackstring_SeLoadDriverPrivilege
{
  strings:
   $smallStack = {c6(45|4424)??53 c6(45|4424)??65 c6(45|4424)??4c c6(45|4424)??6f c6(45|4424)??61 c6(45|4424)??64 c6(45|4424)??44 c6(45|4424)??72 c6(45|4424)??69 c6(45|4424)??76 c6(45|4424)??65 c6(45|4424)??72 c6(45|4424)??50 c6(45|4424)??72 c6(45|4424)??69 c6(45|4424)??76 c6(45|4424)??69 c6(45|4424)??6c c6(45|4424)??65 c6(45|4424)??67 c6(45|4424)??65}

   $largeStack = {c7(45|85)[1-4]53000000 c7(45|85)[1-4]65000000 c7(45|85)[1-4]4c000000 c7(45|85)[1-4]6f000000 c7(45|85)[1-4]61000000 c7(45|85)[1-4]64000000 c7(45|85)[1-4]44000000 c7(45|85)[1-4]72000000 c7(45|85)[1-4]69000000 c7(45|85)[1-4]76000000 c7(45|85)[1-4]65000000 c7(45|85)[1-4]72000000 c7(45|85)[1-4]50000000 c7(45|85)[1-4]72000000 c7(45|85)[1-4]69000000 c7(45|85)[1-4]76000000 c7(45|85)[1-4]69000000 c7(45|85)[1-4]6c000000 c7(45|85)[1-4]65000000 c7(45|85)[1-4]67000000 c7(45|85)[1-4]65000000}

   $register = {b?53000000 6689???? b?65000000 6689???? b?4c000000 6689???? b?6f000000 6689???? b?61000000 6689???? b?64000000 6689???? b?44000000 6689???? b?72000000 6689???? b?69000000 6689???? b?76000000 6689???? b?65000000 6689???? b?72000000 6689???? b?50000000 6689???? b?72000000 6689???? b?69000000 6689???? b?76000000 6689???? b?69000000 6689???? b?6c000000 6689???? b?65000000 6689???? b?67000000 6689???? b?65000000 6689????}

   $dword = {c7(45|85)[1-4]6f4c6553 c7(45|85)[1-4]72446461 c7(45|85)[1-4]72657669 c7(45|85)[1-4]76697250 c7(45|85)[1-4]67656c69 [0-1]c6(45|85)[1-4]65}

   $pushpop = {6a535? 6a65 6689????5? 6a4c 6689????5? 6a6f 6689????5? 6a61 6689????5? 6a64 6689????5? 6a44 6689????5? 6a72 6689????5? 6a69 6689????5? 6a76 6689????5? 6a65 6689????5? 6a72 6689????5? 6a50 6689????5? 6a72 6689????5? 6a69 6689????5? 6a76 6689????5? 6a69 6689????5? 6a6c 6689????5? 6a65 6689????5? 6a67 6689????5?}

   $callOverString = {e81500000053654c6f616444726976657250726976696c6567655? }

  condition:
    any of them
}
Unforunately in this case, the stack string is being built up out of order, meaning this auto-generated rule won’t be able to pick it up. So let’s look in the next post about a way we can deal with this.
Day 95 - AcidBox - Main Worker DLL Technique - SeLoadDriverPrivilege Stack String - Part 2
Let’s look at the code that is loading the stack string:
       1800097cf c7  44  24       MOV        dword ptr [RSP  + Stack [-0x21 ]],"eliv"
                 37  76  69
                 6c  65
       1800097d7 c7  44  24       MOV        dword ptr [RSP  + local_2f[0] ],"aoLe"
                 29  65  4c
                 6f  61
       1800097df 66  c7  44       MOV        word ptr [RSP  + local_1f +0x2 ],"eg"
                 24  3b  67  65
       1800097e6 c7  44  24       MOV        dword ptr [RSP  + local_2f[5] ],"virD"
                 2e  44  72
                 69  76
       1800097ee c7  44  24       MOV        dword ptr [RSP  + Stack [-0x25 ]],"irPr"
                 33  72  50
                 72  69
       1800097f6 c6  44  24       MOV        byte ptr [RSP  + local_2f[4] ],'d'
                 2d  64
       1800097fb c6  44  24       MOV        byte ptr [RSP  + Stack [-0x26 ]],'e'
                 32  65
       180009800 c6  44  24       MOV        byte ptr [RSP  + local_30 ],'S'
                 28  53
As we can see, the different parts of the string are being loaded on to the stack out of order, and in variable amounts: either 1, 2, or 4 bytes at a time. As we can see, each set of instructions looks like this (note that we’re adding wildcards to the stack offsets):
- 1-byte -
C6 44 24 ?? AA - 2-byte -
66 C7 44 24 ?? AA BB - 4-byte -
C7 44 24 ?? AA BB CC DD
So, if we want to write a YARA rule for this stack string, we will have to do it in an un-ordered way, and if we want to hunt for more samples we can’t necessarily assume that it will be in the same order we observe here. As such, we will need to generate all possible instructions for loading the characters onto the stack. The following Python code can do this for us, and format them as YARA strings:
import binascii

api_name = "SeLoadDriverPrivilege"

one_byte_strs = []
two_byte_strs = []
four_byte_strs = []

for c in api_name:
    hex_str = f"$one_byte_mov_{c}_stack = {{C6 44 24 ?? {format(ord(c), 'x')}}}"

    if hex_str not in one_byte_strs:
        one_byte_strs.append(hex_str)

for i in range(0, len(api_name)-1):
    chars = api_name[i:i+2]
    two_bytes = binascii.hexlify(chars.encode(), ' ').decode()

    hex_str = f"$two_byte_mov_{chars}_stack = {{66 C7 44 24 ?? {two_bytes}}}"

    if hex_str not in two_byte_strs:
        two_byte_strs.append(hex_str)

for i in range(0, len(api_name)-3):
    chars = api_name[i:i+4]
    four_bytes = binascii.hexlify(chars.encode(), ' ').decode()

    hex_str = f"$four_byte_mov_{chars}_stack = {{C7 44 24 ?? {four_bytes}}}"

    if hex_str not in four_byte_strs:
        four_byte_strs.append(hex_str)

for string in one_byte_strs + two_byte_strs + four_byte_strs:
    print(string)
We’ll start building YARA rules with these values in the next post.
Day 96 - AcidBox - Main Worker DLL Technique - SeLoadDriverPrivilege Stack String - Part 3
Using the strings generated from the script in the previous post, we can start with the following naive attempt:
rule Heuristic_Stack_String_SeLoadDriverPrivilege_A {
    meta:
        description = "Detects the stack string SeLoadDriverPrivilege being loaded in a combination of 1, 2, and 4 byte chunks, not necessarily in order"

    strings:
        $one_byte_mov_S_stack = {C6 44 24 ?? 53}
        $one_byte_mov_e_stack = {C6 44 24 ?? 65}
        $one_byte_mov_L_stack = {C6 44 24 ?? 4c}
        $one_byte_mov_o_stack = {C6 44 24 ?? 6f}
        $one_byte_mov_a_stack = {C6 44 24 ?? 61}
        $one_byte_mov_d_stack = {C6 44 24 ?? 64}
        $one_byte_mov_D_stack = {C6 44 24 ?? 44}
        $one_byte_mov_r_stack = {C6 44 24 ?? 72}
        $one_byte_mov_i_stack = {C6 44 24 ?? 69}
        $one_byte_mov_v_stack = {C6 44 24 ?? 76}
        $one_byte_mov_P_stack = {C6 44 24 ?? 50}
        $one_byte_mov_l_stack = {C6 44 24 ?? 6c}
        $one_byte_mov_g_stack = {C6 44 24 ?? 67}

        $two_byte_mov_Se_stack = {66 C7 44 24 ?? 53 65}
        $two_byte_mov_eL_stack = {66 C7 44 24 ?? 65 4c}
        $two_byte_mov_Lo_stack = {66 C7 44 24 ?? 4c 6f}
        $two_byte_mov_oa_stack = {66 C7 44 24 ?? 6f 61}
        $two_byte_mov_ad_stack = {66 C7 44 24 ?? 61 64}
        $two_byte_mov_dD_stack = {66 C7 44 24 ?? 64 44}
        $two_byte_mov_Dr_stack = {66 C7 44 24 ?? 44 72}
        $two_byte_mov_ri_stack = {66 C7 44 24 ?? 72 69}
        $two_byte_mov_iv_stack = {66 C7 44 24 ?? 69 76}
        $two_byte_mov_ve_stack = {66 C7 44 24 ?? 76 65}
        $two_byte_mov_er_stack = {66 C7 44 24 ?? 65 72}
        $two_byte_mov_rP_stack = {66 C7 44 24 ?? 72 50}
        $two_byte_mov_Pr_stack = {66 C7 44 24 ?? 50 72}
        $two_byte_mov_vi_stack = {66 C7 44 24 ?? 76 69}
        $two_byte_mov_il_stack = {66 C7 44 24 ?? 69 6c}
        $two_byte_mov_le_stack = {66 C7 44 24 ?? 6c 65}
        $two_byte_mov_eg_stack = {66 C7 44 24 ?? 65 67}
        $two_byte_mov_ge_stack = {66 C7 44 24 ?? 67 65}

        $four_byte_mov_SeLo_stack = {C7 44 24 ?? 53 65 4c 6f}
        $four_byte_mov_eLoa_stack = {C7 44 24 ?? 65 4c 6f 61}
        $four_byte_mov_Load_stack = {C7 44 24 ?? 4c 6f 61 64}
        $four_byte_mov_oadD_stack = {C7 44 24 ?? 6f 61 64 44}
        $four_byte_mov_adDr_stack = {C7 44 24 ?? 61 64 44 72}
        $four_byte_mov_dDri_stack = {C7 44 24 ?? 64 44 72 69}
        $four_byte_mov_Driv_stack = {C7 44 24 ?? 44 72 69 76}
        $four_byte_mov_rive_stack = {C7 44 24 ?? 72 69 76 65}
        $four_byte_mov_iver_stack = {C7 44 24 ?? 69 76 65 72}
        $four_byte_mov_verP_stack = {C7 44 24 ?? 76 65 72 50}
        $four_byte_mov_erPr_stack = {C7 44 24 ?? 65 72 50 72}
        $four_byte_mov_rPri_stack = {C7 44 24 ?? 72 50 72 69}
        $four_byte_mov_Priv_stack = {C7 44 24 ?? 50 72 69 76}
        $four_byte_mov_rivi_stack = {C7 44 24 ?? 72 69 76 69}
        $four_byte_mov_ivil_stack = {C7 44 24 ?? 69 76 69 6c}
        $four_byte_mov_vile_stack = {C7 44 24 ?? 76 69 6c 65}
        $four_byte_mov_ileg_stack = {C7 44 24 ?? 69 6c 65 67}
        $four_byte_mov_lege_stack = {C7 44 24 ?? 6c 65 67 65}

    condition:
        any of ($one_byte_*) and
        any of ($two_byte_*) and
        any of ($four_byte_*)
}
This is naive in the sense that it is looking for at least one of each type of stack loading (1, 2, and 4 byte), but it is looking for them anywhere in the file. While the 4 byte strings won’t be as common, the other ones (especially the 1 byte strings) will be a lot more common, meaning we might run into some false positives, and as such we cannot rely on any one type on its own at this stage. We’ll see if we can do any better in the next post.
Day 97 - AcidBox - Main Worker DLL Technique - SeLoadDriverPrivilege Stack String - Part 4
Instead of looking for each type of stack string loading anywhere in a scanned file, let’s be a bit more specific. In particular, how can we ensure that they are appearing in the same region as each other?
My first thought for this is to introduce a for loop as follows:
rule Heuristic_Stack_String_SeLoadDriverPrivilege_B {
    meta:
        description = "Detects the stack string SeLoadDriverPrivilege being loaded in a combination of 1, 2, and 4 byte chunks, not necessarily in order"

    strings:
        $one_byte_mov_S_stack = {C6 44 24 ?? 53}
        $one_byte_mov_e_stack = {C6 44 24 ?? 65}
        $one_byte_mov_L_stack = {C6 44 24 ?? 4c}
        $one_byte_mov_o_stack = {C6 44 24 ?? 6f}
        $one_byte_mov_a_stack = {C6 44 24 ?? 61}
        $one_byte_mov_d_stack = {C6 44 24 ?? 64}
        $one_byte_mov_D_stack = {C6 44 24 ?? 44}
        $one_byte_mov_r_stack = {C6 44 24 ?? 72}
        $one_byte_mov_i_stack = {C6 44 24 ?? 69}
        $one_byte_mov_v_stack = {C6 44 24 ?? 76}
        $one_byte_mov_P_stack = {C6 44 24 ?? 50}
        $one_byte_mov_l_stack = {C6 44 24 ?? 6c}
        $one_byte_mov_g_stack = {C6 44 24 ?? 67}

        $two_byte_mov_Se_stack = {66 C7 44 24 ?? 53 65}
        $two_byte_mov_eL_stack = {66 C7 44 24 ?? 65 4c}
        $two_byte_mov_Lo_stack = {66 C7 44 24 ?? 4c 6f}
        $two_byte_mov_oa_stack = {66 C7 44 24 ?? 6f 61}
        $two_byte_mov_ad_stack = {66 C7 44 24 ?? 61 64}
        $two_byte_mov_dD_stack = {66 C7 44 24 ?? 64 44}
        $two_byte_mov_Dr_stack = {66 C7 44 24 ?? 44 72}
        $two_byte_mov_ri_stack = {66 C7 44 24 ?? 72 69}
        $two_byte_mov_iv_stack = {66 C7 44 24 ?? 69 76}
        $two_byte_mov_ve_stack = {66 C7 44 24 ?? 76 65}
        $two_byte_mov_er_stack = {66 C7 44 24 ?? 65 72}
        $two_byte_mov_rP_stack = {66 C7 44 24 ?? 72 50}
        $two_byte_mov_Pr_stack = {66 C7 44 24 ?? 50 72}
        $two_byte_mov_vi_stack = {66 C7 44 24 ?? 76 69}
        $two_byte_mov_il_stack = {66 C7 44 24 ?? 69 6c}
        $two_byte_mov_le_stack = {66 C7 44 24 ?? 6c 65}
        $two_byte_mov_eg_stack = {66 C7 44 24 ?? 65 67}
        $two_byte_mov_ge_stack = {66 C7 44 24 ?? 67 65}

        $four_byte_mov_SeLo_stack = {C7 44 24 ?? 53 65 4c 6f}
        $four_byte_mov_eLoa_stack = {C7 44 24 ?? 65 4c 6f 61}
        $four_byte_mov_Load_stack = {C7 44 24 ?? 4c 6f 61 64}
        $four_byte_mov_oadD_stack = {C7 44 24 ?? 6f 61 64 44}
        $four_byte_mov_adDr_stack = {C7 44 24 ?? 61 64 44 72}
        $four_byte_mov_dDri_stack = {C7 44 24 ?? 64 44 72 69}
        $four_byte_mov_Driv_stack = {C7 44 24 ?? 44 72 69 76}
        $four_byte_mov_rive_stack = {C7 44 24 ?? 72 69 76 65}
        $four_byte_mov_iver_stack = {C7 44 24 ?? 69 76 65 72}
        $four_byte_mov_verP_stack = {C7 44 24 ?? 76 65 72 50}
        $four_byte_mov_erPr_stack = {C7 44 24 ?? 65 72 50 72}
        $four_byte_mov_rPri_stack = {C7 44 24 ?? 72 50 72 69}
        $four_byte_mov_Priv_stack = {C7 44 24 ?? 50 72 69 76}
        $four_byte_mov_rivi_stack = {C7 44 24 ?? 72 69 76 69}
        $four_byte_mov_ivil_stack = {C7 44 24 ?? 69 76 69 6c}
        $four_byte_mov_vile_stack = {C7 44 24 ?? 76 69 6c 65}
        $four_byte_mov_ileg_stack = {C7 44 24 ?? 69 6c 65 67}
        $four_byte_mov_lege_stack = {C7 44 24 ?? 6c 65 67 65}

    condition:
        for any of them : (
            any of ($one_byte*) in (@ - 100 .. @ + 100) and
            any of ($two_byte*) in (@ - 100 .. @ + 100) and
            any of ($four_byte*) in (@ - 100 .. @ + 100)
        )
}
Here, we are using the fact that as we’re iterating over anonymous strings (via any of them), we can reference each string’s offset via the @ operator. Further to this, we’re saying that for each type of stack string loading (1, 2, and 4 bytes), we want to make sure that one of each type of them will appear “close enough” to each other (i.e. via the any of .. in (@ - 100 .. @ + 100) check).
We could aim to make this rule stricter by changing the range check (e.g. (@ - 50 .. @ + 50)), or checking to see if there are multiple types of each stack string loading (e.g. 2 of them).
Day 98 - AcidBox - Main Worker DLL Technique - SeLoadDriverPrivilege Stack String - Part 5
To wrap up the discussion of this technique, let’s think about if there is a way we can ensure that we don’t have to look for every type of the stack string loading in the same sample. That is, maybe one variant will load this string using five 4-byte loads, and one 1-byte load, and not use the 2-byte load at all.
My thought for this approach is to again use a for loop, and iterate over one of the types (I use the 4-byte version in this case), and see if one of the other types occurs immediately afterwards. Given that the length of the 4-byte move instruction is 8-bytes, the rule looks like this:
rule Heuristic_Stack_String_SeLoadDriverPrivilege_C {
    meta:
        description = "Detects the stack string SeLoadDriverPrivilege being loaded in a combination of 1, 2, and 4 byte chunks, not necessarily in order"

    strings:
        $one_byte_mov_S_stack = {C6 44 24 ?? 53}
        $one_byte_mov_e_stack = {C6 44 24 ?? 65}
        $one_byte_mov_L_stack = {C6 44 24 ?? 4c}
        $one_byte_mov_o_stack = {C6 44 24 ?? 6f}
        $one_byte_mov_a_stack = {C6 44 24 ?? 61}
        $one_byte_mov_d_stack = {C6 44 24 ?? 64}
        $one_byte_mov_D_stack = {C6 44 24 ?? 44}
        $one_byte_mov_r_stack = {C6 44 24 ?? 72}
        $one_byte_mov_i_stack = {C6 44 24 ?? 69}
        $one_byte_mov_v_stack = {C6 44 24 ?? 76}
        $one_byte_mov_P_stack = {C6 44 24 ?? 50}
        $one_byte_mov_l_stack = {C6 44 24 ?? 6c}
        $one_byte_mov_g_stack = {C6 44 24 ?? 67}

        $two_byte_mov_Se_stack = {66 C7 44 24 ?? 53 65}
        $two_byte_mov_eL_stack = {66 C7 44 24 ?? 65 4c}
        $two_byte_mov_Lo_stack = {66 C7 44 24 ?? 4c 6f}
        $two_byte_mov_oa_stack = {66 C7 44 24 ?? 6f 61}
        $two_byte_mov_ad_stack = {66 C7 44 24 ?? 61 64}
        $two_byte_mov_dD_stack = {66 C7 44 24 ?? 64 44}
        $two_byte_mov_Dr_stack = {66 C7 44 24 ?? 44 72}
        $two_byte_mov_ri_stack = {66 C7 44 24 ?? 72 69}
        $two_byte_mov_iv_stack = {66 C7 44 24 ?? 69 76}
        $two_byte_mov_ve_stack = {66 C7 44 24 ?? 76 65}
        $two_byte_mov_er_stack = {66 C7 44 24 ?? 65 72}
        $two_byte_mov_rP_stack = {66 C7 44 24 ?? 72 50}
        $two_byte_mov_Pr_stack = {66 C7 44 24 ?? 50 72}
        $two_byte_mov_vi_stack = {66 C7 44 24 ?? 76 69}
        $two_byte_mov_il_stack = {66 C7 44 24 ?? 69 6c}
        $two_byte_mov_le_stack = {66 C7 44 24 ?? 6c 65}
        $two_byte_mov_eg_stack = {66 C7 44 24 ?? 65 67}
        $two_byte_mov_ge_stack = {66 C7 44 24 ?? 67 65}

        $four_byte_mov_SeLo_stack = {C7 44 24 ?? 53 65 4c 6f}
        $four_byte_mov_eLoa_stack = {C7 44 24 ?? 65 4c 6f 61}
        $four_byte_mov_Load_stack = {C7 44 24 ?? 4c 6f 61 64}
        $four_byte_mov_oadD_stack = {C7 44 24 ?? 6f 61 64 44}
        $four_byte_mov_adDr_stack = {C7 44 24 ?? 61 64 44 72}
        $four_byte_mov_dDri_stack = {C7 44 24 ?? 64 44 72 69}
        $four_byte_mov_Driv_stack = {C7 44 24 ?? 44 72 69 76}
        $four_byte_mov_rive_stack = {C7 44 24 ?? 72 69 76 65}
        $four_byte_mov_iver_stack = {C7 44 24 ?? 69 76 65 72}
        $four_byte_mov_verP_stack = {C7 44 24 ?? 76 65 72 50}
        $four_byte_mov_erPr_stack = {C7 44 24 ?? 65 72 50 72}
        $four_byte_mov_rPri_stack = {C7 44 24 ?? 72 50 72 69}
        $four_byte_mov_Priv_stack = {C7 44 24 ?? 50 72 69 76}
        $four_byte_mov_rivi_stack = {C7 44 24 ?? 72 69 76 69}
        $four_byte_mov_ivil_stack = {C7 44 24 ?? 69 76 69 6c}
        $four_byte_mov_vile_stack = {C7 44 24 ?? 76 69 6c 65}
        $four_byte_mov_ileg_stack = {C7 44 24 ?? 69 6c 65 67}
        $four_byte_mov_lege_stack = {C7 44 24 ?? 6c 65 67 65}

    condition:
        for any of ($four_byte_*) : (
            any of ($one_byte_*, $two_byte_*) at @+8
        )
}
Again, there are more ways to modify this rule, such as including another for loop for each other type, or doing combinations of those, etc. There are usually multiple ways to write these more heuristic rules, and these are just my interpretations!
Day 99 - AcidBox Wrapup
Despite spending many posts looking at AcidBox, I feel like there is still more that can be done! I haven’t looked at the kernel module, or focused on any meta features of the main worker DLL.
However, as I stated back at the start of the AcidBox analysis, I believe I have followed the approach I set out to do, which is as follows:
- Accessibility - I’ve made my rule names and descriptions clear, while referencing the Palo Alto blog and hash values I used to write the rules with
- Simplicity - I’ve stuck to a single idea per rule to try and keep the logic straightforward and understandable
- Redundancy - by writing rules for strings, meta features, code, and techniques, we now have a collection of rules not just for multiple facets of AcidBox, but some heuristic rules that can be used to classify other samples as well
Private Rules
You may not like that each rulename itself is very descriptive; instead, maybe all you care about is having a rule that tells you “is this AcidBox?”. This could be done via private YARA rules, by taking each rule that we’ve written for AcidBox in these posts, making them private, and then referencing them in one main rule:
rule AcidBox {
    condition:
        any of (AcidBox*)
}
You could then decide how strong you want this condition to be. Maybe you want to be confident that it is indeed AcidBox by relying on it covering multiple facets; so you could increase the condition to 2 of them, or break it out further into checking specific combinations of rules (e.g. checking for error codes AND format strings, etc.).
I hope these posts have shown how you can tackle writing rules for a malware family!
Day 100 - 100 Days of YARA Wrapup
We have made it to day 100!! While I haven’t written tonnes of YARA rules for this series, I’m proud of the fact that I’ve done a post each day.
In these posts, I have covered:
- The LNK module I wrote for YARA
- Some of the fundamentals of strings and modifiers (plus using them in ways that may not be known)
- YARA performance basics
- Different command line options for YARA
- A case study of writing rules for the AcidBox malware framework
It has been fun to write these posts, and learn from others in the process! In particular, I’ve been learning a lot about performance through conversations on Twitter.
Shoutout to Greg for organising and starting this trend of 100 Days of YARA, and shoutout to all those who have done posts over the last few months (including @shellcromancer, @Qutluch, @dan__mayer, @wxs, @notareverser , @stvemillertime - sorry to those who I haven’t mentioned!). I can’t wait to see what YARA will look like in 2024!
Bonus: Index of Coincidence
As a last minute addition to #100DaysofYARA, I’ve made a pull request to add functions to the math module to implement index of coincidence: https://github.com/VirusTotal/yara/pull/1907
This index can be used as a rough measure of whether a plaintext string is English, or closer to being “random”. For example, English text will have an index around 0.067. You can play with this in CyberChef.
This could be useful for heuristic rules where you’re using wildcards/regex strings to see what “structure” the strings have. For example, you could look for variables in scripting languages that are long and made up of “random” characters (i.e. they are obfuscated), which will likely have a lower index of coincidence value than regular variable names.